A leaking water heater never comes at a convenient time. When a water heater starts to leak, the mere thought of a repair can be scary.
A small leak can be a sign that a more significant problem may exist. If left unattended, a small leak can turn into a catastrophic failure, leading to severe water damage to the living areas inside your house. Significant water damage is costly and could cause your family to be displaced for an extended period.
If your water heater is leaking, you can follow these steps to determine what water heater repair you need.
The sources of a leaking water heater include:
- the cold inlet
- the anode rod
- the hot outlet
- the temperature and pressure relief valve
- the upper heating element
- the lower heating element
- the drain connection
- the tank itself
You can usually fix a water heater leaking from the top. A water heater leaking from the bottom is generally leaking from the drain valve or the internal tank. You can generally repair drain valves. However, if the inner tank is leaking, the only repair is to replace the water heater.
You can usually fix a water heater leaking from the top around the cold water inlet or hot water inlet connections. You can usually repair a leak around the temperature & pressure relief valve.
Water heater repairs do not have to be scary. Most DIYers can repair their water heater when a leak occurs. If you’re not the handyman type, most plumbers offer emergency service and fix a water heater for a few hundred dollars, depending on the severity of the repair.
To repair a leaking water heater, we need first to determine the cause of the leak. Sometimes this is an obvious step, while other times, it may require some investigation.
If your water heater has a water heater blanket installed, you’ll need to remove it to troubleshoot the steps below.
First, Let’s Find the Water Heater Leak
When diagnosing a leaking water heater, the problem looks worse than it is most of the time. This section will look at the steps needed to help you find where the problem is located and what you can do to fix it.
But first, let’s be sure the water heater is leaking.
Inspect the Leaking Water Heater
One of the most common causes of water on the floor, tank, or supply lines is condensation.
Condensation forms when water vapor in the air changes from a gas to a liquid state. Moist air around the water heater contacts hot and cold surfaces, causing water to form on the water heater or piping surface. Some of this water may end up on the floor, resembling a leak.
Water Heater Condensation
Condensation often occurs on the water heater tank and pipes, particularly in water heaters that are:
- Older water heaters that are not well insulated.
- Water heaters located in an uninsulated area; such as in an exterior storage cabinet, crawl spaces, basements, or attics.
- Water heaters that have exterior damage which may have damaged the interior insulation.
- Water heater thermostat is set to high causing the water heater to heat up beyond recommended temperatures.
Here are 6 steps to determine if the water is from condensation or a leak.
- Turn off the electric breaker or service disconnect for the water heater. If your water heater is a gas unit, set the fuel knob to pilot or a vacation mode.
- Dry up as much of the water as possible and do a visual inspection of the water heater for oblivious signs of leakage. Allow the water heater to sit for several hours to see if the water returns.
- If the water does not return, restore power to the water heater and set the temperature to a maximum of 125°. Monitor the water heater for a few hours.
- If the water returns, consider replacing the water heater if it is over 10 years old or has visible damage to the water heater.
- If the water heater is new and no damage is visible, consider investing in a water heater blanket to insulate the outside of the water heater. See our article Do Water Heater Blankets Save Money for more details.
- It is also recommended that water supply pipes located in uninsulated spaces be insulated to protect again both freezing and condensation.
Locate the Water Heater Leak
Once you’ve ruled out condensation as a water source on the floor around the water heater, let’s look at some other possible causes.
To do this, let’s look at the next few steps:
1. Turn off the Power to the Water Heater
it’s essential before you begin any work on the water heater to cut off the power to the water heater.
You’ll need to turn off either the service disconnect located beside the water heater or the circuit breaker located inside the electrical panel box for an electric water heater.
For gas water heaters, you’ll need to turn the control valve On the bottom of the tank to the offsetting before beginning any work on the water heater. It is not advised that you turn off the fuel shut valve because these are prone to failure.
2. Inspect the Water Heater for Leaks
You’ll need to inspect the water heater thoroughly to locate the source of the leak. In some cases, this may be obvious, while in other cases, it may not be.
- Inspect the cold water supply line connections for leaks.
- Inspect the hot water supply line connections for leaks.
- Inspect the temperature & pressure relief valve, the connection joint, and the attached discharge pipe.
- For Electric Water Heaters: Remove the top element cover to determine if the leak is coming from the seal around the top heating element.
- For Electric Water Heaters: Remove the bottom element cover to determine if the leak is coming from the seal around the bottom heating element.
- Inspect the drain valve and connection as a source of the leak.
- Inspect the exterior of the water heater tank around the seams for rust or damage.
3. Turn Off the Cold Water Supply
After the power supply has been turned off to the water heater, you’ll need to turn off the water supply to stop water flow into the tank.
The water shut-off valve is located on the cold water supply pipe coming into the water heater.
In some older water heaters, there may not be a shut-off valve at the water heater. If this is the case, you’ll need to turn off the water at your water meter base or well.
How to Repair a Leaking Water Heater
This section will look at some of the areas where water could be leaking from your water heater.
Some repairs are not too complex if you have some DIY experience with minor plumbing repairs around your house.
If you decide to repair your leaking water heater yourself, we’ve included a few steps for the most common sources of water heater leaks.
If the repair appears to be more difficult or you feel uncomfortable with the job, you should contact a plumber for assistance. Before we begin, we must caution you.
WARNING: The water inside a water heater is very hot and may present a scalding hazard. Professional plumbers should only do some water heater repairs. Improper repairs can lead to catastrophic damage due to flooding, which can be expensive to repair. If you do not have experience working with plumbing systems, you should contact a licensed plumber to repair or replace your water heater.
Some repairs will require that you drain the water heater. These steps will direct you on how to do this. You don’t need to drain your water heater quite yet. These steps will be here if you need to drain your water heater to replace a component.
- With the water heater power turned off and water supply turned off, connect a garden hose to the drain outlet at the bottom of the water heater.
- Direct the hose to a floor drain, nearby sink or to the exterior.
- Open the hot water side at a nearby faucet to allow air to enter the water heater. This helps to release pressure from inside the water heater.
- Open the drain valve to begin draining the water heater.
- For a leak at the top of the water heater, you’ll only need to partially drain the water heater. For a leak at the bottom of the water heater you’ll likely need to drain the entire water heater.
Leaking From the Water Supply Connections
Inspect the cold water and hot water supply connections typically found on the top of the water heater.
The water supply pipes will likely be made of copper, CPVC, or Pex. If you find water leaking around the fittings, you may be able to tighten the fittings with a pipe wrench.
You should do this carefully because overtightening the pipe fittings could crack the fitting, compounding the problem. Some fitting, such as Pex) require specific tools to work with Pex pipe.
If you can’t tighten the fittings or rust is visible on the hot or cold supply pipe connections, you’ll need to contact a licensed plumber.
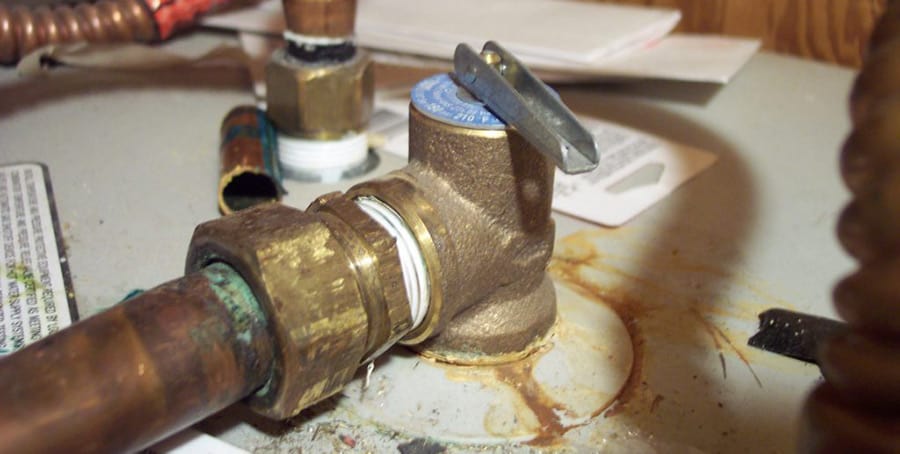
Leaking From the Temperature & Pressure Relief Valve
The temperature and pressure relief valve (also referred to as a T&P valve) relieves overheating and excessive pressure inside the water heater. If overheating or extreme pressure is present inside the water heater, the T&P valve will open to allow hot water to escape the water heater and reduce the pressure inside the tank.
For more details about Temperature & Pressure Relief Valves and why it is leaking see more information in our article Why Your Water Heater Pressure Relief Valve is Leaking.
The T&P valve can leak from one of two locations:
- the T&P valve itself or
- the seal around the T&P valve
First, we need to determine if the leak came from the temperature & pressure relief valve due to the valve’s proper operation or failure. To do this, we need to:
- Turn the power/gas back ON to the water heater.
For electric water heaters, turn the breaker or the service disconnect ON.
For gas water heaters, turn the fuel control back to ON.
- Reduce the temperature on the thermostat.
You may need to remove the top element/thermostat cover for electric water heaters to access the thermostat control setting.
Most have a dial temperature setting. Some thermostats will say Hot to Very Hot others will have temperature readings from 110 to 150 degrees.
Some electric water heaters have thermostats on the top and bottom elements. Others may only have a top thermostat. If you are unsure, try to Google “Your Water Heater Brand Model # manual,” for example, “State ES652D0RT manual”. Most manufacturers have their manuals available for download online.
- For gas water heaters, you can adjust the temperature using the control knob on the front of the water heater.
Much like electric water heaters, some control knobs will list temperatures ranging from Low to 160 degrees. Others will list from Low to Very Hot.
With the temperature turned down if water continues to leak from the T&P valve, your T&P valve is likely the problem. The T&P valve could have sediment trapped in the valve, or the T&P valve has failed. To find out, we have a few troubleshooting steps to follow.
- Let’s flush the temperature & pressure relief valve. Place a bucket under the T&P valve or T&P discharge pipe to collect water. If your T&P discharge pipe is directed to the exterior no bucket is needed.
- Open the valve to flush the T&P valve. Allow the valve to drain for a minute or so to thoroughly flush the valve of sediment. Close the T&P valve.
- Observe to see if the T&P valve continues to leak. If the T&P valve stops leaking this likely cleared trapped sediment preventing the T&P valve from closing fully.
- If the T&P valve continues to leak, the T&P valve is likely faulty and needs to be replaced.
How to Replace the Temperature & Pressure Relief Valve
To do this step, you will need to drain the water heater. The following steps will help you to replace the T&P valve.
- Remove the attached discharge pipe from the T&P Valve.
- With a wrench or a set of channel lock pliers, remove the old T&P valve from the water heater.
- Inspect the T&P valve mounting flang to see if the threading is rusted. Using a rag clean the threading on the water heater inlet. If really dirty you may need to use an old toothbrush or a small wire brush if needed to clean the mounting flange. If the mounting flange can’t be cleaned, it’s likely the internal tank is just as bad (or worse) and replacement of the water heater is your best option. If the mounting flange is clean proceed to step 4.
- In a clockwise motion, wrap Teflon tape tightly around the threaded end of the new T&P valve. Four or five passes should be sufficient. Be sure all the threads are covered.
- Attach the new T&P valve to the water heater firmly. Be sure the valve is pointed down.
- Open the cold water supply to fill the water heater. Do not turn the power on until the tank is completely filled to not damage the water heater.
- Once the water heater is filled and water begins exiting the open hot water tap at the sink, close the hot water tap and turn the power ON to the water.
- Observe to be sure there are no leaks around the T&P valve threading.
- Reattach the discharge pipe to the new T&P valve.
Monitor the new T&P valve for a few days to ensure no leaks occur.
Leaking From the Side Panels: Top or Bottom Heating Elements
If you have an electric water heater, the leak may be present at the top or bottom heating element. Each heating element has a seal that over time becomes worn, causing it to leak. While this isn’t very common, it does happen and deserves to be checked.
- To check for a failed heating element seal, you will need to do the following:
- Locate and remove the access panels on the side of the water heater.
- Move the insulation so that you can view the area around the heating elements.
- Inspect for signs of water or rust around the heating elements.
- If you see water or rust around the heating element seal, you’ll need to replace the seals. If replacing one of the seals, I recommend replacing both heating element seals.
- Follow the instructions above to drain the water heater. You will need to drain the water heater in order to remove and replace the heating element seals.
- With the tank drained, disconnect the wiring and remove the element with a socket or heating element wrench. Before removing the wiring, take out your phone or a camera and snap a picture of the wiring connections so that you can refer back to when installing the heating element.
- Clean the mounting flange that holds the heating element. Remove the old gasket before installing the new one. You can purchase heating element seals in the plumbing department of your local hardware store. I also recommend taking this opportunity to replace the heating elements.
- Apply the new seal and reattach the heating element with a socket or heating element wrench. Be sure the heating element is secure but do not over tighten as this could damage the new seal.
- Using the picture you took as a guide, reattach the wiring to the heating elements.
- Open the cold water supply to refill the water heater.
- Once the water heater is filled, close the hot water tap at the sink.
- Turn the power to the water heater ON at the breaker or service disconnect. For gas water heaters, turn the control knob from Pilot/Vacation Mode back to ON.
- Monitor the area around the heating elements to be sure the leak has stopped. Once confirmed, reattach the cover panels to protect the heating element and wiring connections.
Get more information and demonstrate how to test and replace heating elements in our article Test & Replace a Bad Water Heating Element: DIY Guide.
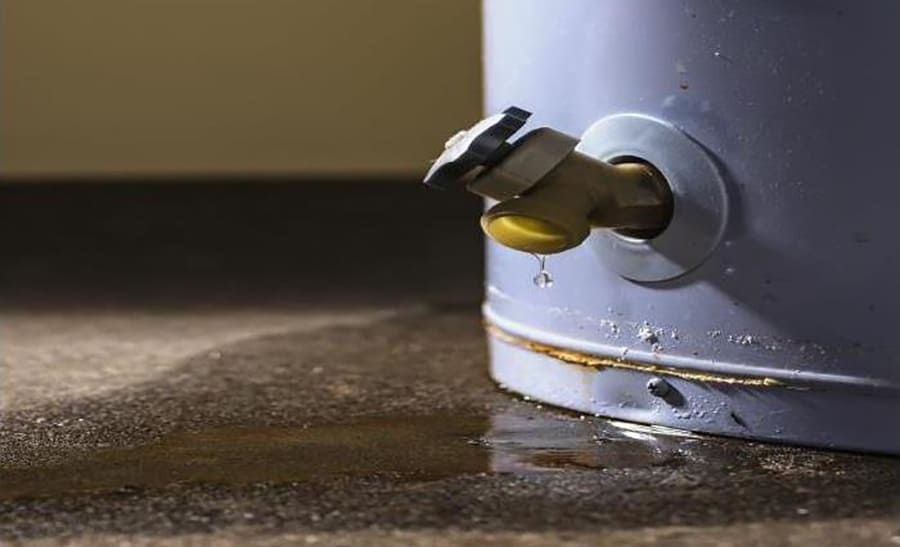
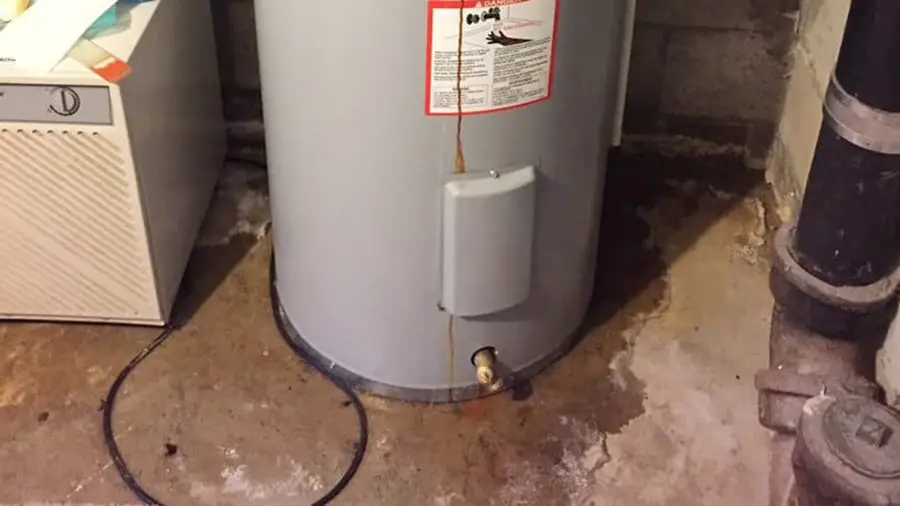
Leaking From the Drain Valve
The drain valve, located at the bottom of the water heater, is used to drain the water heater maintenance. Typically if a drain valve begins to leak, there is debris or sediment lodged in the drain valve, or the drain valve is faulty.
- To determine the reason the drain valve is leaking, you should do the following:
You will need a stocking, a bucket, or a garden hose to drain the water heater and collect any debris exiting the drain for analysis.
If using a bucket, attach a stocking around the drain valve. If using a garden hose, connect one end to the drain valve, and the opposite end attaches a stocking to the garden hose.
- Open the hot water tap at a nearby sink to release pressure inside the water heater.
- Open the drain valve to begin draining the water heater.
- After a few minutes, close the drain valve and check the stocking for debris.
If you see pieces of plastic in the stocking, the plastic dip tube located inside the water heater has likely broken off inside the water heater. If this is the case, there is no repair for the water heater. Replacement is your best option.
If the water heater will not drain or is draining very slowly, it’s likely large chunks of sediment have clogged the drain valve. Replacement of the water heater is the only option.
It is common to see sediment in the stocking. Continue with a full drain and flush of the water heater until no more sediment is present.
- Close the drain valve and begin to refill the water heater. If the drain valve continues to leak the valve is faulty and needs to be replaced. To replace the drain valve continue to the next section.
How to Replace the Drain Valve
See our Replace a Water Heater Drain Valve: DIY Illustrated Guide for a step-by-step guide to replace your drain valve. We include an informative video as well.
- Completely drain the water heater.
- Using a wrench carefully remove the old drain valve. If the drain valve on your water heater is plastic, be very careful to not break the plastic drain valves off inside the water heater.
- After successfully removing the drain valve, clean the mounting flange removing any rust and sediment.
- Purchase a new drain valve from the plumbing department at your local hardware store. Brass valves are the best choice.
- In a clockwise motion, wrap the threaded end of the drain valve four or five times with Teflon tape. Be sure the tape is tight and fully covers the threaded end.
- Using a wrench, screw on the new drain valve and secure firmly. Be sure the valve points downward.
- Open the cold water supply and begin to refill the water heater.
- Once the water heater is filled, restore power to the water heater.
Electric water heaters: this includes turning the breaker or service disconnect back ON.
Gas water heaters: this entails moving the control valve from the pilot/vacation setting to the ON setting and adjusting to your desired temperature.
- Observed a new drain valve install to be sure no leaks are present.
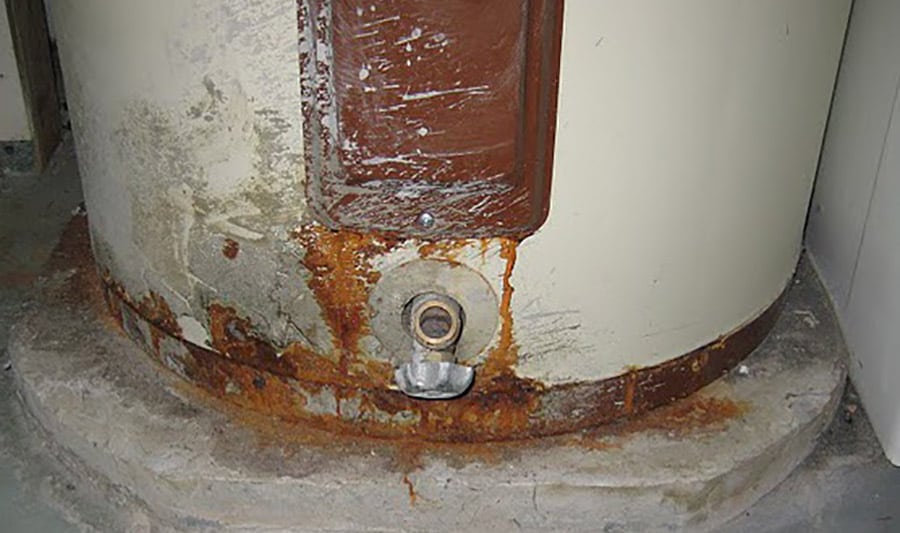
Leaking From the Internal Tank
Lastly, look for signs around the bottom of your water heater, such as rust or staining around the metal seals. This is generally a good indication that the water heater’s inner tank has failed, and water has started to seep out of the tank.
If the above attempts have failed to prevent the water heater from leaking, your only option is to replace the water heater.
Once the water heater’s inner tank has failed, there is no repair for the water heater. Do not attempt to remove the outer shell of the water heater. You cannot repair internal leaks, and replacement is the only option.
Unless you are very familiar and have experience working with plumbing and water heater installation, you should call a plumber.
A plumber can diagnose your leaking water heater to quickly determine if you can repair it or need to replace the water heater. Most plumbers give an estimate on a water heater replacement.
Water heater prices vary based on the size of the water heater, the type of water heater (gas, electric, or heat pump). Consult with a plumber to help you make the choice that is right for you.
New Water Heater Installation Costs
According to HomeDepot.com, the average cost of a new water heater is around $1,308. Nationwide prices typically range from $952 to $2,098. This replacement estimate includes the following components:
- Basic tank water heater – typical water heater size is 40 or 50 gallons
- Installation materials such as fittings, shut off valves, piping, etc
- Installation labor by a licensed and insured plumber
- Removal and disposal of the old water heater in accordance with local laws
- A water heater installation permit can cost between $50 and $150
If you plan to buy and install a water heater yourself, you can expect to pay between $350 to $2000 depending on the size and type of water heater you decide to purchase—the average tank-style 50-gallon water heater costs between $600 to $900 from Home Depot or Lowe’s.
Is a Leaking Water Heater Dangerous?
A leaking water heater is dangerous or even deadly in some rare instances. For most water heater leaks, the risk is minimal if caught and addressed early. Scalding is the biggest risk of a leaking water heater.
The water exiting a T&P valve can exceed 212 degrees causing severe burns.
There is a rare chance of a water heater explosion if the T&P valve fails. The T&P valve releases hot water to reduce pressure rising inside the tank. A water heater explosion can cause personal harm and thousands of dollars in property damages.
However, most leaks are not severe as long as you are proactive with maintenance and repairs.
What to do if Water Heater is Leaking From Bottom?
Leakage from the bottom of a water heater often points towards a larger underlying issue. It may result from a faulty drain valve or a build-up of sediments within the internal tank. Once you have ascertained the leak’s location, it is then crucial to turn off the power and the water supply to the heater.
For an electric water heater, look for the circuit breaker and switch it off, while for a gas heater, locate the on/off dial, and turn it to ‘off.’ Next, find the water supply dial and rotate it clockwise to turn it off. This done, contact your local plumber who, depending on the cause of the problem, will suggest either replacing the drain valve or replacing the water heater altogether.
Can I Take a Shower if My Water Heater is Leaking?
A leaking water heater does seem like a dangerous thing to meddle with. However, whether or not you can take a shower when your water heater is leaking depends solely on the extent and the cause of the leakage. If the leakage occurs from the drain valve, it is perfectly safe to take a hot shower. Leaky delivery pipes are also fairly harmless in this regard.
When it comes to a leaky pressure or temperature gauge, it’s prudent to check the leak’s extent. A minor leak is not a threat, but anything more than that has to be addressed immediately. All in all, while it is safe to take a shower if your water heater is leaking, we would recommend that you get the problem treated at the earliest convenience.
Can a Leaking Water Heater be Fixed?
Repairing a leaking water heater may or may not be possible depending on the underlying cause behind the leakage. Common causes might include loose fittings, sediment accumulation in the internal tank, temperature or pressure gauge leakage, or a leaky drain valve. In loose fittings, the leakage can be treated by simply tightening up the loose components.
A leaky drain valve, too, can be easily addressed by replacing the valve in question. A leaking TPRV or temperature and pressure relief valve can, in most cases, also be replaced. However, when it comes to leakage from the internal tank, it is usually the result of a sediment build-up at the base, which corrodes the tank’s inner lining. In a case of this kind, the water heater in its entirety needs to be replaced.
Can a Leaking Water Heater Explode?
A water heater explosion can be quite dangerous, and as such, it is crucial to look out for warning signs that could be early indicators of a potential explosion. Anything that points towards excessive pressure or heat build-up must be addressed immediately. One of these red flags includes a leaking temperature and pressure relief valve.
This could indicate excess pressure build-up within the system, which can cause your water heater to explode. It can also signify large amounts of sediment accumulation, another common cause behind water heater explosions. Keep an eye out for brown water leaking out of your water heater, which is a sign of sediment or rust build-up and is extremely detrimental to the functioning of your water heater.