We will likely all be faced with a water heater that’s not producing any hot water at some point. We can either call a licensed plumber or fix it yourself. Fortunately, you can repair most water heaters relatively quickly.
There are two leading causes of a water heater failure:
- the heating elements
- the thermostats.
If you haven’t tested or replaced a water heater thermostat before, it can seem like a daunting task. It’s not too hard. Fortunately, the process is relatively straightforward if you have someone knowledgeable guiding you and a few basic tools.
Get FREE quotes from licensed Plumbers in your area today. Whether you need a new water heater, a sink repair, or a toilet fixed, We Can Help! All Plumbers are screened, licensed, and insured.
No one likes cold water when bathing or cleaning. If you have no hot water, we need to test the water heater thermostat and replace it if needed. This article will look at how to troubleshoot your electric water heater thermostat and how to replace it if needed.
How Electric Water Heater Thermostats Work
When you start to notice that your water heater isn’t working as it should, the thermostat is likely the problem or at least part of it. There’s no need to replace the whole electric heater if you can save yourself time and money with a simple thermostat replacement. Once you’ve read through the following steps, it only takes a few minutes.
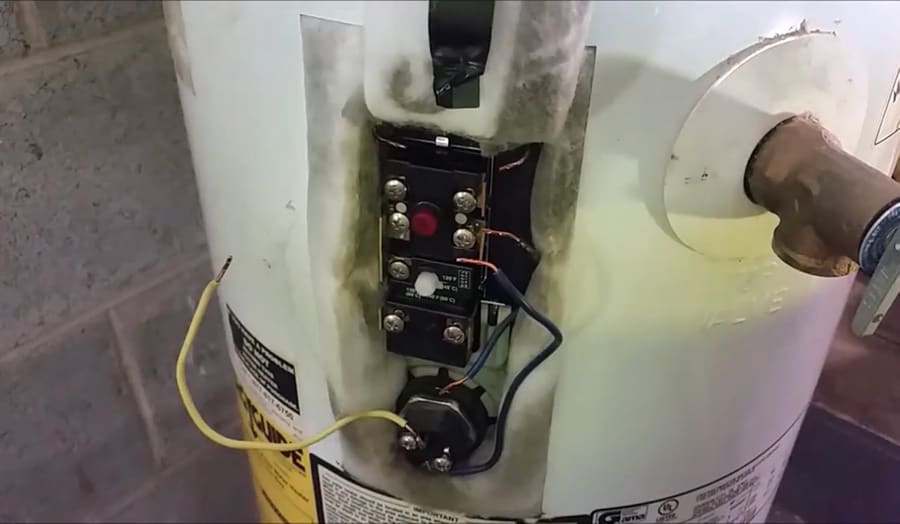
Electric water heater thermostats work by opening and closing contacts that allow electricity to flow to the heating elements. The heating elements cycle on and off depending on demand.
All modern residential water heaters have two heating elements and two thermostats. There are two panels on the side of your electric water heater, each of which houses a thermostat and heating element. The upper thermostat is different from the lower thermostat. The upper thermostat is larger and controls the lower thermostat.
Rarely do both thermostats fail simultaneously (although I recommend replacing both when one fails).
When an upper heating element or thermostat fails, the water heater stops producing hot water. When a lower heating element or thermostat fails, the top thermostat and element will continue to heat water in the upper half of the hot water tank. Still, you will notice the hot water quickly runs out or is only lukewarm.
Are Electric Water Heater Thermostats Universal?
No, all water heater thermostats are not universal. There are some variances in thermostats between single-element water heaters and dual-element water heaters. Also, there is a difference in the upper and lower thermostats in dual-element water heaters.
When shopping for a water heater thermostat, you need to know how many elements the water heater has and the voltage. You can find this information on the data tag on the side of the water heater.
If the data tag is missing, you can identify a single-element vs. a dual-element by the number of access panels on the water heater. You can find the voltage written on the end of the heating element. Common residential dual-element water heaters are 240 volts.
There are more than 50 residential tank-style electric water heaters on the market, and the thermostats are designed to be interchangeable on most models. You should read the product description carefully when purchasing.
Dual-Element Thermostats
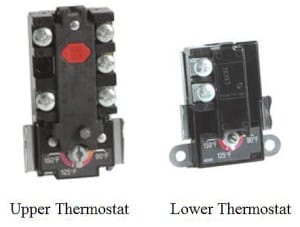
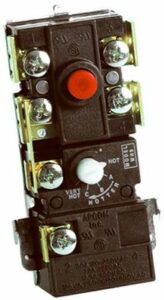
This photo shows a set of upper and lower thermostats for a typical residential water heater.
The thermostat on the left is the upper thermostat and includes a high limit switch identified by the red reset button. The upper thermostat controls the upper element and the lower thermostat.
The thermostat on the right is the lower thermostat, and it controls the lower element.
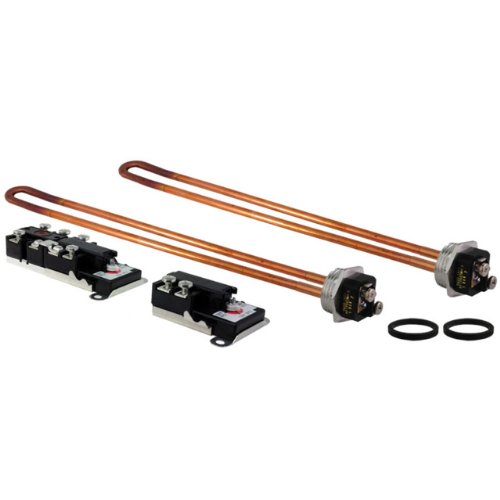
For a replacement kit containing two heating elements, upper and lower thermostats and seals, we recommend the Rheem SP20060 Electric Water Heater Tune-Up Kit, available at Amazon.com.
If you only prefer to purchase the upper thermostat, see the Rheem UV11698 UV11698-Thermostat-Electric. It’s a universal upper thermostat manufactured by Rheem.
If you only need a lower thermostat, see the Rheem SP11695 Electric Thermostat. It’s a universal lower thermostat manufactured by Rheem.
Single-Element Thermostats
The thermostat pictured here is for a single-element water heater.
The thermostat resembles an upper dual-element thermostat, but the difference is in the number of wire terminals.
As you can see, the single-element thermostat only has two terminals on the right side and four on the left side.
If you need to purchase a single-element thermostat, see the Camco 07843 Single Element Water Heater Thermostat with HLC. This is a universal single-element thermostat with a built-in high limit switch.
Necessary Tools and Preparation
Here’s a list of the materials you’ll need:
- 1/4 inch nut driver or Flathead Screwdriver
- #2 Phillips screwdriver
- Multimeter/Voltmeter
- A replacement thermostat
How to Test a Water Heater Thermostat for Continuity – Step-By-Step
We need to check the thermostats for continuity to determine if the thermostat has failed. To do this, you will need a multimeter.
WARNING: Working with electricity is very dangerous and can kill you. Be sure the power is OFF before working with wiring and electrical connections.
Use these steps to figure out which thermostat has failed.
Step 1: Turn the power off

Head to your circuit board and turn off the power source at the water heater breaker. Locate the breaker inside the electrical panel box labeled “water heater” or “hot water” and turn the breaker off.
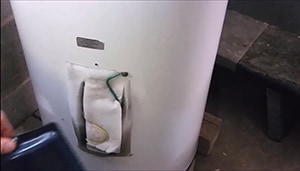
Step 2: Remove the outside access covers
Use a 1/4 inch nut driver or flathead screwdriver to remove the access cover from the upper and lower thermostat. Fold back the insulation over the thermostat. Use tape to secure the insulation out of the way. Remove the interior plastic cover over the thermostat.
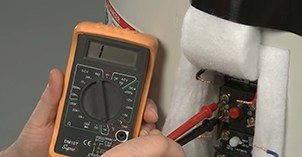
Step 3: Confirm power is off to the water heater
Before handling anything on the thermostat, use a multimeter to confirm the power is off to the water heater. If you have a voltage stick, you can use that as well.
Using the multimeter connections, touch the top to legs simultaneously. The meter should read 0. With the black connector touching the water heater, touch each leg to confirm there’s no power.
Step 4: Check the high limit reset button
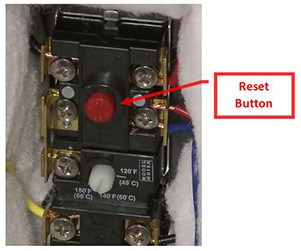
Check to see if the manual reset switch, the high limit reset button, has tripped. Sometimes this button will trip if:
- The thermostat contacts have fused closed.
- The thermostat is out of calibration.
- The heating element has failed.
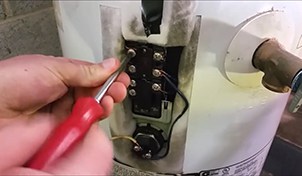
Step 5: Disconnect the wiring
Using your phone or a digital camera, snap a picture to provide a reference if needed to identify which wires are connected to which terminal. Use a #2 Phillips screwdriver to loosen the terminal screws to disconnect the wiring from the thermostat terminals.
Step 6: Check the thermostat with a multimeter
Set the multimeter to the lowest ohms of resistance (typically x10). Calibrate the meter by pinching the probes together and adjusting the needle to 0.
Using a digital multimeter, set the multimeter to the lowest ohms of resistance (typically 200), or if your meter has resistance with the tone, use that option.
Take one of your multimeter’s black probes and place it on the left side screw terminal. Take the red probe and put it on the other left side terminal. If the terminal has continuity, the meter should read close to zero. If it doesn’t, the faulty thermostat needs replacement.
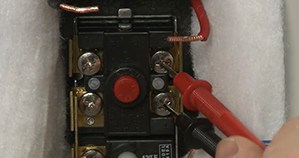
Repeat this process for the right side terminals and the element terminals. See the above video for a demonstration.
If the upper thermostat is fine, you’ll need to repeat these steps for the lower thermostat and element.
Once you finish testing your water heater thermostat, you can reconnect the wiring, close the access cover, or proceed to the steps to replace your thermostat.
If you’ve determined that your thermostats do not need replacing, you can check your heating elements next. We have another step-by-step article to do that at How to Test and Replace a Bad Water Heating Element.
How to Replace a Faulty Water Heater Thermostat – Step-By-Step
Once you’ve determined which thermostat is defective, it’s time to start the removal and installation process.
Insider’s Tip: As mentioned earlier, it is generally a good practice to replace both thermostats and heating elements. The reason is that if one of the heating elements is starting to fail, it could short out the new thermostat shortly after it is installed.
You will repeat some of the steps here. Following the testing instructions above, you could skip to Step 5. We will first recap the preliminary steps for those not testing their thermostats. Here we go.
Step 1: Turn the power off
Head to the circuit breaker box and locate the switch labeled ‘Water Heater’ or something similar. Turn it off, ensuring you turn off both switches if it’s a 220v switch. If you aren’t sure which water heater is due to old stickers or labels, contact a professional to switch them off for you.
Step 2: Remove the outside access covers
Remove the cover panel that corresponds to the thermostat that needs replacing. The covers are usually on the side of the water heater tank. Use the 1/4 inch nut driver or a flathead screwdriver for this part, ensuring you don’t lose the small screws. Take out the insulation and remove the plastic protective cover over the thermostat.
Step 3: Confirm power is off to the water heater
Use your multimeter/voltmeter to test each wire. You can do this by grounding one of the lines and testing each terminal individually. Even though you’ve turned out the power at the circuit breaker, you should always double-check your work using one of these meters to avoid electrocution.
Using the multimeter connections, touch the top to legs simultaneously. The meter should read zero. The black connector touching the water heater touches each leg to confirm no power.
Step 4: Disconnect the wiring
Using your phone or a digital camera, snap a picture to provide a reference if needed to identify which wires are connected to which terminal. Using a #2 Phillips screwdriver, disconnect the wiring to each terminal on the thermostat.
Step 5: Remove the defective thermostat
Using a finger or a flathead screwdriver, gently remove the old thermostat by pressing outward on the clips and lifting to thermostat up and out of the retaining bracket. Be careful not to break the retaining bracket. Breaking this retaining clip could require your water heater to be replaced.
Step 6: Insert the new thermostat
Place the new thermostat in the exact location by inserting it into the retaining bracket that holds the thermostat in place. Reconnect the wires back onto the correct terminals. Use the photo you took earlier as a guide if needed. Be sure that each wire is firmly connected.
Be sure the thermostat is resting firmly against the water heater because the thermostat may not function properly.
Next, set the thermostat to your desired water temperature. We recommend a maximum water temperature of 120 degrees Fahrenheit. You can use the flathead screwdriver to make these adjustments. This temperature setting is essential because anything higher can become a scalding hazard for young children or the elderly.
Insider’s Tip: If you plan to replace your heating element with your new thermostat, you’ll need to drain the water heater. Some suggest a fast change without draining the storage tank, however, I do not recommend this because any error could damage the interior of your home. For draining your water heater and other maintenance tips see our article Water Heater Maintenance Tips for Gas and Electric Tank Water Heaters.
Step 7: Reattach the cover panels
Now that you’re done with the replacement, it’s time to seal everything up and check your work. Replace the plastic protective cover and insulation. Reattach the exterior access panels.
Step 8: Turn the power back on
Now that everything is in place go back to the electrical box and turn the breaker back on. Hot water recovery will take approximately one hour to recover fully, but you should start getting hot water within 15 minutes. Be sure to check the water heater periodically over the next few days.
Water Heater Thermostat FAQs
What should water heater thermostats be set at?
Electric water heater thermostats come preset from the manufacturer, usually at 110 degrees. You can raise the temperature to the maximum, usually 150 degrees Fahrenheit (65 degrees Celsius). We recommend a maximum water temperature of 120 degrees Fahrenheit (48 degrees Celsius) because a higher setting can become a scalding hazard for young children or the elderly.
Should water heater thermostats be set to the same temperature?
Yes, you should set the upper and lower thermostats to the same. The dip tube feeds cold water into the bottom of the tank. Having uniform settings helps maintain an even temperature throughout the tank.
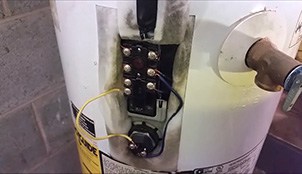
What would cause a water heater thermostat to burn up?
A water heater thermostat can burn up due to a faulty heating element, power surge, or age. Water heater thermostats go bad and fail when internal components wear out. An older thermostat can fail even at normal electric currents. The thermostat needs replacement if your water heater’s manual reset switch does not reset.
It’s best practice to replace both thermostats and heating elements together because if one of the heating elements is starting to fail, it could short out the new thermostat shortly after installing it.
Final Thoughts
That’s all there is to it! Water heaters aren’t too challenging, and replacing a thermostat can be done in a few minutes once you know what you’re doing.
The key is to avoid shortcuts, as dealing with electrical equipment can be dangerous. However, using the proper techniques and tools will make sure your water heater thermostat replacement is a quick and safe procedure.
Get FREE quotes from licensed Plumbers in your area today. Whether you need a new water heater, a sink repair, or a toilet fixed, We Can Help! All Plumbers are screened, licensed, and insured.