Water heater leaks are a common occurrence. Reasons vary from negligence to the age of the heater, installation mishaps, and routine operations. It’ll cost you more to leave a leaking water heater unchecked. It might even force you to buy a new water heater — to the tune of thousands of dollars. Luckily, that’s avoidable.
You have two solutions for a water heater leaking from the drain valve: fix it, or replace the heater. Water heater leaking from the drain valve could mean a few things:
- You have a loose drain valve.
- Your drain valve is deteriorated from the inside and needs replacement.
- There’s too much pressure in the heater.
Get your toolbox. We’ll show you how to diagnose a water heater leaking from the drain valve and how to fix it to keep giving you that hot water convenience.
Why Is My Water Heater Leaking From the Drain Valve?
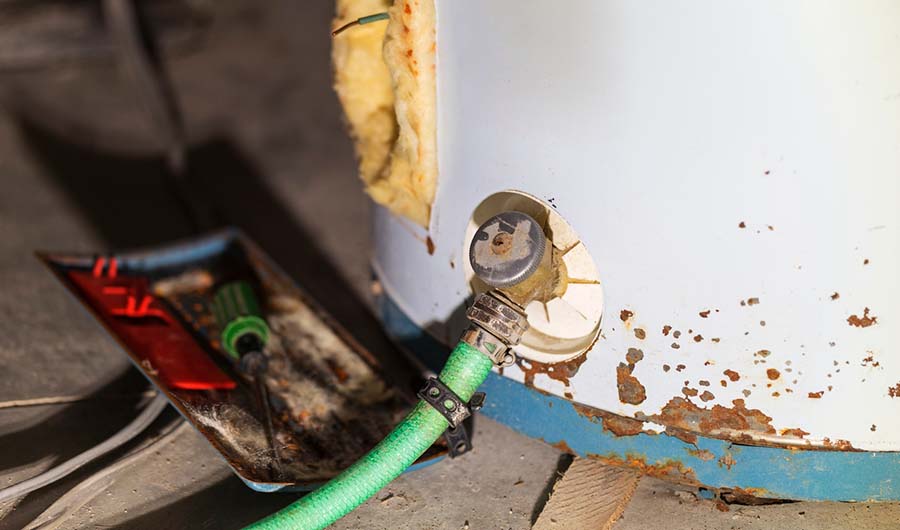
Drain valves are a vital piece of the water heater. It’s the part of the tank that you open every time you do routine maintenance. It drains the tank to clear the sediment in the heater.
Water heaters leak from the drain valve because of these five reasons.
1. Loose Valves
Regular maintenance sometimes leaves your drain valves improperly tightened. Also, the drain valve usually gets beaten up quite quickly due to its location near the bottom of the water heater. Eventually, the valve comes loose, and water leaks out.
2. Worn-Out Valves
Every component of the water heater is prone to aging and getting worn out. This might be a serious problem that goes beyond a few wrench turns. Worn-out valves can no longer sustain the water pressure in the heater, leading to a leaking drain valve.
3. Bad Rubber Gaskets From Stock Drain Valves
Some heaters come with a plastic drain valve. These plastic drain valves have rubber gaskets that lose their grip over time. They lose grip, especially if the heater has undergone numerous checks. That deterioration leaves space for leaks.
4. Damaged Drain Valve Washer
The washer is a rubber or plastic stopper in the valve that prevents water spillage. It loosens or breaks down, especially if you have an old heater. A loose washer can’t keep out the water. Eventually, you end up with a small drip that might become serious if you don’t address it.
5. Debris Buildup Around The valve From The Inside
Debris buildup around the valve in the heater indicates a bigger problem. It means your heater is long overdue for maintenance. The debris buildup around the valve only makes the valve weaker from the inside. It might be too late by the time you address the problem since the sediment might start ruining the tank from inside. At that point, you’ll be looking at a full replacement that’ll cost you a lot more money.
How Do You Fix a Leaky Drain Valve?
Fixing a leaky drain valve can be a DIY project if you have the right tools. Also, you can have a licensed professional service it for you at a fee. Since most cases of a leaky drain valve are down to loose fittings, tightening the drain valves would be enough. Still, there are other methods to fix a leaking drain valve:
- Capping a drain valve
- Replacing the drain valve
Capping the drain valve is a temporary solution if you just found out it’s leaking. Capping works if the leakage is too minimal to need immediate attention or if the leak is coming from the spigot. The good news is, you can buy a drain valve cap for about $2 at a store. Also, you can get a plastic or metal cap for your type of drain valve.
Replacing the drain valve is a lasting solution if your heater is in good shape and only needs a drain valve change. You’d need a new drain valve and a few hours, though. As a bonus, it’s a great time to change your drain valve from plastic to a lasting brass drain valve.
How Do You Cap a Water Heater Drain Valve
Capping is a fairly straightforward process. You don’t have to drain the water heater to cap the valve.
- Get a cap from a local store. Check your garden house to get the right size and type. The cap should be the same type and size as a cap for a garden hose. If you plan on upgrading the drain valve from plastic to metal, get a metal cap.
- Put the cap on the spout and tighten with an adjustable wrench. Be careful with the tightening if it’s plastic. A twist too tight, and you might break the valve.
As the cap holds, get a more sustainable solution. Get a replacement drain valve.
How Do You Replace a Water Heater Drain Valve?
Before replacing the water heater drain valve, you need to make sure power and water are off.
1. Turn Off the Power Supply
Switch off the heater’s power supply from the main circuit breaker. Most heaters will have a dedicated electric supply. Most homes have the heater’s power supply already marked. Flip the switch off.
If you have a gas water heater, turn the gas level off. The lever should be perpendicular to the pipe.
Your water heater might have a knob indicating “PILOT LIGHTING’. Turn the knob to the PILOT LIGHTING. Turn the gas control off.
2. Turn Off the Water Supply
Shut off the cold water inlet at the top. Open one hot water tap nearest to the water heater. Alternatively, you can open the one closest to the bathroom or in the tub. Opening the tap releases any water in the pipes. It also relieves pressure.
3. Drain the Tank
Connect a garden hose to the drain valve. Use your screwdriver to open the valve. Direct the garden hose outside or to a drainage outlet, preferably outdoors. Alternatively, you can direct the house to the tub.
Note: Be patient. Drainage can take a considerably long time. This is a perfect time to know if your water heater has any sediment buildup in it. If there’s sediment buildup, it’s a perfect opportunity for a quick water blast into the heater to flush the water heater. The quick water blast agitates the sediment in the heater to make it easier to drain.
4. Flush the Heater
The first flush is a quick flash if the water heater is blocked during drainage. A second flush is needed so you can clear all the sediment. For this, you’ll need to turn on your cold water inlet. The first flow should unsettle the sediment. Keep an eye out for the run-off. Repeat the flushing until the run-off is clear and has no sediment.
Shut off the drain valve and disconnect the hose.
5. Remove the Damaged Drain Valve
The area under the heater should be dry while you do this. Leave a few heavy absorbent towels on the ground to soak up any water that might spill.
Use an adjustable wrench to loosen the drain valve. Be careful not to turn so hard that you ruin the valve. Loosen the drain valve until you can safely remove it with your hands.
Note: There are many instances of plastic valves breaking when removing. If your plastic valve breaks, Use a small hacksaw to cut the plastic in half. Lift the sawed-off section with a flat head screwdriver and twist it off. Use long-nose pliers to remove the other pieces. Still, be careful not to saw into the valve’s thread.
6. Install the New Drain Valve
Before installing the new drain valve, scrub the bare threads with a wire brush. The wire brush removes any sediment in the threads and ensures you get a tighter seal with the new drain valve.
Wrap Teflon tape around the thread of the new drain valve. It’s best practice to wrap the tape clockwise. Remember, you will be screwing the drain valve anticlockwise. Leave a few threads (about 3) bare, so the tap doesn’t eventually break into the heater.
Screw it in with your hand until it’s secure. Use the wrench to finish off the installation.
7. Refill the Empty Tank
With one hot water tap open and the drain closed, open the cold water inlet. The open tap will release bursts of water with high pressure. Close the hot water tap as soon as you get a steady stream of water.
Once the tank is full, turn on the heater’s power at the circuit breaker. Turn your gas heater back on if you have a gas water heater. Relight the pilot, too.
How Much Does It Cost To Replace a Water Heater Valve?
Fixing a defective drain valve can be a home DIY project. However, there is always a risk of not doing it right and extending the damage. That is where hiring a plumber comes in. But even when you DIY the repair, you still have to buy a replacement drain valve.
A replacement brass drain valve usually costs around $9.50. You can get a brass valve with a garden hose cap for around $29. It’s good to have a few extra valves around your home in case you need to replace one quickly without running to the store.
It’ll cost you less than $10 for a plastic drain valve made from reinforced plastic.
However, if you want to have better results, it will cost more.
Typically, you’d have to call a plumber to check out the leak. Plumbers have a call-out fee between $50 and $200, depending on their expertise, location, and availability. The call-out fee is usually right after you discover the leak and covers the plumber’s travel and professional fee to come and look at the problem.
They might charge you separately for individual fixes. For example, water heater flushing alone can cost anything between $75 and $250. A flush and full tank cleaning can cost between $75 and $250.
Leak repairs attract a $100 – $1000 bill depending on the damage.
The average hourly rate for plumbers is between $40 to $200. A drain valve leak can take up to 4 hours to fix. Therefore, you’re looking at a total fee of between $160 to $800.
If the plumber sees it better to replace the water heater, they’ll likely charge you between $600 and $1800.
The good news is that these figures vary depending on your negotiation skills. Most plumbers are open to negotiation, especially if they are local to your area. You can cut down even further if you do regular maintenance yourself.
What Happens If You Don’t Flush Your Water Heater?
If you fail to flush your water heater, you’re looking at more repair costs and a possible total breakdown of the heater.
Water heater flushing is a core aspect of water heater maintenance. You need to flush out your water heater at least twice a year, even when your heater is performing at its optimum.
Sediment buildup is dangerous to your heater. Not only that, but it also raises your home’s utility costs. Your water heater uses more energy to keep up, thus making you save less than you would if it was clean.
Additionally, excess buildup might increase the internal pressure in the tank. That buildup could start to weaken the heater, leading to cracks and leakage from the tank. You’ll be dealing with burst pipes, low water pressure, and all-around heater inefficiency.
In some extremes, you might find sediment in your taps. This is equally dangerous. Over time, such occurrences might ruin your tap too.
Final Thoughts
The little bits and pieces that make your water heater can increase or decrease its lifespan. Therefore, you need to ensure they are always working. While you can always check for a periodic breakdown of such components, you can also call a home inspector to conduct a complete checkup of your tank.
You can save a lot more on constant repairs, energy savings, and heater replacement. Contact a home inspector and book a consultation.