A leaking temperature and pressure relief (TPR) valve on your water heater can be a perplexing problem. Understanding why your valve is leaking ‒ and how to fix it ‒ are both critical pieces of information for any homeowner to have.
The temperature & pressure relief valve is a safety feature on an electric or gas tank water heaters that will open to discharge hot water and reduce pressure inside the tank. There are numerous possible reasons your water heater pressure relief valve leaks.
- the water pressure inside the tank is too high
- the water temperature is too high
- the pressure relief valve is faulty
- the pressure relief valve wasn’t installed correctly
Identifying the cause of your temperature & pressure relief valve leak may take a bit of time, but you should be able to figure it out without too much trouble. The rest of this article will take you through the causes of water leaking from the pressure relief valve and explain how you can fix each of them.
The Purpose of the Pressure Relief Valve
Before we get started, I want to give a quick refresher on what the TPR valve does. This safety valve exists to provide water and steam the chance to escape when the temperature or pressure gets too high inside the water heater tank.
Although the name contains both “temperature” and “pressure,” most valves are almost exclusively used for water heater pressure relief. This is because the temperature of your water needs to rise to a ridiculously high level to set off the valve.
If this valve didn’t exist, your water heater would be a ticking time bomb sitting in your home. The water heater could explode due to thermal expansion if excessive pressure rises to an unsustainable level.
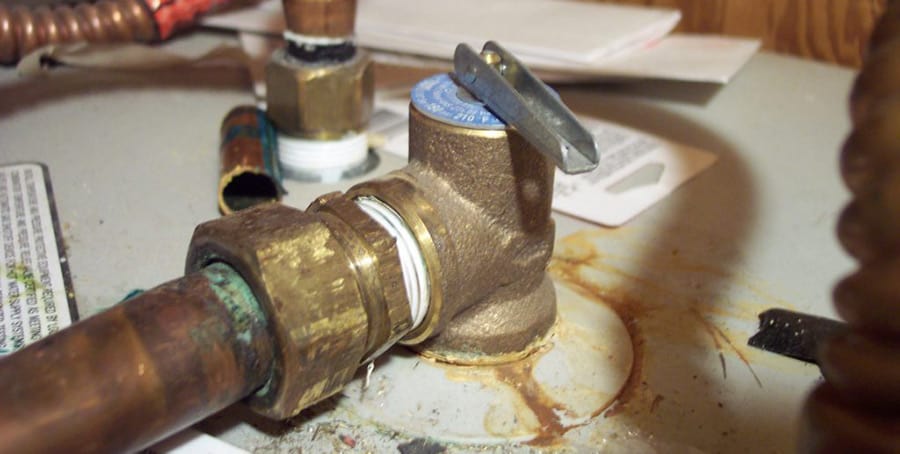
While settings can vary between brands and models, the valve is typically set to open when the temperature exceeds 210 degrees, and the pressure exceeds 150 psi. If your valve is set to a different set of specifications, you might have a valve intended for another appliance.
High Water Pressure
Although many people automatically assume a leaking valve is a broken valve, that isn’t always the case. If your TPR valve is constantly leaking, there’s a good chance it’s working precisely as intended and is relieving excess temperature or internal pressure.
Testing the pressure level in your water heater is a relatively simple process. You need to buy a pressure gauge (available on Amazon) and attach it to your system of pipes. Don’t worry about connecting it to a hot water pipe or a cold water pipe ‒ both will show the same pressure.
While there are many locations where you can connect the gauge to your plumbing, the easiest option is to connect it to one of your outdoor hose faucets. You’ll need a pressure gauge with threading designed for garden hoses ‒ the one linked above has this feature.
With all other faucets and water outlets turned off, the pressure should be between 40 psi and 80 psi. If the gauge shows the pressure is at 150 psi or more significant, excessive water pressure is probably causing your pressure valve to leak. But if the water leak is active while the pressure, the water pressure in your plumbing system probably isn’t causing it.
A closed plumbing system usually causes excess pressure. The water heater does its job and heats the water, which causes upward expansion of the water and an increase in pressure. The water won’t have anywhere to go if the system is closed, and the TPR valve opens to relieve the stress.
You can typically solve an excess pressure problem by installing an expansion tank, which will give the pressure an outlet that isn’t the valve. Expanding water can flow into the expansion tank instead of exiting via the valve, and the water heating process can continue to work.
If installing an expansion tank doesn’t solve the problem, you may have installed the tank incorrectly.
High Water Temperature
The TPR valve opens for both excessive pressure and excessive temperatures. I admit, it’s doubtful that the pressure valve is being set off by excessively high temperatures, as the water temperature would need to be near the boiling point to set it off. It’s still possible, so it would be wrong not to cover it here.
Checking the water temperature in your water heater is a straightforward process.
- Get a meat thermometer.
- Turn on a hot water faucet.
- Run the hot water for a minute.
- Take the temperature of the water with the thermometer.
The hot water temperature coming from your faucet should be around 110 to 120 degrees. Anything more is dangerous but wouldn’t necessarily explain a faulty pressure valve. As I said, the temperature would need to be near the boiling point of 212 degrees to set off the valve.
Pressure Relief Valve not in Use
If your water heater pressure relief valve hasn’t opened in a few years, a slight leak may spring after you finally open it. This leak usually isn’t anything severe ‒ a minor drip is the most it will likely become. If the leak does become more serious, you’ll have to replace the whole valve.
Unfortunately, the damage caused by years of non-use can be tough to fix. While I did say you only required replacing severe leaks, the easiest way to solve even minor dripping issues is to replace the valve entirely. This way, you don’t get your time and energy caught up in the intricacies of repairing something that costs less than $15 to replace entirely.
The Wrong Pressure Relief Valve Installed
While uncommon, the leaking from the pressure valve may be the wrong pressure valve. For example, other appliances ‒ like boilers, also use pressure relief valves. While these valves operate in the same way as the one on your water heater, they release pressure at a much lower psi. Boiler pressure valves typically release water and steam at 30 psi, not the 150 psi typical of water heater valves.
This is extremely unlikely because the valve would have been leaking from when you installed it. If there has been any time at all in between installing your water heater and the moment your valve started leaking, you almost certainly have the right kind of valve installed.
Failed Pressure Relief Valve
The final possibility is that the valve has failed and needs replacement. While TPR valves are usually pretty sturdy, improper installation or excessive wear over time can cause the valve to break down and spring a leak.
Fixing the valve is technically possible, but replacing it is honestly the easiest and safest option. Most replacement TPR valves cost approximately $30 or less, and the replacement process is pretty straightforward. Here’s a step-by-step walkthrough:
Replacing the Pressure Relief Valve
What you will need:
- Large adjustable wrench or pipe wrench
- Flathead screwdriver
- Teflon tape
- Pipe dope
- Replacement pressure relief valve – See below
- Bucket
- Garden hose
Insider’s Tip: The video references Teflon tape, but I recommend Teflon tape with a thin coat of pipe dope over the tape for a watertight seal.
When purchasing a new pressure relief valve, you need to be sure you are purchasing the correct type. There are two types:
- Short shank
- Extended shank
The pressure relief valve with a short shank like the Camco 10471/10473 3/4″ Temperature and Pressure Relief Valve with 4″ Epoxy-Coated Probe fits most all water heaters that have a short shank. The valve will sit close to the tank in most cases.
The pressure relief valve with an extended shank like the Camco 10493 3/4″ Temperature and Pressure Relief Valve with 4″ Epoxy-Coated Probe – Extended Shank fits most water heaters that have an extended shank. The valve sits off the water heater, or sometimes the extended shank is needed to reach the inner tank.
Step 1: Turn the power off
The first thing we need to do is turn the power off.
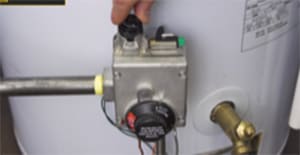
If you have a gas-powered water heater, you need to shut off the gas supply. Now the video references turning off the gas and the control knob. You don’t need to turn the gas off. You only need to turn the control knob to the vacation or pilot setting to turn off the burners inside the water heater but not the pilot light.
If you are more comfortable turning off the gas, by all means, do so. If you do, you will need to relight the pilot upon completion.

If you have an electric water heater, you’ll need to locate the 220 circuit breaker for the water heater and turn it off to prevent the water heater from producing hot water while working on the water heater. We will also be partially draining the water heater, and you don’t want the upper element not to be submerged in water.
Step 2: Turn the cold water supply off
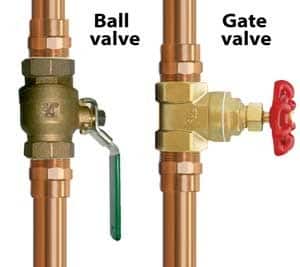
Locate and close the cold water shut-off valve entering the water heater located directly over the water heater. It will either be a ball valve or a gate valve.
For a gate valve, turn the valve clockwise to close.
Turn the handle perpendicular to the pipe for a gate valve to turn the valve off. The water is on if the valve is in line with the pipe.
Step 3: Drain about 10 gallons from the water heater
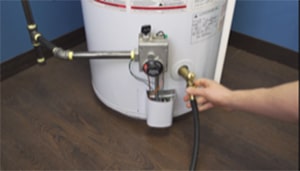
Next, we need to drain the water level beneath the valve, about 10 gallons of water from the tank. To do this, connect a garden hose to the drain valve located at the bottom of the water heater. Direct the garden hose outside or to a floor drain.
Open the drain valve on the water heater, then open the hot water tap at a nearby sink to release the vacuum on the tank.
Place a bucket under the discharge pipe connected to the valve to collect water and open the TPR valve. When no water exits the discharge pipe from the TPR valve, close the drain valve and remove the garden hose.
Step 4: Remove the pressure relief valve
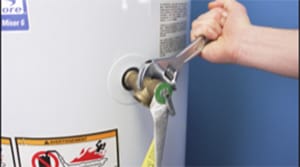
You will need to remove the discharge pipe from the existing TPR valve. Unscrew the pipe and set it aside to reconnect later. You may have to cut the pipe off in some instances.
When removing the discharge pipe, use the large adjustable wrench (or 18″ pipe wrench if you need more leverage) to unscrew the old pressure relief valve. You will initially need to use some force to break the seal.
Remove the old valve.
Step 5: Install the new pressure relief valve
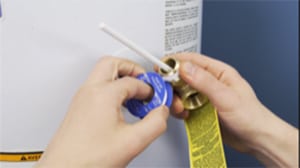
Clean the inlet with a small wire brush. Wrap the Teflon tape around the threads of the new valve in a clockwise motion. I like to use a thin coat of pipe dope before installing it to prevent leaks.
Screw the new valve in by hand, then use the wrench to tighten. Be sure the valve points downward.
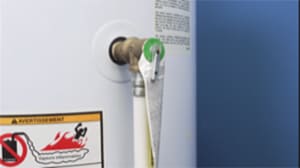
Reattach the discharge pipe ‒ wrap the threads in Teflon tape before doing this. If you had to cut the pipe off, you’d need to replace it with a specifically rated pipe for hot water use.
When you glue the pipe back on, make sure to use glue that is also rated for hot water use.
Step 6: Turn the water on
Now that the valve is tight and the discharge pipe is installed, we can re-open the cold water cut-off valve to refill the tank. Please wait until all the air has exited through the hot water tap to close the hot water tap.
Step 7: Turn the power on
Check for leaks or dripping around the repaired valve. If the repair went smoothly, everything should be dry.
Once you’ve confirmed, everything looks good, turn the breaker at the electrical panel back on. For gas models, turn the pilot back on and adjust the temperature to the desired setting. If you turned the gas off, you’d need to light the pilot light.
If you’ve exhausted all of the other possibilities mentioned in this article, replacing your pressure relief valve is is probably the best solution. If you prefer, you should contact a licensed plumber to replace your temperature & pressure relief valve.
Why Tankless Water Heaters Leak from Relief Valve
Tankless water heaters don’t store water. They only heat water on demand. However, if you have noticed some water around your tankless water heater, this is not to say a leak from it is impossible. It’s hard to distinguish whether a water heater pressure relief valve (PRV) is leaking or just doing its function to release water. Here are some things to consider.
A tankless water heater can leak from the temperature & pressure relief valve if it heats water too fast, causing pressure inside the appliance to rise. The temperature & pressure relief valve open to release hot water and lower water pressure when this occurs. Other causes for a relief valve to leak on a tankless water heater includes:
- The PRV valve is faulty or installed incorrectly
- The tankless water heater flow rate is too low
- The tankless water heater temperature is set too high
- There is a storage tank in use that has exceeded pressure limits
Does a Tankless Water Heater Need a Pressure Relief Valve
Many people think that a tankless water heater doesn’t need a pressure relief valve (PRV), which is not the case. Manufacturer specifications supersede plumbing codes, and not installing one can void your warranty.
A tankless water heater requires a pressure relief valve (PRV) installed on the hot water line out of the tankless appliance. Appliance manuals, including Tagaki, Rinnai, Noritz, and Bosch, require a PRV to relieve pressure detected by the internal sensor.
You should check your tankless water heater manual to see what the manufacturer stipulates. Today, plumbing codes have caught up with tankless water heaters and are required by most national, state, and local municipal public water utility regulations.
A pressure relief valve is required when the supply piping uses plastic tubing like PEX, CPVC, and plastic tubing, which is commonplace in most homes today. Plastic tubing is rated to about 100PSI and can rupture if pressure rises about the tubing threshold.
Related Questions
Are water heater expansion tanks required?
Most cities need residential plumbing systems to be closed water heater systems. A new water heater on a closed system building code requires an expansion tank. For more info, see our article Are Water Heater Expansion Tanks Required.
Is a drain pan required under a water heater?
In most cases, Yes. Whether you need a drain pan under a water heater is mainly determined by its installed location. If your water heater is installed in an attic or ceiling space or inside the interior living space, a drain pan is required under your water heater. In most states, you don’t need a drain pan under a water heater inside garages. See our article Is a Drain Pan Required Under A Water Heater for more info.