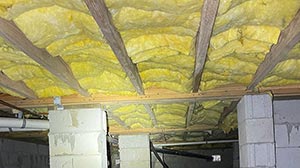
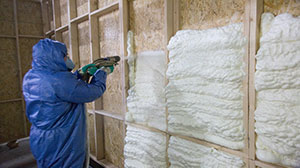
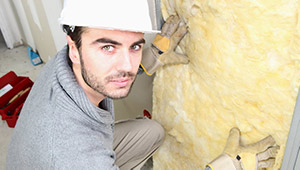
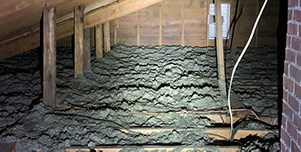
Crawl Space, Insulation

Which Way Should Insulation Face in a Crawl Space?

insulation crawl space lg

One of the essential parts of maintaining your home is making sure that it’s properly insulated. Without proper insulation, your house won’t be able to keep warm air inside during winter or cold air inside during summer. You’ll have higher energy bills and possibly even face mold in the crawl space

Insulation should always get installed with the paper portion facing the inside or the heated part of the house. The insulation mustn’t face the wrong way, as it can lead to mold and water damage. Whether it’s in a crawl space, an attic, garage, or any other unconditioned area, you shouldn’t be able to see the paper after installation. Still, you should be able to see the insulation. 

There are many different types of insulation and ways to insulate a crawl space. When using faced insulation, which is insulation on one side and paper facing on the other, there’s only one right way to install it. Not correctly installing insulation is asking for big problems with your house and insulation alike. Let’s look at the different types of insulation and the best way to make sure your crawl space is insulated and protected. 

What Happens if Insulation is Installed Backward? 

The big issue with installing insulation backward is that the paper portion acts as a barrier that doesn’t allow air to escape the insulation. Moisture from humidity in the air can get trapped inside the insulation. The paper then acts as a barrier and doesn’t allow it to escape. The trapped moisture will sit and rot inside of the insulation and eventually cause mold to form. 

The mold then spreads to the beams and joist spaces in your crawl space and eventually spreads through the floor. Over time, your entire floor will need replacing because of water and mold damage from the improperly installed insulation. 

The same principle applies if you don’t install the insulation correctly in a wall cavity space. The paper will trap warm air and moisture inside the insulation, damaging both the insulation and anything it’s touching. Water damage caused by insulation facing the wrong way is especially dangerous because you can’t see it without removing the insulation. 

Which Way Does Insulation Need to Face?

Another way to remember which way your insulation should face is that the paper part should always face the conditioned side of the house. When the furnace is running, your floor will be warmer than the crawl space during the winter.

When the AC is running, your floor will be cooler than the crawl space during the summer. You always want the paper to be facing the conditioned part of the house. 

If that didn’t completely make sense to everyone, here’s another way to remember which way to face your insulation. The paper part of the insulation should face the side of your house that’s warm during the winter and cool during the summer.

Both of the statements I just made are saying the same thing. Use whichever one makes the most sense to you, and you’ll have your insulation facing the right way. 

The paper part of the insulation acts as a water barrier. A vapor barrier means that moisture and condensation from the air can’t penetrate it, which is why it traps moisture inside of it when it’s facing the wrong way. Moisture creeps in above the paper part of the insulation and cannot escape when the paper is facing the bottom of the crawl space

How Should Insulation be Installed in a Crawl Space? 

You should install your insulation with the paper part facing the floor and the insulation part facing back towards you. It’s not as easy as just shoving insulation into a joist space, however, and there are some things you should keep in mind when installing it. 

Cover the Ground of the Crawl Space

Depending on how you built your house, you might have a concrete floor in your crawl space, or it might be dirt. You should first ensure that your insulation won’t get dirty from dragging it through the crawl space. To do this, cover the area you plan on working in with tarps or plastic to protect both yourself and your insulation. 

Seal the Subfloor

To do the job right, make sure that you go through the crawl space and spray foam to insulate any holes in the floor. Pipes, wires, or vents going through the floor often leave a gap around their perimeter, and you should make sure you seal these holes before covering them with insulation. 

Insulate Between the Floor Joists 

Once you seal all the holes in the floor, it’s time to install the insulation. Make sure you have the insulation facing the right way to prevent mold and water damage

Insulate the Perimeter Spaces

After the floor spaces are insulated, it’s time to do the same with the perimeter walls of the crawl space. Measure, cut, and install insulation everywhere that you need to. 

Ensure the Insulation is Supported

For anywhere the insulation gets installed in-floor spaces, it will be necessary to support the pieces, so they don’t droop and fall. You can do this by stapling the paper portion to the floor or running pieces of strapping from joist to joist under the insulation to ensure it doesn’t fall. Insulation will likely get heavier from moisture and dirt as time passes, and the increase in weight can make it eventually fall out of place. 

Insulate the Ducts and Pipes as Well

If you have any plumbing or HVAC ducting in your crawl space, you’ll want to make sure that these are insulated as well. During periods when the temperature inside the pipes is different from the temperature of the crawl space, they will condensate and drip. 

If it’s your first time installing insulation, here’s the best way to do it properly. 

  1. Measure the width and length of the space you’re insulation. 
  2. Cut the insulation to the appropriate length and width using a sharp-edged but not serrated knife. 
  3. Put the insulation into place in the floor space or along the wall where you want to install it. 
  4. Use a stapler to fasten the paper portion to the wall or floor that you’re trying to insulate. 

You might use a variation of this formula, but for the most part, this is a pretty good way of properly insulating your crawl space. 

Which Way Should Insulation Face in the Basement?

The paper portion of the insulation should always face the warm in the winter side of the house. Whether it’s in a basement, a crawl space, or an attic, the insulation should face the unconditioned side of the house, while the paper faces the conditioned side. Insulation gets installed in this manner to prevent moisture and water damage from occurring. 

Why Does it Matter Which Way Insulation is Facing in a Basement? 

Insulation facing the wrong way in a basement can cause the same issues in a crawl space. It can lead to moisture, mold, mildew, and water damage. Here are some of the risks you face when your insulation is facing the wrong way and moisture gets trapped inside the paper vapor barrier. 

Allergies 

Moisture trapped in your crawl space eventually forms mold. The moldy air that gets formed won’t stay put forever and will eventually get circulated throughout your home. As you and your loved ones inhale the spores from moldy air, they can cause severe allergies or further complicate existing allergies. Sinus infections and other more serious allergic reactions can result from inhaling moldy air for an extended period. 

Asthma 

While the moldy air you’re inhaling won’t necessarily cause asthma, it will make it worse if you already have asthma. Asthma problems are especially true for children and teens. 

Illness 

Mold spores are also capable of causing more serious illnesses outside of asthma and allergic reactions. You can contract any number of lung and respiratory conditions from inhaling moldy air for any period, especially an extended one. To protect your health and for that of your loved ones, make sure your insulation is facing the right way. 

Structural Damage 

Outside of possibly harming you and the other inhabitants of your house, moisture can also cause structural damage. Moisture will creep through your subfloor and into your floorboards and damage them. They will start to creak and split apart at the seams with enough moisture damage. 

Moisture can then spread to your walls, ceilings, and even onto furniture and objects touching the floor. The process will take some time, but if left unchecked, the mold can spread endlessly. 

What is the Best Way to Waterproof a Crawl Space? 

Insulating your crawl space is an excellent start to making sure your crawl space doesn’t affect the rest of your house, but there’s more work to do. Here’s a list of steps to follow to keep moisture out of your crawl space and keep it as dry as possible. 

Replace Old Coverings with Airtight Vent Covers and Doors

Ensuring that all the vent covers and access doors are airtight is a great first step at keeping your crawl space dry. Unfortunately, because the crawl space is underground or at ground level, there are many other areas for water to leak in. 

Get Rid of Existing Water in the Crawl Space

If you haven’t been taking care of your crawl space and are finally getting around to it, there’s a good chance that some water will have already found its way inside. Using a shop vac or bucket system, get rid of any standing water or puddles in your crawl space. Starting with a clean and dry crawl space is crucial to the waterproofing process. 

Fix any Structural Damage Present

Any cracks or seams in the foundation will let water creep inside. Making sure that your foundation gets completely sealed and solid is essential to keeping it that way. 

Insulate the Crawl Space Thoroughly with Insulation and a Vapor Barrier

Finally, you’re ready to start insulating your crawl space. Using the steps laid out in the pages above, insulate your crawl space’s floor spaces and perimeter walls. If you use insulation with a vapor barrier attached, you don’t need to add any additional barrier. If, however, you’re using insulation without a vapor barrier, you’ll need to install one before hanging the insulation. 

Use a Commercial Grade Dehumidifier if Necessary

If you notice that you still have a moisture problem inside your crawl space after sealing and insulating everything, you might need to add a dehumidifier. A crawl space dehumidifier will remove any extra moisture out of the air and keep your crawl space as dry as possible. 

What is the Best Insulation for a Crawl Space? 

When it comes to choosing the right insulation for your crawl space, you have several options at your disposal. We’ve mostly talked about faced insulation, where one side has a paper vapor barrier, and the other is insulation. Let’s look at a few different options you have. 

Unfaced Insulation 

Unfaced insulation is similar to faced insulation, only that it doesn’t have a paper vapor barrier attached. You can use unfaced insulation in a crawl space as long as you take the time to add your vapor barrier. The most common use of unfaced insulation in crawl spaces is when you’re adding on to insulation that’s already there. 

Blown Insulation 

Using blown insulation isn’t recommended in a crawl space simply because it’s very difficult to do. Blown insulation consists of loose insulation particles that get blown out of a hose. This type of insulation gets used primarily in attics where you don’t need to support the insulation, but it can rather sit on the ceiling drywall. 

Spray Foam Insulation 

Spray foam insulation gets sprayed out of a hose or nozzle and adheres to whatever it touches. It’s possible to use in crawl spaces but difficult if the area is small and tight. Spray foam isn’t recommended in crawl spaces because it can make floor or plumbing repairs difficult.

Foam Pad Insulation 

Foam pad insulation commonly gets used around the perimeter foundation of the house. It comes in plywood-sized sheets and is anywhere from a half-inch thick to several inches thick. Foam pad insulation isn’t designed to get used in your crawl space’s floor spaces or wall spaces. 

Advantages of an Insulated Crawl Space? 

Having a properly insulated crawl space helps in everything from lower energy bills to a more comfortable house. If you need more convincing, here’s a list of advantages to an insulated and waterproof crawl space

Lower Energy Bills

Your floors, windows, and doors are the worst places to lose heating and cooling during the winter and summer. Insulating your crawl space will keep the conditioned air where you want it to be and won’t let it escape through the floor. 

Warmer Floors 

If you struggle with cold floors during the winter, it’s likely because you don’t have an insulated crawl space. Adding insulation to the floor spaces in your crawl space will keep your floors warmer. 

A More Valuable House 

A warmer and more efficient house is a valuable commodity in today’s housing market. With so many people cutting corners to save money at the expense of quality, an insulated crawl space is a valuable commodity. 

Better Air Quality 

A lack of insulation in your crawl space or insulation facing the wrong way can damage moisture. Moisture in your house and the air can lead to a bevy of allergies, moldy spores, and other nasties floating through your air, waiting for you to inhale them. 

Storage Space if Needed 

You can even use a conditioned crawl space as extra storage space! Many crawl spaces have large access doors and enough floor space to keep valuables and storage items as long as the space gets conditioned. An uninsulated and wet crawl space will damage anything that’s inside of it, your storage items included. 

Final Thoughts 

Ensure that your faced insulation is facing the right direction to prevent water damage and moisture from wreaking havoc on your house. Also, make sure to utilize a vapor barrier to ensure that your home stays dry and mold-free from whatever might be lurking in your crawl space. 

Author

Hubert Miles | Licensed Home Inspector, CMI, CPI

Hubert Miles is a licensed home inspector (RBI# 2556) with more than two decades of experience in inspection and construction. Since 2008, he has been serving South Carolina through his company, Patriot Home Inspections LLC. As a Certified Master Inspector, Hubert is dedicated to providing his expertise in home inspections, repairs, maintenance, and DIY projects.