If you’re reading this article, a home inspector or a pest control technician has probably mentioned that you should consider a crawl space encapsulation system to address wet crawl space conditions.
You probably have a lot of questions, such as:
- What are crawl space encapsulation systems?
- What is the cost of crawl space encapsulation?
- What are the benefits (and negatives) of crawlspace encapsulation?
- Can you encapsulate your crawl space yourself?
The purpose of crawl space encapsulation is to turn a damp crawl space into a dry space. Wet crawl spaces cause structural problems, pest activity, and mold growth. The crawl space encapsulation process includes sealing off crawl space vents and installing a thick reinforced moisture barrier over the dirt floor that works with a commercial-grade crawl space dehumidifier to eliminate crawl space problems and keep the structure of the home dry, pest-free, and mold-free.
A crawl space contractor can list dozens of reasons why you should encapsulate your crawl space. It may also be beneficial for your health and your home value.
In this article, we’ll be discussing crawl space encapsulation in detail. We’ll discuss and answer your questions, including:
- What is crawl space encapsulation?
- Why crawl space encapsulation?
- How much does it cost to encapsulate a crawl space?
- What are the benefits (and the negatives) of encapsulating crawl space?
- Can you encapsulate a crawl space yourself?
- Do building codes require crawl space encapsulation?
- How long does the encapsulation take?
- Does encapsulation add value to your property?
Let’s get started!
What is Crawl Space Encapsulation?
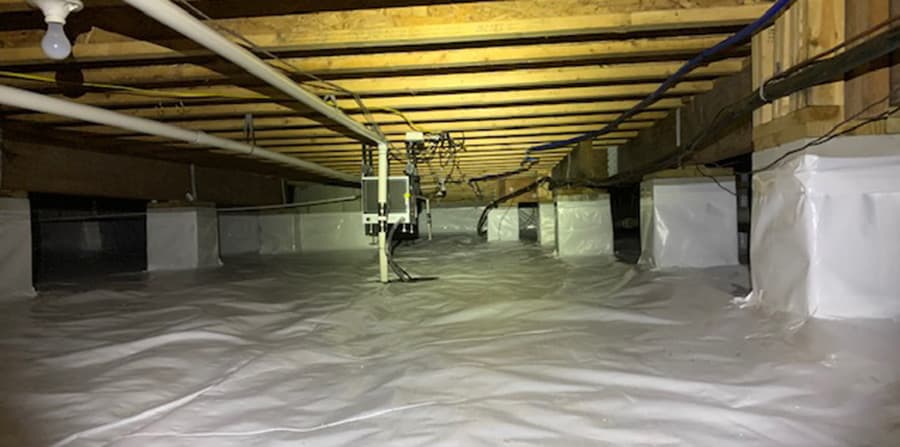
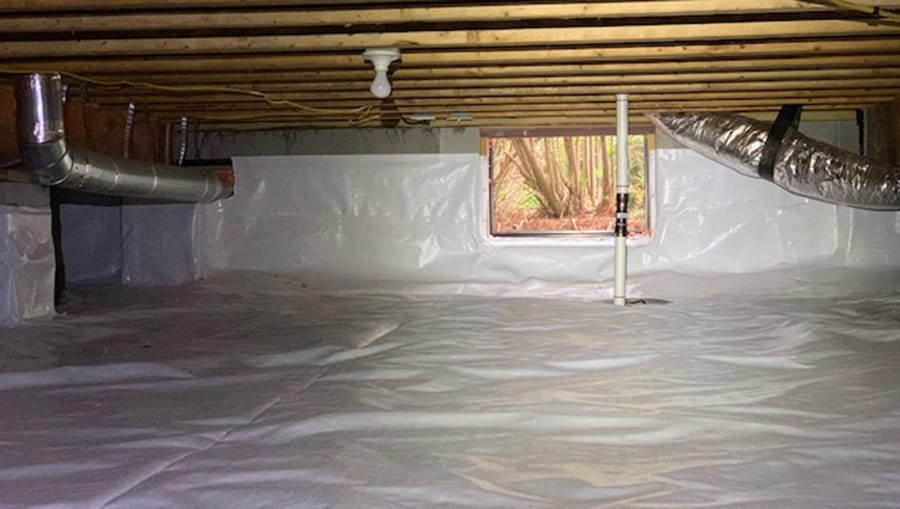
Crawl space encapsulation is sealing the entire crawl space from the outside air. A vapor barrier installation over the crawl space walls and dirt floor usually does it.
A commercial-grade crawl space dehumidifier helps control humidity in the crawl spaces. A sump pump installation removes any water that could build up under the vapor barrier.
Crawl space encapsulation is a great way to improve energy efficiency and provide cleaner air inside your home. Cleaner air is obtained by managing moisture and virtually eliminating mold problems. Crawl space encapsulation is not a do-it-yourself project and should be done by professional contractors.
Why Crawl Space Encapsulation?
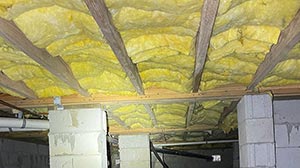
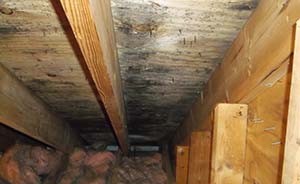
Excess moisture problems are widespread in houses with crawl spaces. If your crawl space is dry, consider yourself fortunate. Crawl spaces are generally damp spaces. It’s not unheard of to have moisture levels of over 70% during the summer months. If the wood moisture content in your crawl space is around 18%, you are susceptible to wood rot and mold growth.
A multitude of factors can cause moisture problems in crawl spaces. The main contributing factors to damp crawl spaces include:
- The ductwork in the crawl space produces condensation during the summer months.
- High groundwater levels during rainy seasons.
- Poor lot drainage allows water to flow into the crawl space.
- Undetected plumbing drain leaks that allow water to settle inside the crawl space.
If you have a damp crawl space, you likely have problems with the following:
- Risk of mold growth on the wet insulation and wood floor structure. Mold growth occurs in the wood when wood moisture levels exceed 20%. Over time, wood dry rot and decay sets in, potentially causing thousands of dollars in property damage.
- Foundation cracks form when the house settles. Settlement typically occurs when wet soil compacts, soil erosion, or poor perimeter drainage.
- Termites and other wood-destroying organisms are attracted to damp areas and moist wood. Damp crawl spaces are a perfect environment for these organisms to thrive.
- High heating and cooling costs are typical in homes with damp crawl spaces because the HVAC systems have to work harder to achieve the desired comfort level.
- Windows sweating on the interior in homes with damp crawl spaces. This is because moist, humid air from the crawl space rises to the home’s interior and condensates on the windows caused by radiant heating.
- Repairing damage caused by these items far outweighs the cost of an encapsulation system. The time to encapsulate a crawl space is before the problems exist or become significant.
How Much Does Crawl Space Encapsulation Cost?
It isn’t easy to estimate how much encapsulation can cost accurately. Crawl space encapsulation costs are based on several factors, including:
- The size of the crawl space. The square footage of the crawl space dictates how much encapsulation material your home’s foundation will need. Materials such as the plastic vapor barrier are priced by square footage. Also, you may need multiple dehumidifiers depending on the crawl space size.
- Depending on the drainage around the home, you may require a french drain system and roof gutters.
- Depending on the groundwater levels around your home, you may need one or multiple sump pumps.
HomeGuide states the national average is about $3000 to $8000, with prices topping $15,000 for larger houses.
HomeAdvisor states that the national average is $1500 to $15,000, with a median price of $5500.
That means an average crawl space encapsulation cost is about $5,000 – materials and labor by a professional contractor included. However, the average prices can range from $5,000 to $10,000 per job. For an average of about $8750.00
Acculevel says the average crawl space is 1500 to 2000 square feet. At an average cost of $3 to $7 per square foot, a 1500sf house can cost $4500 to $10,500, making the average cost more like $7500.
A 2000sf house can cost $6000 to $14,000, making the average cost more like $10,000.
All this can be confusing, yet these costs may not include French drains, sump pumps, etc. Let’s find out what exactly determines the price of encapsulation.
Contractors often suggest insulation based on your crawl space’s size and ventilation.
- Foam insulation boards cost between $0.50 to $2 per board foot for the side walls.
- Fiberglass batt prices range from $2 to $4 per square foot.
When your contractor starts installation, they will cover the foundation walls with rigid, R-valued foam board and install insulation.
Vapor barriers also make up for a large portion of the price. A 20-mill vapor barrier can cost $0.50 to $0.70 per square foot. The tape to secure the seams costs about $50 for a 4-inch wide 180-foot roll. It’s better to put this rather than thin 6-millimeter plastic.
People tend to choose plastic over the vapor barrier because it’s cheaper but thinner – meaning it can rip open and compromise the work. A thicker plastic barrier resists tearing, which is needed to maintain moisture.
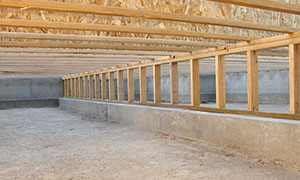
The charges for installing a vapor barrier depend on the crawl space size. A crawl space contractor’s quote will include all labor and materials. A vapor barrier is a plastic sheet (it can be anything from 6 to 23 millimeters in thickness) that lines the ground and wall of a crawl space to restrict moisture from entering.
After all the leaks in your crawl space have been fixed, your contractor will install the encapsulation. Following this, they need to seal exterior vents and air leaks. You can usually buy vent covers online, from $15 to $22.
However, contractors often cut a rectangular insulated board to close off vents and spray foam insulation to seal air leaks around the vents and foundation wall penetrations. Air conditioning from the inside may help keep the area dry, so your contractor may install vents that allow this.
The drainage system around your home is critical, especially if you live in an area with a high water table. Your contractor may suggest you install a sump pump as part of your encapsulation system – about $1,100 (on average). The pump isn’t inexpensive, anything from $60 to $170 for a pedestal version, and submersible pumps usually cost $100 to $400.
The pump needs to be powerful enough to keep up with heavy rainfall. The sump pump needs to sit in a bucket with an airtight lid to prevent water from pooling and evaporating back into the crawl space is also necessary.
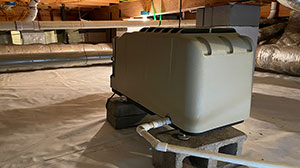
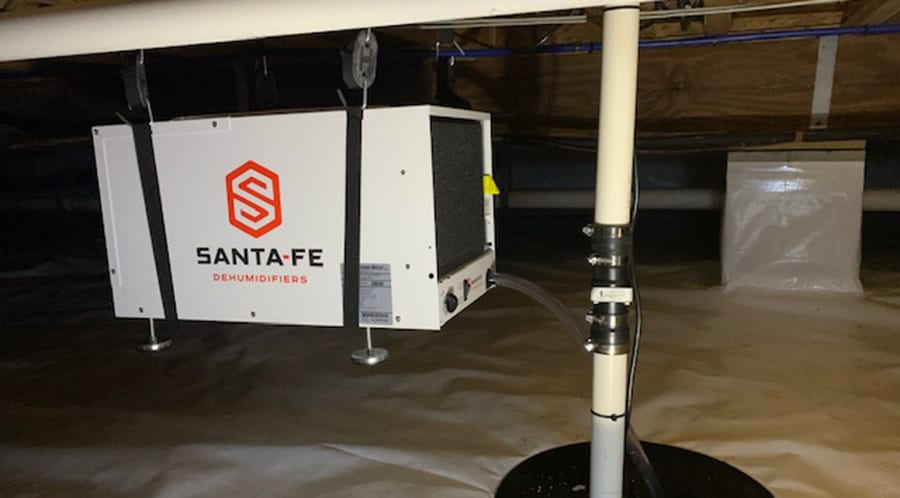
An encapsulation system is not complete without a commercial-grade dehumidifier. Dehumidifiers may cost anything from $780 to $1,500 – without installation. Commercial-grade dehumidifiers are large and built for higher moisture levels.
The Santa Fe Compact70 Dehumidifier is popular among contractors and installers.
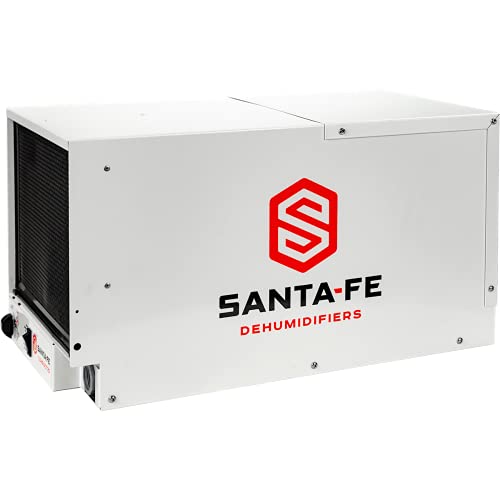
- For Basements & Crawl Spaces up to 2600SF
- Removes 70-Pints Per Day
- Freestanding or Ducting Installation Options
- Cleaner Air with MERV 13 Air Filtration
- Auto Restart After Power Outage
- Auto Defrost Function
- Energy Star Rating
- 6-Year Warranty
Before encapsulation, you must clean the crawl space floor to remove debris that could tear the vapor barrier.
You must remove rocks and debris from the crawl space so the vapor barrier can lie flat and not rip on sharp objects. Total project rates usually include the removal of stones and debris.
Foundation repairs can cost anything from $1500 to ten times that much, depending on the severity of the repair needed. Wood rot to floor structures, foundation settlement, sagging floors, or mold remediation issues are the most expensive.
You also need to replace old insulation that is mold-contaminated.
Finally, an encapsulation system can also feature alarm systems to alert homeowners when a leak occurs in the crawl space.
Benefits of Encapsulating Crawl Space
Humidity is a problem every household faces. Depending on your geographical positioning, your humidity can be high or low. In crawl space encapsulation, you control humidity levels with a dehumidifier.
1. Encapsulation Prevents Moisture Problems
Encapsulated crawl space reduces or eliminates moisture problems in the crawl space. Encapsulation aims to maintain relative humidity below 60% in the crawl space regardless of the outdoor humidity.
With a dehumidifier, humidity levels are routinely less than 50%, which is more hygienic and ensures the structure’s longevity. Mold and moisture are harmful to wood, and they will cause problems that may be hard to solve in the long run.
2. Encapsulation Prevents Pest Infestations
Many places are infamously known for high humidity, and Charlotte (North Carolina) is one of them. Many faunas thrive in humid areas, but you will likely witness a drop in termites and rodents when encapsulating your crawl space.
Termites love damp crawl spaces, and drying a crawl space with encapsulation will lower the risk of termites. However, it doesn’t eliminate the threat. You will still need a termite bond if you live in an area prone to termite activity.
3. Encapsulation Saves on Energy Costs
You will undoubtedly feel the effect of crawl space encapsulation in your pockets – and I don’t mean the overall cost of the encapsulation process. After encapsulating your crawl space, you’ll improve the energy-efficiency loss due to bad ventilation and poor airflow, so you’ll spend less on your energy bills.
Advanced Energy studies have found nearly a “20% reduction in energy use in homes with a conditioned crawl space”. 1
4. Encapsulation Prevents Musty Odors
The noticeable absence of foul odors is another benefit of encapsulating your crawl space. Crawl spaces are one of the most significant contributors to musty smell, and after you get all those pesky spaces sealed, you’ll get rid of those mold and mildew odors.
5. Encapsulation Improves Indoor Air Quality
Your air quality will drastically improve because mold can’t grow freely around your house. The issue with crawl space isn’t just that it’s full of mold; it also has unsealed openings that allow mold spores to flow freely into the living space, causing health issues, musty smells, and mold growth.
Once you’ve successfully encapsulated your crawl space and sealed those openings, even if mold does grow (which it likely won’t), it won’t spread throughout your house. Gasses released by soil, as well as dust and allergens, are also effectively blocked.
Negatives of Encapsulating a Crawl Space
Despite all the benefits of crawl space encapsulation, it doesn’t come without its negatives, and unfortunately, most of these negatives will hit your wallet.
1. Encapsulation is not Cheap
The most prominent negative that deserves your attention is that encapsulation is costly. Not every home needs encapsulation, but many homeowners still go through with it. Most homeowners save money by installing a 6-millimeter plastic vapor barrier to protect their home’s wood structure from moisture issues.
Although many homes need to encapsulate their crawl space, many homes don’t, and this process will only hurt their pockets, which is probably the most significant disadvantage of this process.
Many homeowners who looked at this as their first solution to a damp crawl space now look back in buyer’s remorse, thinking they could have gone with cheaper options for the same effect. However, if you’re facing serious issues with crawl space mold and humidity, this may be the best option and could have saved you money long-term with offset structural damage repair costs.
2. Encapsulation may Require New Crawl Space Insulation
Another disadvantage of going through this is that you may have to have foundation wall insulation. Some contractors will recommend additional rigid foam insulation inside the foundation walls. We’ve discussed these costs above.
Other than the cost, rigid spray foam insulation can hide termite activity. Many contractors cover the masonry walls as well as the wood beams. If adding spray foam, I recommend discussing the risk of termites and if leaving the wood exposed is preferred.
3. Encapsulation may Require HVAC Upgrades to be Effective
Encapsulation can also lead to more expenses when upgrading your HVAC system. Encapsulated crawl spaces will limit the amount of free-flowing air in your house. Your current HVAC system may require more airflow to function correctly. You might need to upgrade your HVAC to keep your house’s temperature stable and consistent.
You should also include an inspection of your ductwork to ensure no leaks that may harm your new upgrade. Chances are, your ductwork contributed to the moisture problems in the crawl space and may need replacement.
If your present air handler or gas furnace is inside the crawl space and your ductwork needs replacement, consider moving the HVAC outside as a package unit or, if possible, into the attic with new ductwork. Do it if you can get the ductwork out of the crawl space.
4. Encapsulation Requires More Preventive Maintenance
After encapsulating the crawl space, you will likely need additional maintenance depending on the number and kind of features you installed during the encapsulation. Other care can include maintaining gutters, sump pumps, etc. Maintenance costs can add up to more than you’d be paying without the crawl space encapsulation.
You may not see a return on investment from crawl space encapsulation if you live in a dry area with little annual rainfall (such as in the southwest). You won’t realize the main benefit of sealing out moisture because you have low rainfall levels, and your crawl space is already dry and moisture-free.
5. Dehumidifiers Require Routine Maintenance
Lastly, the dehumidifier will need regular service to run correctly. It would be best if you serviced the dehumidifier at least once a year. Dehumidifiers have filters that need to be cleaned or replaced. Also, crawl space dehumidifiers use a condensate pump to push moisture to the exterior. Condensate pumps can become clogged, which will require service to clear.
However, all of these disadvantages need to be taken with a grain of salt. In my opinion, many advantages overshadow the disadvantages.
Can You Encapsulate the Crawl Space Yourself?
Encapsulation is not a DIY job. A lot goes into a crawl space encapsulation, and even with 2 or 3 workers on site, it can still take several days to complete. While nothing says you can’t do this yourself, this is not considered a one-person job and can take several days to complete. You should ask yourself, can you do it as well as a professional?
Most professionals will advise you not to take this project on yourself. To quote Home Advisor:
“Encapsulation is a job for a professional. Do not try this as a do-it-yourself project.”
However, many people are skeptical about this, as they think that professionals would prefer that you exclusively call them about this job instead of doing it alone (if you’re capable of doing so).
I’m afraid I may disappoint you, so I recommend listening to the experts and letting them do the job. Encapsulation is complex, and you’ll be working in a confined space.
However, it is possible if you decide to do it yourself.
Time to Complete: You’ll need 8-10 hours per two people per 1,000 square feet
Tools You’ll Need:
- Plenty of lighting:
flashlight , headlamps, or utility lamps - Utility Knife
- Drill with masonry bits
- Measuring tape
- Trash bags
- Marker
- Rubber paint roller
Protective Gear You’ll Need:
- Coveralls
- Work gloves
- Protective eyewear
- Knee pads
Materials You’ll Need:
- Crawl space vapor barrier or retarder
- Vapor barrier seam tape
- Double-sided construction tape
- Dehumidifier
- Condensate Pump
- Masonry Screws
Steps to Encapsulate Your Crawl Space Yourself
Access Your Crawl Space
The first thing you want to do is assess your crawl space. Take a careful look at the foundations and the walls. If necessary, take pictures. You’ll need to measure everything (and I mean everything). Measure the foundation walls’ height and perimeter to calculate the crawl space square footage.
Clean the Crawl Space
Following this, you’ll need to clear everything out. Investing money in materials would be terrible, only to rip them on a rock or something else. Start using a rake at the farthest point from the access door and begin raking debris. Carry a 5-gallon bucket or large trash bag to collect debris as you return to the access opening.
Order Supplies to Begin Encapsulation
After you measure your space, you need to order the materials you’ll need. You can purchase most supplies (seal tape, barrier material, etc.) locally. The supplies are available from Lowes or Home Depot.
However, the commercial-grade dehumidifiers may have to be ordered online, depending on where you live. Santa Fe dehumidifiers are amongst the most popular brands, so you should look them up. I recommend the Santa Fe Compact70 Dehumidifier for Crawl Spaces and Basements.
You’ll also need a condensate pump to use with the dehumidifier. I recommend the Little Giant 554415 VCMA-15ULST Automatic Condensate Removal Pump with Safety Switch and 20-feet Tubing.

Prepping the Vapor Barrier
Cut the barrier material into pieces to cover each corresponding wall. You’ll want to cut the pieces slightly larger than you need and overlap them when installing so there are no gaps. Cut the vapor barrier in your yard or home (not in the crawl space).
Start Installing the Vapor Barrier
After cutting all your materials to their proper measurements, add double-sided seal tape along the foundation walls under the floor joists. After that, attach the plastic vapor barrier along the foundation walls, keeping the vapor barrier as consistent as possible.
Insider Tip: Carefully press down against the wall using the rubber paint roller to seal the tape’s vapor barrier.
This part usually takes another person to pull off, so you’ll need a partner to finish it. After doing this, repeat the same process with the floor.
- Overlap the seams by a few inches.
- Tape all the seams.
- Use the rubber paint roller to seal the tape on the vapor barrier seams.
Don’t forget to seal any vents or windows that you might find. The access door needs to be completely airtight, as well.
Many tutorials on YouTube can help you out if you’re having trouble envisioning this.
Install the Dehumidifier
All you need to do now is provide the encapsulated crawl space with a dehumidifier. According to experts, keeping the humidity level around 55% is best. Santa Fe dehumidifiers are amongst the most popular brands, so you should look them up.
I would advise everyone to hire a professional to do this job because you’ll likely need to run a GFCI outlet to the location where you intend to install the dehumidifier. Also, most contractors generally offer a warranty for a typical crawl space encapsulation project.
You must repair the potential damage and cover expenses if you do the job yourself. When you have a contractor’s warranty, they’ll fix everything and cover their costs. After all, you, as an amateur, can’t guarantee your work, while professionals can.
Do Building Codes Require Crawl Space Encapsulation?
No building code requires crawl space encapsulation. Building codes do not apply to existing houses. Any crawl space encapsulation recommendation made to you by a contractor is only a recommendation. Do not fall for salesman scare tactics into thinking it is a building code requirement.
While it has many benefits, crawl space encapsulation is not the only means of controlling moisture in crawl spaces.
How Long Does it Take to Encapsulate Crawl Space?
The process of encapsulation shouldn’t take too long. A professional can encapsulate a crawl space in a couple of days.
As a DIY project, you can do it over a single weekend, but you’ll need 8-10 hours per two people per 1,000 square feet. The issue is everything that comes beforehand.
Firstly, you need to clear out the mess. If you’ve just moved to a new home, you have already experienced copious cleaning hours and caring for someone else’s mess. This is the same thing, but much worse. It’s damp, dirty, messy, and a bit claustrophobic.
After cleaning everything out, you’ll measure the space. Waiting for the materials you’ve ordered usually doesn’t take too long, but those are the standards we got used to before a global pandemic. Now, ordering anything is not so simple, and you may have to wait a while.
Once your materials arrive, you can get to work. And, as I’ve said, the job usually doesn’t take more than two days with a worker partner.
Does Encapsulating Crawl Space Increase Your Home’s Value?
Encapsulation is becoming a standard for all crawl space homes in the USA. As the public becomes more educated on the subject, the demand is rising in the housing market, and homeowners who have encapsulated their home’s crawl space have increased their home’s market value in some markets.
It improved interior air quality and less indoor humidity during the warmer months. Better ambient internal temperature stabilization. Warmer interior floors, especially those rooms with hardwood or tile.
By doing this, you’re ensuring your family’s health safeguarding – this is another reason houses with encapsulated crawl spaces have more value than the opposite.
I’ve already mentioned that these houses have fewer problems with pests of all kinds. You would not believe the charges pest control will charge you for cleaning this sort of space. Not to mention that your house’s longevity is drastically improved.
Having your crawl space encapsulated, or encapsulating it yourself, is a move you should consider, but make sure to do it carefully. This process suits you, your family, and your house, whether you intend to live in it or flip it for profit.
However, it would be best if you were careful when deciding to go through with this since, in some places, it may be a complete waste of money, as some areas don’t require crawl space encapsulation because of their low humidity rate.
Try to get professionals to do this job for you instead of doing it yourself. Contractors know what they’re doing and will do a better job than you ever can. If you’re looking for a long-term profit return, you’ll feel the benefits of crawl space encapsulation on your monthly utility bill and other things.