Water heater drain valves can get clogged with mineral deposits, or they can wear out. A clogged drain valve can impede the flow of water within the water heater and won’t drain. A damaged or worn-out valve, on the other hand, can cause your water heater to leak.
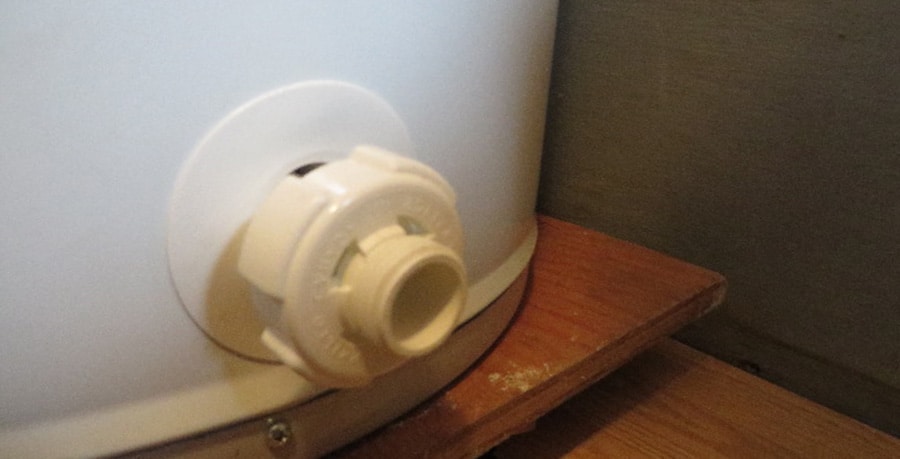
So, can a water heater drain valve be replaced? Drain valves are readily available in hardware stores and online shops. Many stock water heaters have plastic drain valves that can easily fail. If you have a plastic drain valve, it’s also a good idea to replace it immediately to prevent property damage from a leaky drain valve.
While most water heaters come with plastic valves, you should consider upgrading to a brass ball valve. These valves are stronger and more durable, while plastic drain valves are prone to breaking and clog relatively easily.
Plumbers recommend the ball brass valves simply because they provide fast draining and hassle-free maintenance. Just make sure the ball valve is made for water heaters.
To learn more about replacing your water heater drain valve, read on.
Choosing the Right Drain Valve Replacement
There are three main types of drain valves found in gas and electric water heaters: plastic, composite, and brass.
As stated above, most water heaters come with built-in plastic valves, but you can still replace them with brass/composite valves.
Plastic valves are the cheapest but not quite as reliable as the two options. Since they get damaged easily, the valves are more likely to leak. Composite (glass-filled nylon) valves do not deplete the system anode like brass valves so. They are also relatively cost-effective.
Brass valves remain the best option for water heaters. Not only are they durable, but they can also withstand the higher temperatures seen in high-temperature installations.
Brass valves come in both ball valves and gate valves.
Ball valves are either fully open or fully closed, with nothing in between. Although they cost a few dollars more, these valves allow water to drain quickly, so you might want to go with one of them over the standard option.
How to Remove a Broken or Faulty Drain Valve
If you want to remove a broken or faulty drain valve, you’ll need the following items:
- Screwdriver/ needle-nose pliers
- Hacksaw blade
- Self-tapping threaded inserts for plastic
- Hosepipe
- Large bucket
- Adjustable wrench/tongue-and-groove pliers
Removing the valve may not be as straightforward as it sounds, but it’s nothing overly complicated.
Plastic drain valves are a bit tricky to remove as they can easily break off in the process. So you need to be a bit cautious when dealing with one to avoid further damage.
Before removing the drain valve, make sure the valve that the cold water supply into the water heater is turned off. The water taps should also be closed.
You need to drain your water heater first if at all possible. For a step-by-step guide to drain your water heater, see our article Water Heater Maintenance Tips – Gas and Electric Tank Water Heaters.
You should also check and replace your anode rod if needed. See our article Water Heater Anode Rods: What it is & How to Replace it for a step-by-step guide to anode replacing rods.
There are three ways you can go about the removal.
Method 1 – Unscrew the Plastic Drain Valve
Using a pair of channel lock pliers, try to carefully remove the drain valve by twisting it in a counter-clockwise motion. If you can carefully remove the plastic drain valve without breaking it, it’ll make the process much easier.
Method 2 – Cut the Drain Valve Off
Using a hacksaw blade, make two cuts across the nipple until it pops out. Be careful not to cut the threads on the water heater. Finally, remove the remaining pieces with a small screwdriver or needle-nose pliers.
Method 3 – Remove a Broken Drain Valve
Another method is to use a tapered threaded insert for plastics. Just push the inserts into the nipple and unscrew it. However, this might not work if you’re dealing with a plastic valve in an old water heater.
How to Replace a Water Heater Drain Valve
If you want to replace a water heater drain valve, you’ll need the following materials:
- Adjustable wrench or channel lock pliers
- Large bucket
- Rags
- Garden hose
- Water heater drain valve
- Teflon tape
- Pipe dope
And here’s a step-by-step guide to replacing your valve:
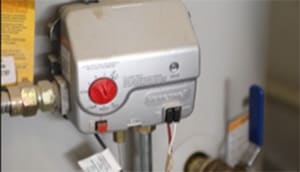
Step 1: Switch off the power supply.
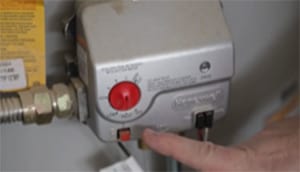
For safety purposes, you need to switch off the power supply at the circuit breaker. If your water heater uses natural gas, turn the regulator valve to “pilot.” Also, so that the water is not wasted, use the hot water in the tank to wash dishes, clothes, or showers.
If you have an electric water heater, turn the breaker off in the electrical panel box.
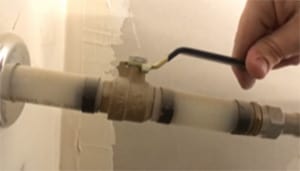
Step 2: Turn the cold water supply valve off.
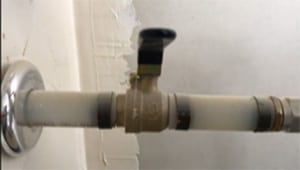
Next, you need to turn the cold water supply off to the water heater. This prevents the water heater from filling when you start to drain the water heater. To turn the valve off, turn the valve perpendicular to the supply pipe.
Step 3: Drain the water heater
Connect the garden hose to the drain valve and run it outside the ground or to a floor drain. Open the drain valve and the hot water tap in a nearby sink.
If the tank is not draining, you will need to open the pressure relief valve located on the tank’s top (or side). Once that’s done, allow the water to drain out.
If the drain valve is clogged with sediment, stick a screwdriver into the hole and try to break up the sediment. Make sure you have cleared all the sediments inside the tank.
Depending on the size of the water heater, it could take up to 30 minutes to drain fully.
Step 4: Remove the old drain valve.
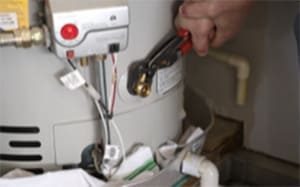
With the water heater drained, you’ll need to remove the old drain valve. With a pair of channel lock pliers, carefully unscrew the drain valve in a counter-clockwise motion, trying not to break the drain valve.
If the channel lock pliers do not remove the seal, you may need a larger 18″ pipe wrench or breaker bar.
If the drain valve breaks, you’ll need to remove the remnants of the drain valve from the drain valve port. Be careful not to damage the threading on the port. Once all the remnants are removed, clean the port to prepare for the new drain valve.
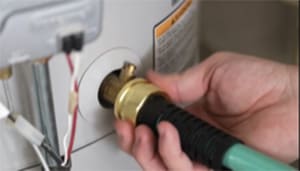
Step 5: Install the new drain valve.
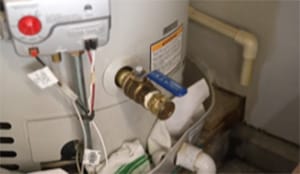
First, wrap the thread with Teflon tape. Apply the tape to the right in the same direction the drain valve is treaded so that the tape tightens as the drain valve is tightened. Apply a light coat of pipe dope if desired.
After that, please insert the new drain valve in the hole and use a wrench to tighten it. Ensure the valve is in the same position as the old one, snug and pointing downwards.
When installing a ball valve, ensure the handle has enough room to be entirely on or off.
If installing a plastic drain valve, make sure you don’t overtighten the connections. The excessive force can cause the valve to break off and leak. It may not happen right away, but it will make its way around eventually.
Step 6: Turn on the Cold Water Supply
Now you need to turn the cold water supply back on to refill the tank. While the tank is filling, check for leaks and tighten the drain valve slowly if needed. Be sure to fill the entire tank before turning the power back on.
As the water in the tank rises, air will escape through the open hot water tap. Once water exits the hot water tap, close the tap.
Step 6: Turn on the gas supply or power.
If there are no water leaks, turn the gas control knob back to the desired setting. For electric heaters, turn the breaker in the panel box back to the on position.
Check for water leaks for the next few days to be on the safe side.
Best Water Heater Drain Valves
Here are some of the best replacement options on the market today:
Rheem SP12112G Brass Drain Valve – Coming from the leading provider of electric and gas water heaters, its quality is unquestionable. This brass drain valve fits both Rheem and Rudd heaters perfectly. For your convenience, it comes with a screwdriver slot to open and close the drain valve. This helps to operate the drain vale in tight locations.
House Mods HMP010 Brass 3/4\” MIP Water Heater Replacement Drain Valve – This heavy-duty brass ball valve comes with an enlarged octagon nut for easy installation. It also has a full port ball valve, making it easy to unclog and for fast draining. The handle is quite large, so ensure you have enough room for installation.
Eastman 60092LF Water Heater Drain Valve, 0.7 x 0.75 x 2, Brass – This is another quality study yet inexpensive brass drain valve. It’s lead compliant and designed for MHT outlet connections. This means it can fit directly into any water heater. It also provides a strong compression hold without creating a mess while cleaning.
Camco 11683 3/8″ Water Heater Drain Valve – A very easy-to-install drain valve made of durable brass. It comes with an east-twist handle that can fit most RVs. It can handle a maximum working pressure of 120. Also, it comes at a budget-friendly price tag.
Reliance 9000058 2-Inch Water Heater Drain Valve -Unlike other options on the list, this tool is made of fiberglass-reinforced Celcom. This 2-inch drain valve is designed to fit all residential water heaters. It has a hose thread outlet and a 3/4-inch MIPS inlet and comes at an affordable price.
Camco 11513 Water Heater Drain Valve (Brass) – Another great product from Camco. This is a brass constructed valve that fits directly into any water heater type. It’s 2.5 inches long and features a 3/4 inch NPT and a 3/4-inch male hose thread.
Camco 11523 3/4″ Plastic Water Heater Drain Valve with 2-1/2″ Shank – If you prefer plastic drain valves, you should consider this option. It’s made of reinforced plastic for durability. Also, it comes with an easy-to-grip handle for easy installation. It features a 3/4 inch NPT thread inlet as well as a 3/4 inch NH thread outlet.