If the top of your water heater is leaking, you’re likely wondering if it can be fixed or if you need a new water heater. Fortunately, a top leak has a better chance of getting fixed than a leak from the bottom of the water heater.
Seven common areas cause a water heater to leak from the top. They include:
- loose connection at the cold water inlet
- loose connection at the hot water outlet
- a faulty temperature and pressure relief (T&P) valve
- a faulty anode rod connection
- a loose pipe fitting
- a leak around the top seam
- a loose connection at the expansion tank
When you notice your water heater leaking from the top, immediately turn off the system’s water supply to prevent further damage. A leak on the top of a water heater is usually repairable without replacing the water heater.
A leak at the bottom of the water heater can cause significant water damage. If caught in time, a top leak can be repaired with minimal water damage.
What Causes a Water Heater to Leak From the Top?
If you look at a cost-risk angle, a water heater leaking from the top is possibly the best-case scenario. See, you can quickly diagnose a top leak. You can fix it in a matter of hours. However, the first step is to find out the source of the leak.
While not unheard of, it is unusual for a water heater to leak around the top seam.
A leak at the top of the water heater might be because of 6 things:
1. The Cold Water Inlet
All the water coming into the water heater comes through the cold water inlet. Therefore, a loose cold water inlet valve is one of the first suspects you need to look at if you find your heater leaking from the top. In most cases, this area leaks water from the threaded connection if it’s worn out or loose.
2. The Hot Water Outlet
Much like the cold water inlet, water can often leak from the hot water outlet. A repair at the hot water outlet can be tricky in some models. For example, Bradford White water heaters have the anode rod connected to the hot water outlet. In this scenario, replacing the entire assembly is best.
3. Loose Pipe Fittings
Loose pipe fittings are another key checking point any time you have a water leak from the top. Water heaters have a lot of pressure on them. Loose pipe fittings mean the pressure build-up will drive water up a weak point to release. Periodically check how tight the pipe fittings are.
4. Leaky T&P Relief Valve
A T&P valve is a crucial feature that manages pressure in a heater so it doesn’t explode. Some heaters have a top-mounted T&P valve, while others have a side-mounted T&P valve. Due to constant pressure and temperature regulating activity, the T&P valve picks up reasonable wear and tear. Too much pressure can cause the valve to discharge, which is normal.
T&P valves can also leak around the threaded fittings. Over time, the connection can corrode and leak from the side or from the top of the water heater. You can usually replace the TPR valve provided the threading on the connection is in good shape and can make a tight seal.
5. The Anode Rod
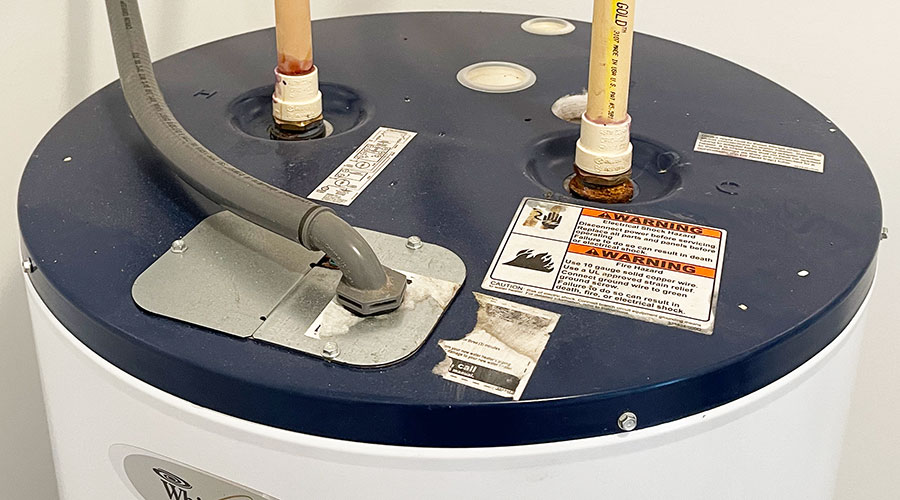
If you have an old model tank and it’s leaking from the top, you might have an issue with a loose anode rod screw. In older models, you’ll find the anode rod at the top of the tank between the cold inlet valve and the hot water supply outlet pipe.
Usually, a faulty anode rod is not supposed to lead to a water leak. However, anode rods are sacrificial. If the corrosive elements in the tank eat at an anode rod long enough, the corrosion can deteriorate the threading connection past the insulation.
The water forms bubbles and starts to creep up the rod. This is when you’ll see the water leaking from the top.
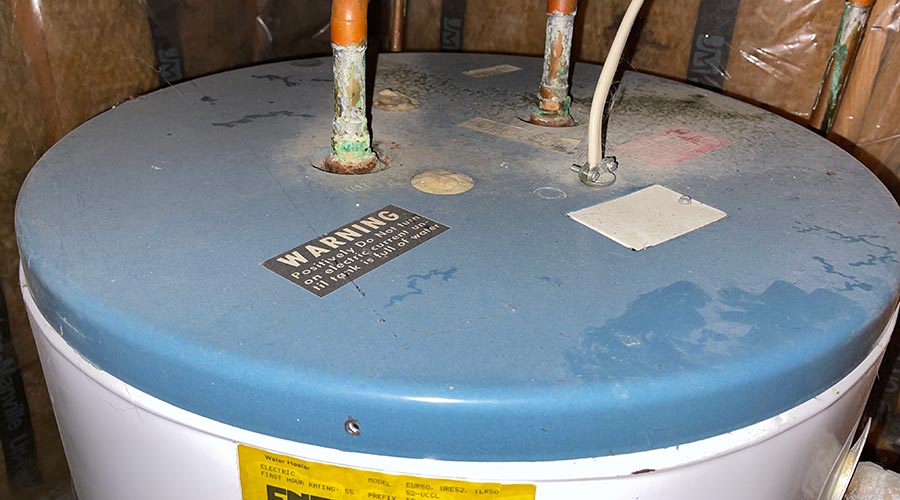
6. Leak from the Top Seam on the Water Heater Tank
If you see water seeping out around the top seam, there is likely a leak at the cold water inlet, hot water outlet, anode rod, or a top-mounted T&P valve. The outer shell doesn’t contain any water. The outer cover houses the insulation around the tank. Depending on how big the leak is, the insulation may be soaked.
Any leak that is coming from the top seam is likely due to a leak at one of the threaded fittings that pass through the outer cover to the inner tank. Water leaking from one of these connection points is trapped between the inner tank and outer cover.
If the inner tank was leaking, the leak would likely be bigger. Partially drain the top third of the tank and inspect and repair the fittings and look for rust or corrosion on the threaded connections. If the damage is significant or the threaded connections are badly rusted, you’ll likely have no choice but to replace the water heater.
7. The Expansion Tank
Expansion tanks are optional tanks installed by homeowners to store excess hot water. Usually, you install these tanks above the main water heater. If you notice a leak at the top of the main water heater, check whether the expansion tank is leaking onto the main.
It might have a loose connection, or the tank itself is leaking.
How Do You Stop a Hot Water Heater From Leaking?
You can fix most water heater leaks from the top using one of these three ways:
- You can tighten any loose valves
- You can replace old and loose valves with new ones
- You can replace the anode rod
- Replace the water heater if needed
You can either fix the leaking water heater yourself or call a professional plumber. Professional plumbers don’t come cheap. Therefore, grab your pipe wrench, and a ladder and get ready for DIY water heater fixing.
If a leak springs up even after fixing, it may be time to consider replacing your water heater. A home inspector can assist you in deciding on fixing a leaking water heater or replacement.
As mentioned, fixing a water heater can be easy if you know what you are doing. Here’s a quick guide on how to fix a water heater from leaking.
1. Turn Off the Power to the Heater
Most heaters have a dedicated 240v electric circuit. Shut it off from the main. Look for the two-pole breaker labeled ‘water heater’ and switch it off.
Also, find the cold water inlet and shut it off as well.
If you have a gas water heater, turn the gas valve to the OFF position. The ball valve to the gas heater should turn 90 degrees perpendicular to the piping.
2. Clean Up Any Water
Dry off the spot under the heater to see if the leak is ongoing. Also, this will help you know if the tank is busted and leaking. The clean-up also allows you to know if your repair work was successful.
3. Tighten Loose Fittings
If you have confirmed your leaks are from loose fittings, you will only need a wrench to tighten the loose fittings. You can either confirm this by yourself or call a certified inspector/plumber to check the state of your leaking water heater.
To do it yourself, get a size-appropriate wrench and turn the fittings clockwise to the tightest fit. You can also turn anticlockwise to check the health of the threading. If the threading is undamaged, use about six rounds of Teflon tape and return the fittings.
4. Replace the Temperature and Pressure Relief Valve
First, check if the T&P valve works. Flip the pressure valve upwards. If you hear a hiss, that means the valve is working. If you don’t get the hiss, your valve might be damaged, and it needs a replacement.
You’ll need these tools:
- A new T&P valve
- A CPVC or copper drain line
- Pipe wrench/adjustable wrench
- Extension or cheater bar
- Flat blade screwdriver
- Teflon tape
- Garden hose
You should shut off the cold water inlet line at this point. You can also shut off the water from the main supply line. Also, open a hot water tap in the bathroom or anywhere closest to the heater. This is to relieve the pressure.
- Attach a garden hose to the drain valve at the bottom of the tank. Direct the other end to a floor drain or outside. Be careful. The water might be hot.
- Use the flathead screwdriver to open the drain valve. This allows the tank to drain. Drain out two gallons if you have a top-mounted T&P valve or 10 gallons if you have a side-mounted T&P valve.
- Remove the run-off tube connected to the T&P valve.
- Turn the old T&P valve anticlockwise with your wrench.
- Get the new T&P valve, and wrap it in at least six rounds of Teflon tape to seal the thread.
- Replace the new T&P valve and tighten it.
- Reconnect the run-off tube to the new valve.
- Open the cold water inlet. The heater will start to fill with water.
- Flip open the T&P valve lever. You’ll see water running down the run-off tube. Once there’s a steady stream from the run-off tube, shut off the T&P valve.
- Remember the hot water tap you left open? Check if it has a steady stream. If it’s steady, close it.
- Make sure there are no leaks.
- Turn ON the power from the main circuit breaker. If you have a gas heater, turn ON the gas supply.
Caution: Ensure the tank is full before turning on the power. An empty tank with power running might damage the tank’s heating elements.
Is a Leaking Water Heater an Emergency?
A leaking water heater is not necessarily an emergency. A water heater should last 10 to 15 years, although most only have a 6-year water heater warranty. However, you should inspect your water heater regularly and have any leaks fixed as soon as possible. Otherwise, you risk flooding and costly interior damage.
Final Thoughts
You’d surely like to keep enjoying your hot showers. Routine maintenance makes a huge difference in if you’ll spend a few bucks on replacement valves or thousands on a new heater. Ensure all your fittings are sediment and damage-free, well-fitted.