Have you ever had noisy flooring? If so, you know the downfalls of the creaking and expansion they make every time you walk. Or, if you are trying to enjoy something, such as a specific TV show downstairs, but one of your family members is walking around all over the place upstairs, it can leave you with an enormous sense of frustration.
In return, you do not want to invest in any other flooring types that make many sounds to spare yourself the irritation. Luxury vinyl flooring (LVT and LVP) has its own sets of pros in cons in terms of noise generation, but the leading causes and factors that contribute to this problem may surprise you. So is LVT (luxury vinyl tile) flooring noisy?
Luxury vinyl flooring is not noisy when installed correctly. Luxury vinyl flooring needs a perfectly flat concrete substrate or wood subfloor. Unevenness causes luxury vinyl flooring to move, which often is the source of the noise.
That said, luxury vinyl plank flooring is effortless to install yourself. If there is one floor that you want to do by yourself, these are the floors to do it. However, as I mentioned above, vinyl tile flooring can be either noisy or quiet, depending on its insertion. This article will discuss some proper ways they can be installed to ensure much noiseless flooring for your home.
How Is LVT Flooring Secured?
When dealing with any flooring, you need to know how they are properly secured and make sure that they do not make a lot of noise. Being secured properly ensures preventive measures to prevent buckling from happening and the rising of the surface, which we will go a little more into detail later. As we advance, let us look at how to secure your LVT flooring properly.
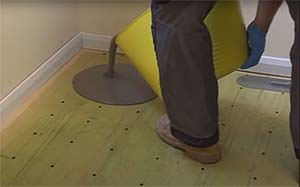
- Make sure your subflooring is completely clean when you install it. If there are any dents, make sure you take care of them properly first. Cleaning the floors first and foremost allows the boards to be even in all aspects. An uneven floor will make your home always creak, and this is what we are trying to avoid.
- Lay your first planks down closest to the wall. Remember to leave roughly ¼ of an inch between the flooring and the wall.
- Drop the next few planks and make sure they each lock into place. Some LVT floors may not have a lock-in-place feature, which, if this is the case, glue down or place them directly next to each other. The backing layer of the plank allows the floor to attach to your subfloor automatically.
- Use a jigsaw tool to cut any other planks together that wrap around corners or door frames. If you do not have one, you can easily rent it out. On the other hand, a utility knife works for smaller pieces that need to come off.
- When the floors are complete, put the baseboards for your walls down and lay molding between the baseboard and floors to give it a nice, finished look.
How Much Distance Should Be Between The Floor And Wall?
One of the many mistakes made is that people do not leave a distance between the floor and the walls. As you are installing your floors, it will look weird at first, and you might wonder why this is. Nevertheless, the main reason why this is so is that it allows your floors to expand freely with temperature changes. When the humidity is high, your flooring will expand, whereas it will squeeze together if it is colder. They will need to go somewhere specific to ring these temperature changes, and if you do not have a gap between them, it will not be charming for your floors in the long run.
As briefly mentioned earlier, creating a gap between the walls and flooring can indeed be done by inserting seams to create roughly ¼ of an inch to ¾ inch gap separating the flooring and walls.
Room Temperature
Although LVT flooring is created out of vinyl, it still has its limits and will expand and contract just like wood. In return, it may cause buckling in your floors. The things that can cause this include, but may not be limited to, heat, sunlight, moisture, not allowing a perimeter, and dragging heavy objects across the floor.
We can prevent these issues from happening in a couple of ways. Here are a few key examples:
- Replacing a plank or section: As you initially work on your LVT flooring, make sure you keep any extra material or tools within your home just in case you will need to repair any patches later on. That said, gently remove the tile flooring that is buckling, and use them as a guide to cut new pieces out to the same size. To put the pieces into place, use a rubber mallet.
- Make repairs: If you have your floors glued down, make sure that you peel back the buckling area very gently to ensure you are not ruining the rest of the floor. Scrape away any issue on the subflooring by softening it with a hairdryer or something similar to heat. Afterward, apply new glue and put your tile back in place with a few weights while the adhesive dries up.
Other Common Mistakes To Avoid
Since we know that LVT floors are typically not noisy, to prevent this from taking place, there are plenty of other mistakes to avoid while installing LVT flooring, especially when this is your first time installing a floor. Here is just a few:
- Don’t leave your baseboards on. Although people may think it is easier to keep them on during the installation process, in the long run, it will not do you justice, as this will cause a much noisier floor.
- Not making sure the floors are even. Once you take your old flooring out, it is vital to ensure the subfloor is even. Otherwise, you will have a very uneven and loud surface to deal with, as mentioned before.
- Don’t lay similar patterns right beside each other. If you want to make your LVT floors look like natural tile, make sure those similar patterns aren’t directly beside each other, unless you want to look at 20 different areas within your home that look the same.
- Use the wrong underlayment. Thankfully, you do not need an underlayment with most vinyl floors unless it is with a hard floor that needs ventilation, like concrete.
- Thinking you need expensive tools. LVT floors are effortless to cut with relatively cheap tools.
How Can I Soundproof Vinyl Flooring?
Maybe you already have LVT floors, and you feel the need to soundproof them even more, especially if you have a lot of noise within your home and want some quiet time to yourself from a long day at work. However, you might think that because vinyl floors are hard, this seems to be impossible.
The way you can soundproof your home with LVT floors is simple. All you would need is a good underlayment. Since most luxury vinyl floors come with an underlayment, it might not be necessary. However, to better soundproof your home, this is the way to go.
If you have LVT floors already and think, “I made a huge mistake!” don’t worry. If you did not glue your floors down, this should be no problem but require some work to get them up and put them back down again. On the contrary, if you DID paste your floors to the subfloor, it will require a lot more dedication and work to get this to happen. If you lift the plank with minimal damage, you may reuse the planks. In this case, it might be wise to get some professional help.
How Do I Stop Noise Between Floors?
Dealing with a noise problem throughout your home is a massive pain in itself. No noise reduction does not allow you to create space between you and whoever else is upstairs. In other instances, you may be living in an apartment with noisy neighbors, which can take a significant toll on you if this is the case. Nevertheless, you do not need to always worry about the noise, because there are a few things we can do to reduce this and make a living within your home a much better experience.
- Use green glue: Although it is a glue, it is a soundproofing product that works very well with noise reduction. All you will need to do is apply the glue to where the noise is coming from.
- Locate the noise and address the problem: It might very well be possible that your neighbor or family member does not quite understand how loud they are. For example, a teenager typically does not realize the loudness of playing a game until someone says something.
- Use drywall: Have you considered doubling up the loud area? The denser the sector is, the better off you will be.
- Install acoustic tiles: Not only does it add style to your home, but you can put it on the ceiling to make that specific area soundproof.
- Use acoustic foam: Many studios use this to reduce noise as they are recording. Why not use it within your homes? You can also apply green glue behind the foam for better reduction.
- Consider moving: As mentioned earlier, if you live in an apartment or duplex complex, the best option for you may just be moving away. In moving, it will guarantee you some peace and comfort.
Conclusion
On average, luxury vinyl tile flooring is not necessarily noisy per se. There are a few ways to reduce your floors even more so than what they already are, especially by taking preventative measures as you install your floors the right way. Make sure you take everything into account beforehand. That way, you can ensure a long, noise-free life for your LVT flooring!