Even before we look at where expansion tanks are installed and whether it is on a hot or cold line, we need to understand what the tank involves. An expansion tank is a safety device installed on a heating system to protect fixtures and pipes in a plumbing system not fitted with a backflow preventer or check valve.
In most cases, most local plumbing codes must install an expansion tank when you install a new water heater on the municipal water supply.
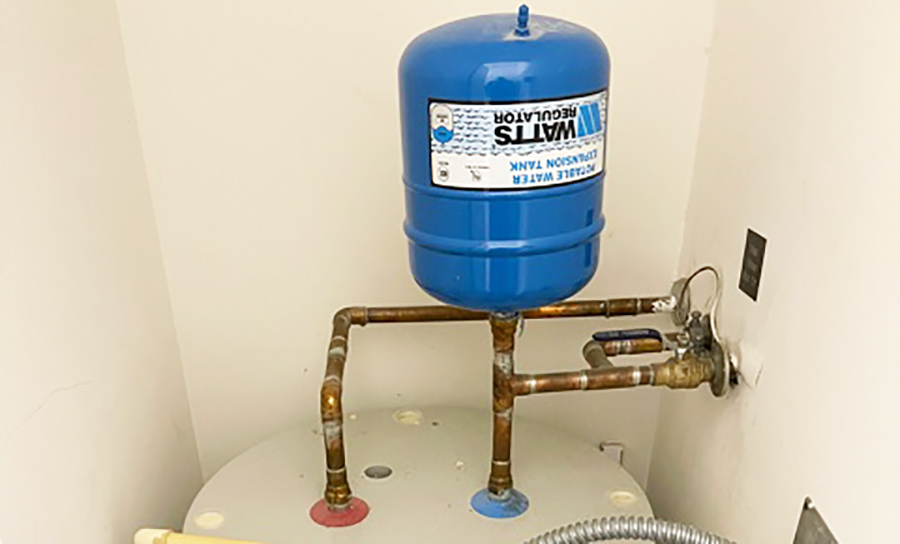
Expansion tanks are installed on the cold water pipe above the water heater. Generally, expansion tanks are installed in an upright position. However, they can be installed inverted or on their side, provided it is strapped for support. A water heater expansion tank is a small air-filled tank that acts as an expansion chamber to control increased water volume created as water is heated and expands.
This article will explore where an expansion tank is installed and how to manage an installation by yourself.
How an Expansion Tank Works
An expansion tank is required in certain circumstances and can help a water heater last longer. We all know that water expands when it’s heated. Without an expansion tank linked to the water heater, any closed plumbing system can undergo severe damage due to thermal expansion.
For instance, when you heat water from 50 to 120 degrees Fahrenheit, its volume rises by about 2%. If you have one in place, it offers space for expanding hot water, reducing excess pressure on the pipes, fixtures, and water tank.
Expansion tanks are essential in closed plumbing systems. Backflow valves or pressure-limiting valves prevent the expanding water from flowing back into the central water supply unit. It has two sections; the first one has an air chamber pressurized when the diaphragm expands, while the other section accepts expansion water when it heats.

Expansion Tanks Might Be Mandatory
Installation of a water heater requires a plumbing permit. You get to learn about the requirements of an expansion tank when you’re applying for a plumbing permit. In most cases, though, you might be forced by your local authorities to install a water tank, where you have a water heater.
However, an expansion water tank isn’t necessary if your system doesn’t have any backflow or pressure limiting valves. If your system has those valves in place, it would be wise to install the tank even if your local code doesn’t make it mandatory.
Where to Install an Expansion Tank
Where would you install a new expansion tank? First, use a tee-fitting above the water heater on the cold water delivery pipe. The tank is usually positioned horizontally.
However, in cases where you have limited space, you can install the tank vertically. The plumbing fittings you’ll require for installation will depend on the types of pipes you have and the tank orientation.
Connections during installation are made using copper fittings and pipes. The expansion tank has a 3/4-inch fitting joined to the cold water pipe using a tee fitting and threaded or sweat-soldered or short-length pipes.
Supplies and Tools You Need During Installation
There are various supplies and tools that you must have ready while installing an expansion tank, as highlighted below:
- ¾-inch copper tee-fitting
- Pipe-sealing tape
- Thermal expansion tank
- ¾-inch copper pipe
- Copper flex pipes
- Dielectric water heater nipple
- A plumbing soldering equipment
- Channel-lock pliers or pipe wrench
- At least two ¾-inch female-threaded copper unions
- Extra ¾-inch copper fitting
Preparations for Installing an Expansion Tank
If you already have an expansion tank and want to add another one on top, you must first drain water from the water heater. Before you start, you must ensure that you have enough space over the water heater to place the expansion tank.
If you are making a completely new installation, there is no need to drain anything. Therefore, it would be best to skip directly to the processes of installing the tank. First, let’s look at how you can prepare for installation by draining the tank:
- The first step is to turn off the mainline supply of water that connects directly to the cold water side of the heater.
- You can then join a hose on the drain valve below the heater and run it to the other end of the nearest drain.
- Release pressure from the water heater tank by opening the drain on the hot side of the closer faucet and the water heater. Don’t open the valve too fast or too much; this may lead to a slide from the drain.
- After draining for some minutes, open the T&P valve slightly to test the pressure. If there is no pressure, head to step 5. If you notice some pressure, wait for a few minutes and then repeat step 4.
- You can finally shut off the faucet and turn off your drain valve once you notice that there is no more pressure from the water heater.
Steps to Installing an Expansion Tank
After preparations, this is now the time to install. First, however, there are steps that you must follow if you want to be successful. Let’s look at these steps:
Make a Plan
Nothing successful starts without a plan. Even the most successful military expeditions begin with a plan on paper. For this project, you need a good plan to run a branch line off to the expansion tank from the hot water tank cold water application.
Please sketch the diagram. You can also obtain the right fittings that you will need to operate a line from the expansion tank up to the tee-fitting inserted in the cold water supply line. If you’re lucky, you might only require a single Tee-fitting and one fitting for the end of the expansion tank.
There usually is at least one elbow fitting required.
Choose Your Spot
The installation can be more straightforward if you have PEX lines in your apartment. If there are copper lines, everything is still doable but can be somehow complicated. The first step here is to decide the exact location where you would like to mount the expansion tank.
The expansion tank should be mounted above the water heater by 18 inches. It should also be closer to the water heater.
I doubt you’ve seen some that are connected to a copper pipe that sticks straight up in the air. Although this might still work, it isn’t recommended. If the copper pipe snaps at any point, your basement will turn into a swimming pool.
You should save your effort and get a universal expansion tank mount. These mounts fit with almost every tank and are likely to keep yours secure.
Acquire Relevant Hardware
Apart from tank brackets and the expansion tank, additional hardware must complete the project you must acquire. These include a few fittings, some Teflon tape for making a worthy connection, and a fitting that links your expansion tank to the size water lines.
You can use PEX push to link fittings. However, if you have copper, you can do either of the following things: purchase some PEX push that can fit fittings because they connect PEX and copper pipes, or acquire a copper fitting and learn how to braze them.
You might be forced to cut a small part out of the copper pipe cold water supply before you insert a PEX tee-fitting. However, this is a simple task that you can do by yourself.
If you have galvanized steel pipes, it’s time to replace them.
Mount Bracket and Prepare Tank
The first thing you should do here is using Teflon tape to attach the connection fitting to the end of your expansion tank. It would be best if you remembered that the fitting you require on the side connecting to your expansion tank is ¾ female. Your copper pipe or size PEX, on the other hand, is ½ inches.
You can proceed to have the expansion tank bracket mounted. The mounting is necessary before you attach the expansion tank.
TIP: Always confirm that the air valve on the opposite of the water connection is reachable and there is enough room for attaching a bicycle pump. At some point, you’ll need it if you need to adjust the pressure. For instance, if the water pressure is lower or higher than 50 PSI, you must release pressure or pump the tank to match the pressure within the water system. Get the pressure as close as possible to the 50 marks. It’s essential to check and adjust the pressure before mounting the tank.
Turn Off the Water Supply and Mount the Tank
At this point, turn off the water supply to your home. It would be best to open the lowest faucet to drain water pressure from the water lines. Next, you can turn off the water heater and mount your expansion tank on the tank bracket.
Add a Tee-Fitting
Hold or place a towel below the point that you’ll insert a tee-fitting into the hot water tank’s cold water line. You’ll notice residual water there that will leak. You can then cut your supply line where you would like to insert the tee-fitting.
Use the tee-fitting to estimate how much you must cut the line for the tee to fit. Then, depending on how you run your PEX, you can bend it so that you don’t have to cut out any part at all.
Take note of the expansion tank’s direction, and the line between the tee-fitting will run. You must insert the tee-fitting in such a way that the connection linking to your expansion tank faces in that direction. Then, push and crimp the other two joints to the tee-fitting.
Connect the Expansion Tank to the Tee
Cut a piece of Pex that runs between the tee-fitting and the expansion tank. If there are any other fittings between these two, you’ll have to cut several pieces of PEX to link them as well.
Quality Control Test
Once you have connected all the fittings and the complete line between the cold water supply and the tank is running, you can now test for leaks. The faucets that you turned on to drain out water and pressure should remain open at this point.
You can then open the valve linking your home to the main water supply. Close the faucet as soon as you see a steady stream of water flowing out. Confirm that there are no leaks on all the fittings that you installed.
If you notice leaks, you should turn off the supply to your home, drain water and pressure again using the same faucet, and check the new fitting connections. Leaking ones will require more pushing or crimping to acquire a better joint.
Once you’re sure that the connection is fixed, go through the turn-on process again.
Hot water
Finally, restart the hot water tank.
Need more information on water heater expansion tanks? Check out this YouTube video below.
Why is the Expansion Tank on the Cold Water Side?
As we have seen above, the water heater expansion tank is placed on the cold water side of the water system. This can be attributed to the fact that the tank isn’t insulated.
When the expanded water volumes get into the tank, it’ll cool due to being closer to the cold water. Therefore, the expanded water passes through the cold water before leaving through the faucets.
Should My Expansion Tank Be Hot?
One of the most common questions is whether the water heater expansion tank should be hot. Unfortunately, the outright answer is no. The top section of the tank should be warm, while the bottom part should be at room temperature.
If the whole tank is warm, there is a high chance that the entire tank is full of hot water. The situation is only possible in cases where the diaphragm fails.
Conclusion
It is now clear that the expansion tank installation involves splicing into a cold water pipe above the water heater. A small air-filled tank is attached to act as an expansion chamber that controls any rise in the volume of water. Since this is a safety device installed on water heating systems to protect fixtures and pipes, you must comply with any available plumbing codes where applicable.