Floors that are sagging, shifting, or wobbly may indicate a severe issue beneath the flooring. If it occurs across an entire, it’s almost certainly a sign of widespread floor joist failure.
Sistering a floor joist is the best way to fix a rotten or broken floor joist. Sistering a floor joist involves joining a new joist to an old joist to restore structural strength to the floor structure.
If your flooring is sagging, it’s time to make some repairs. Continue reading to learn how professionals use joist sistering to mend old or damaged floor joists.
What a Floor Joist Does and Why it’s Important
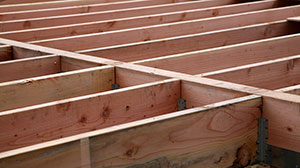
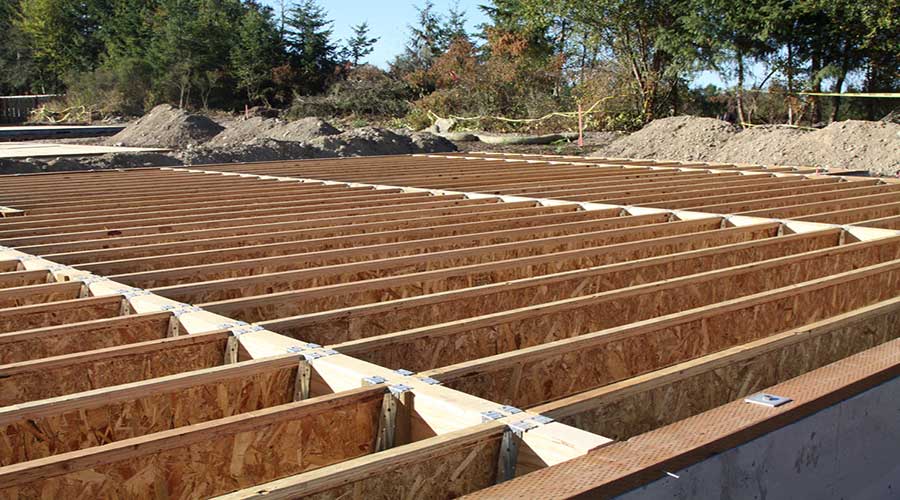
Floor joists support floors, which span from beam to beam and provide structural support for a room. Most people know that if your floors don’t have joists, they won’t have any structural support and will collapse due to the weight in time.
They not only support your floors, but they also bear the weight of the walls, ceilings, furniture, and appliances that you place on them.
Common Causes of Floor Joist Damage
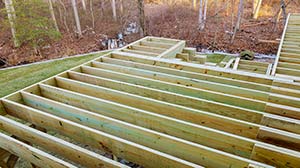
The most common floor joists in houses are dimensional lumber or engineered wood products. Depending on the house’s location and building codes demand, these joists might be doubled or tripled to provide extra load capacity.
Integral strength failure of floor joists is typically due to:
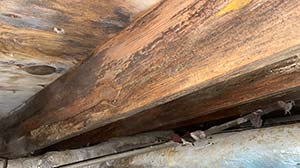
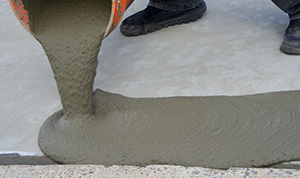
- Wood deterioration due to a damp crawl space. Crawl spaces are frequently full of moisture from exposed wet ground, groundwater flooding, runoff water intrusion, and outside humidity. Prolonged moisture exposure weakens the wood, causing it to decay.
- Water damage is another common cause of joist failure. Wood may deteriorate faster if a house has a plumbing leak. Furthermore, if joist damage from water occurs, it will accelerate the deterioration and movement even more.
- Termite damage is the most common reason for floor joist failure. Termite infestations in homes cause significant structural damage. Termite damage can destroy the structural strength of the house, causing floors to sag under weight loads.
Signs Your House May Have Structural Damage
A sagging floor is the most evident symptom of a home’s structural flaws. Floor joists help distribute the upper floor and roof load from load-bearing walls to the foundation. Under proper load, the joists should keep the floor level.
Doors that stick or drag, cracks in walls or ceilings, bowing floor beam or ceiling beams, and foundation cracks are all indicators that a home’s structural strength is compromised.
Get a Structural Inspection
You should get a consultation from a licensed contractor and even a structural inspection from a structural engineer (if need be) before making any repairs. The problem could be more complicated than you even realize. You can expect a structural inspection to cost $500 to $800 from a structural engineer.
Fixing Structural Damage with Sistering Floor Joists
Sistering floor joists involve adding an identical floor joist to a damaged or inadequate floor joist and ties the two together with 16d common nails, screws, or bolts. It is a very effective way of adding the additional strength needed to hold up a sagging floor. Let’s take a closer look at how you accomplished this.
Leveling the Floors
Sagging floors are usually a telltale sign of floor joist damage. To lift the joist to level, you can use a screw jack post or a hydraulic jack.
To raise a sagging floor, attach a screw jack and beam beneath to push the damaged sagging joist to level. A screw jack is a metal support pillar that rises or lowers via the turning of a threaded steel pipe within it (hydraulic jacks are frequently used for this purpose as well).
If several floor joists have significant sags, professionals will employ several jacks to accomplish the heavy lifting. A 4ft level against the joist may show how much you need to raise the floor.
Lifting a home is always accompanied by the risk of damage. Lifting floor joists can cause cosmetic damage to the paint, drywall, flooring, countertops, and other surfaces. It would be best if you jacked the home up slowly to minimize damage, but some cosmetic damage is inevitable. A good rule of thumb is not to jack the floor more than 1/8 inch per day.
Sistering the Joists
You repair a damaged joist by attaching a new sister board to mend the floor joists. Typically, the replacement lumber to sister joists will span the entire length of the inadequate joist. Scabbing is the process of adding a short piece of dimensional lumber to such a sister a small area of damage.
Sometimes, it is necessary to sister both sides for load-bearing joists for added strength.
Everything You Should Know About Sistering Floor Joists
Sistering floor joists increase the structural support for the subfloor above the joists. A straight piece of lumber with the same length and width as an existing floor joist is installed flush against it.
We’ll go through everything you need to know about sistering floor joists in this post, including:
- How to install a sistered floor joist?
- When you need to sister a floor joist?
- What potential problems may occur when sistering floor joists?

What is Sistering Floor Joists?
Adding a similar-size and -width dimensional lumber is one of the most frequent ways to repair a sagging floor joist. The sagging joist is then mechanically fastened to the additional piece of wood using nails, screws, or bolts. In essence, sistering joists attach a new joist to an old joist.
There are various ways to sister a joist, although not all require dimensional lumber. The most frequent technique for sistering a wood joist is to utilize the same-sized dimensional lumber. Another method is using plywood, OSB, and even metal flitch plates to sister wood joists.
Fixing a broken floor joist is easier with sistering floor joists. Still, it might be a time-consuming operation because you’ll have to remove electrical wiring, plumbing, HVAC ductwork, or other utilities that could obstruct access to the faulty joist.
Why You Sistering Floor Joists is Preferred?
Sister is an essential component in repairing and restoring wood damaged by rot or termites. Sistering floor joists repairs sagging, weak, and rotted joists. A large span of rotten joists, far-apart joists, or failing joists can all cause a floor to sag. You will need to sister the old joist or replace it entirely in any of these cases.
- Repair bouncy floors
- Level the floor and repair sagging joists
- Repair damaged or rotten floor joists
The second most prevalent reason for sistering a joist is to repair a sagging floor. Joists may bend as a result of being undersized or rotten over time. Spacing floor joists too far apart means fewer joists have to carry the load.
In some situations, sistering one or more weak joists after raising the old joists to the intended height will permanently repair a floor sag.
Finally, if you have the time and inclination, visually inspect your floor joists and discover that some are rotten in spots or have soft areas due to moisture damage.
It’s critical to replace the joists in this situation because they’ve lost their ability to support a proper load. In some instances, sistering the damaged joist is required.
What Building Code Says about Sistering Floor Joists
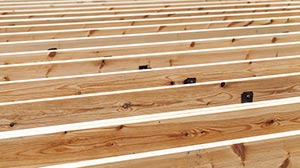
Building codes are guidelines for new home construction. There is no specific building code for sistering joists because it reinforces an existing floor structure. Licensed contractors still look to repair floor joists within 12 to 24-inch spacing, with 16 inches on center as the preferred method.
Sistering is only relevant when floor joist damage occurs or improper construction methods. Neither of which the building code regulates.
Since building code guidelines has no explicit language for sistering floor joists, you won’t need building permits to sister a floor joist. Building inspectors inspect new residential and commercial structures (and some remodeling projects) for building codes.
Best practices indicate that the sister joist runs the entire length of the damaged joist from end to end. You can use double joist hangers to secure the sister joists from bearing wall to center beams.
To prevent a joist from extending the whole length from bearing wall to beam, remove the damaged area and attach a header to the adjacent joists with joists hangers. To attach them to a bearing wall or beam, they must be sistered on both ends and supported on both sides.
A home inspector can help you by inspecting floor repair work that a building inspector does not.
How Long Does a Sister Joist Have to Be?
Sistered joists don’t have to run the length of the original joist. While no steadfast rule exists for how long a sister joist should be, sound building practices recommend that a sistered joist be one-quarter (1/4) the length of the original joist provided the sister joist extends at least 3 feet past the damaged portion of the joist.
If damage is present across the entire joist, you’ll need to sister or replace the whole joist.
Sagging in a joist is referred to as deflection. A sister joist that isn’t identical to the original joist may still help relieve deflection in the joist. However, the sister joist needs to be at least 2×6 in size.
If you don’t have a lot of room and need to repair a sagging or damaged joist, you can sister a joist halfway through, ensuring that the damaged region is at least 3 feet from each end. The farther apart from the deflection point you can get the sistered joist, the better.
Sistering a joist with the point of deflection as one end will not result in significant sag reduction. Sistering a joist not beyond the damaged portion will do little to stabilize the floor. A sister joist in the center without extending to either the beam or the bearing wall can make the floor sag worse.
When sistering a joist, connecting the joists is critical since the fasteners will transfer the load from the original joist to the sister joist.
The fasteners at either end of the sistered joist, if there are no bearing fasteners, will experience the most stress and have the most fasteners than the center of the sistered joist.
Cost to Sister a Floor Joist?
You can expect to pay $100 to $300 for each sistered joist. Using a pressure-treated floor joist may cost more. Total cost varies based on the amount of work needed, the number of joists that need repair, and any subsequent repair work required.
How to Sister Joists
Sister joists is a little more complicated than some may think. As inspectors, we often see sister joists done incorrectly. It’s often cumbersome to remove numerous utilities to create a clear work area to correctly sister the joist. We often see this step skipped, leading to a partial sistering or an inadequately attached sister joist.
As with any construction project, the prep work sets the project up for success.
1. Remove Obstructions like Wiring, Ductwork, or Plumbing
There’s no way around this if you successfully sister a floor joist. Yes, it’s time-consuming, but it’s worth it. You should remove all electrical cables, plumbing, ductwork, and other obstructions to allow room to work safely.
For many, cutting pipes, moving wires, and moving ducts is a labor-intensive process that may cause workers to partially sister a joist. For excellent support of your subfloor, we advise running a sistered joist the entire length of the initial joist.
2. Measure and Cut New Joist
Measuring an Entire Sister Joist
You’ll need to count and measure each damaged floor joist. We recommend starting with the full-length joists first. Measure the old joist from the bearing wall to the beam.
If your rotted joist is 12 feet long, you need a sister joist of 12 feet for a full-length repair.
Measuring a Partial Sister Joist
You’ll need to make two cuts here. The two cuts can come from one longer new piece of dimensional lumber.
When a short section of the joist has rotted, a partial sistering is sufficient, but you’ll need two pieces of the joist to complete the repair.
For example, if three feet (3′) of the end of the joist is damaged, you’ll need a 3′ scab joist and a 6 feet sister joist.
In this scenario where a partial sistering of the end of a joist, we recommend cutting out the damaged area and inserting the 3′ scab piece of a joist, then attaching the 6′ sister joist across the mended area.

3. Setting the New Sister Joist
It may be challenging to get a full-sized sister joist to fit on either the bearing end or the beam against the old joist because your old joist has shrunk or bowed from deflection.
When jacking a floor joist, it’s crucial to jack slowly and carefully. Jacking a floor can cause interior damage. It’s best not to jack a floor more than 1/8 inch a day.
When jacking a floor to level, we find it best to place a 2×4 under the edge of the joist to the sagging joists. If a suitable opening does not exist, you may carefully and slowly jack up the old joist to level the floor structure and fit the new joist into position. Be cautious because if you jacked up the old joist too far, you might damage interior drywall, floors, or ceilings. It’d be best to have a partner inside with a 6-foot level to let you know when the floor is level.
You’ll then need to apply a bead of construction adhesive in a back and forth manner across the old joist.
Using a jack post or a floor jack with a piece of wood placed directly below the old joist beside the beam or wall it rests on, you can set the sister joist in place. Use clamps to hold the sister joist tightly to the old joist until fastening is complete.
About 6 inches from the end of the joist, drill a 3/8 inch hole through both joists. Insert and tighten a 3/8 bolt. Then repeat the process to set the other end of the sistered joist to match the old joist. When in place, drill a 3/8 inch hole through both joists, insert and tighten a 3/8 bolt on the joist end. Drill another 3/8 inch hole in the middle of the joist, then insert and tighten.
When installing a partial joist, you can set the jack under the good portion of the joist and carefully jack up the old joist to level the floor structure. Insert the scab piece of the joist and place the sister joist next to it. Remember to apply the construction adhesive and clamp it in place while fastening the joists together.
4. Fasten Sister Joist
You can fasten a sister joist using 3-inch lag bolts, structural truss-lock screws, or 16d nails. We find that lag bolts or structural screws work best. Joists experience strong vertical shearing forces, requiring structural screws or lag bolts.
Using an impact driver, attach structural screws every 24 inches in a staggered pattern. Be sure to not place a bolt or screw within the top or bottom 2 inches of the joist.
You may also utilize 4″ carriage bolts at the same intervals. To prevent cracking or breaking, you should place bolts 2″ from a joist’s edge.
When nailing a sistered joist, you should alternate top, middle, and bottom nails every 6 inches. Put three nails in a few inches from either end of a partial sistered joist: top, middle, and bottom on each end.
If no ledger board is present, use a double joist hanger on each end to secure the double joist to the bearing wall or beam. You’ll need 2-1/2 inch structural screws to secure the hanger to the beam and 1-1/2 structural screws into the joists.
5. Reinstall Ducts, Pipes, and Wiring
Once you’ve finished sistering the joists, you’ll need to reinstall any removed ducts, wiring, or plumbing pipes. Use plastic clamps to secure wiring and plumbing lines to the bottom of the joists—strapping works best for hanging air ducts.
Sistering Engineered Floor Joists
While this article focused on standard wood joists, many modern floor joists are either engineered floor joists or LVL joists. These can encounter the same problems as dimensional lumber wood joists, such as sagging and bouncy floors. Fortunately, you can do floor repair to these engineered joists as well.
Engineered Wood I-Beams
Replacing engineered I-beams with dimensional lumber is challenging because the widths of I-beams do not always match the actual widths of dimensional lumber.
Not only are they heavier, but I-beams have flanges on the top and bottom with a center webbing which means you’ll need to add another piece of wood between the web and the sistered joist to close the gap.
Because I-beams are difficult to match width-wise with dimensional timber, they are frequently sistered with a piece of plywood or OSB. In these circumstances, it is still preferable to parallel the I-beam’s length of the original joist. If not, keeping the sistered joist as long as feasible is a good idea.
The web thickness of most I-beams is 1″ greater than the outer edge of their flange. You’ll have to fill that gap with two layers of plywood or OSB, one piece on each side of the webbing. To ensure no overlaps, stagger the pieces and arrange them staggered.
According to theplywood.com, “CDX construction plywood to both sides of the damaged floor joist can actually produce a stronger joist than using solid dimensional lumber.”
Once you’ve finished filling in the web, make a sister joist with 3/4″ plywood, continuing to stagger your plywood over one other.
Except that instead of using two separate pieces, you’ll sister them with the same nailing patterns as before. The thickness will be lower than if you were sistering two standard pieces of dimensional lumber because the nails would be 8d common nails.
Laminated Veneer Lumber (LVL) Floor Joists
If you have damaged laminated veneer lumber (LVL) floor joists, the technique for sistering them will be similar to that of sistering dimensional lumber. If possible, try to obtain wood equal in width to your LVL joist. If you can’t find dimensional lumber with the same joist depth as the LVL, you can use the construction plywood method described above.
Using 1/2 inch CDX construction plywood allows you to cut the piece of plywood to the exact joist depth as the LVL and attach it on both sides of the LVL floor joist with a bead of construction adhesive and screws or bolts.
Because LVLs beams span long distances that exceed the maximum length of dimensional lumber, you’ll only be able to partially sister the joist. If this is the case, follow the same steps as when sistering dimensional wood.
Avoid These Mistakes When Sistering Floor Joists
Floor joists help support upper floors and transfer the load to the foundation, making them essential to the building structure. Repairing floor joists requires skill, and it is crucial to make sure that everything goes smoothly. Please don’t rush this job, as it could cause other problems down the line.
Failure to Address the Main Problem
If termites cause damage to the floor structure, call a professional exterminator to treat the house to prevent the termites from returning. Termites are subterranean, meaning they live underground and could return, causing damage to the new sister joists.
You should address water damage before repairing the joists. Rotting wood may be due to mold, and you should also take care of it. If you have a groundwater problem in the crawl space, an encapsulation system is your best option for permanently controlling the crawl space moisture.
When you encapsulate a crawl space, a reinforced moisture barrier and dehumidifier will work to keep the crawl space dry.
Fix any leaking plumbing pipes. Plumbing leaks cause moisture problems that won’t go away. They’ll only get worse.
Ductwork condensation can also cause structural wood rot to occur. If your ductwork produces a lot of condensation, it can cause mold and rot to return.
If you don’t address the problems causing the damage to floor joists, then it will only happen again.
Notching Too Much
Generally, it would be best to use a 2×8 or larger dimensional lumber for new floors. Old houses, however, might have 2×6 joists instead. You can easily over-notch joists which weakens the joist. Be sure not to notch over 1/6 the depth of the joist and no more than 1/3 the depth of the joist in length. Notches on the joist ends should not exceed 1/4 the joist depth.
For more details on notching or drilling joists, see How to Safely Notch or Drill Floor Joists (& Alternatives).
Not Leveling the Floor
Generally, when a joist fails and starts sagging, the upper floor will become uneven. Gaps can form between the floor and the baseboard. When you don’t level the floor before sistering the joist, a full joist likely won’t fit or line up correctly.
Failure to level the floor often leads to partially sistered joists that won’t support the floor and a fully sistered joist.
Not Securly Fastening the Joist
A sister joist can’t transfer the damaged joist’s load if it is not attached correctly. Failing to use construction adhesive to bind the joists together can cause gaps to form. To maintain the integrity of the floor structure, use lag bolts or structural screws to secure the joists together.
Ensure the bolts ar screws are staggered in a zig-zag pattern and not within the top or bottom 2 inches of the joist.
Not Covering Enough of the Bad Joist
A common problem is sister joists that do not cover enough damage or extend past rotten areas more than a few inches. A sister joist needs to extend past the damage at least 36 inches to ensure the repair is done correctly and won’t fail in the future.
Not Supporting the Repaired Joist
Rotting rarely occurs only in the center of the joist. Most joists form damage along load-bearing enter walls or center beams.
Damage along exterior walls usually occurs from water intrusion behind an exterior door or porch. Damage along center beams usually occurs from ductwork condensation or plumbing leaks.
When making repairs, be sure to repair ledger board damage that the joist sits on or install double joist hangers to support joists that do not have ledger boards. Joist hangers help prevent the repair from pulling away from the wall or beam and help to hold the joist up.
Not Seeking Professional Help
While it is possible to repair floor joists yourself, it isn’t a DIY job. You’ll likely need the help of a friend to help. If you find you are in over your head, seek help from a contractor or structural engineer.
Conclusion
The most challenging aspect of sistering a joist is no clear code of practice to assist us. Every situation is unique, and the remedy for your weak or twisted joists may be quite different from someone else’s.