Learning the hard way about the importance to encapsulate a crawl space is common. Many people don’t notice their crawl space wet until too late. Even if a home looks perfect above ground, the area under the floors might be damp.
Over time, this dampness can cause fungi and molds to grow under your floorboards. This can weaken the beams and lower the air quality in your house. Also, unwanted animals like rats might find their way in. Keeping the crawl space under your house dry and sealed is crucial.
If there’s not much moisture damage, you can fix the crawl space yourself. This process is called encapsulation.
Encapsulating a crawlspace involves the following:
- Covering the dirt floor so that any moisture in the ground cannot rise onto your floorboards
- Insulating the sidewalls
- Sealing off any vents or openings to the outside where moisture could enter from outside
- Installing a dehumidifier to keep the air below your home dry.
Benefits of Encapsulating Crawl Spaces?
Encapsulating your crawl space stops moisture from reaching your home’s wooden frames and floors. This moisture can cause rot, weakening your home’s structure. Also, mildew and mold can grow, releasing spores that harm the air quality inside your house.
Sealing the crawl space also keeps out termites that eat wood. These termites can enter your home unnoticed and cause a lot of damage.
Another benefit of encapsulation is energy savings. By covering the soil under your house, you insulate your home from direct contact with the ground.
Let’s Get Started!
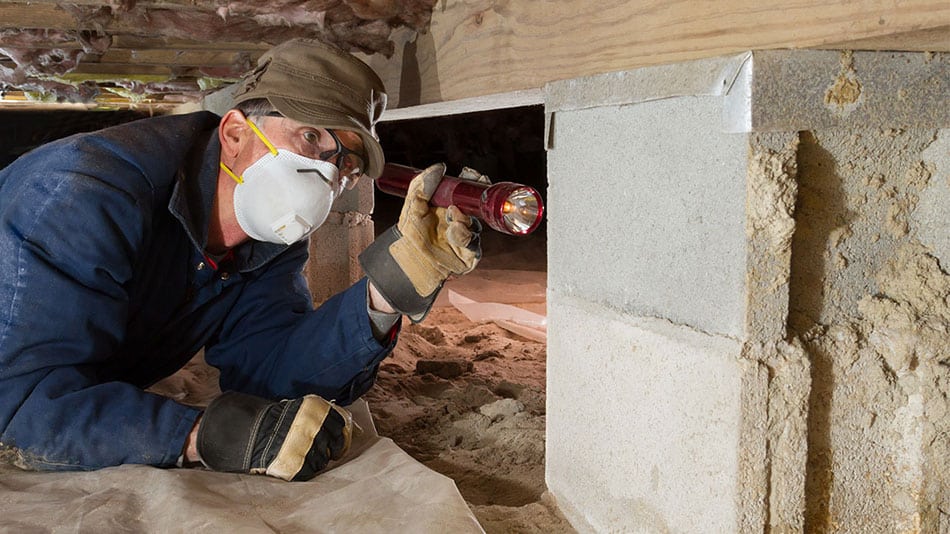
Step 1 – Perform a Thorough Inspection
The space under your house can be intimidating. It’s usually cold, damp, and dark, with pieces of old construction debris scattered around. When you inspect it, note what needs fixing to repair any existing damage. Also, understand the layout well before you start encapsulating the area.
Things to look out for when doing the initial inspection:
- Look for water seeping into the crawl space.
If yes, check your guttering and grading around the house. Sump pumps are essential in managing water intrusion, especially in areas prone to flooding or high groundwater levels. Installing a sump pump can significantly reduce the risk of water damage in your crawl space. Encapsulating the crawl space won’t be effective if groundwater seeps under your home. Remember all seasons’ weather while doing this – do your inspection based on the rainiest season.
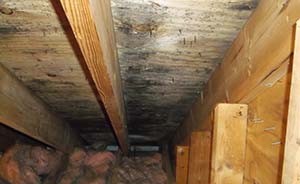
- Check for damage to the wooden beams and joists.
If there is any sign of rot in the floor beams, you must replace all damaged sections before continuing.
- Check for signs of mold.
Use a
To clean visible mildew, use a foaming spray or a mold-killing chemical. It’s crucial to clean and completely dry these areas before beginning encapsulation.
After cleaning, sweep up any debris. You might also want to use a fogger as an extra step after spot-treating mildew. This helps ensure no spores grow back.
A product like DWD2 Home and Commercial Mold Treatment is ideal. This type of aerosol is designed to kill all microscopic and airborne spores that might still be around.
- Carefully inspect areas where your gas appliances backdraft.
Once you have encapsulated your crawl space, the last thing you want is for toxic fumes from some of your gas appliances to vent into a sealed area. This could be hazardous if the fumes build up too much.
- Level out the ground as much as possible and note areas you will need access to in the future.
While inspecting, clear out any bricks, rubble, or old beams left from when the house was built.
Pay extra attention to finding sharp objects like nails or metal pieces that might puncture the vapor barrier later. Covering the ground is easier if the area is tidy and flat.
- Measure the surface area and the height of the walls
Since you are already down there, take your tape measure along and note the size of the area you will need to cover. You should mark special requirements like specific areas of plumbing and wiring that will need to be while encapsulating the area.
Step 2: Seal the Area off From the Outdoors
Older buildings often have multiple vents, some even decorative from the outside. They were meant to allow airflow under the structure, but this isn’t very effective, especially in humid climates.
These vents can also be entry points for critters and bugs. For example, I once had to call bee removal experts to relocate a swarm that had built a hive in the crawl space, which was challenging.
To prevent such issues, seal all openings to the outside. Sealing crawl space vents is crucial to stop excess moisture and pest infestation, including mold spores, from entering the space. This also aids in maintaining the encapsulation process. Use foam board and foam spray to close all gaps completely. A good tip is to work on a sunny day. When inside the crawl space, turn off your
You aim to create a sterile cushion for the building to rest on, so ensure all holes are properly sealed.
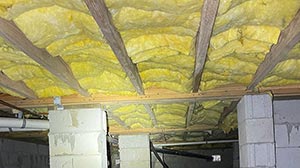
Step 3: Add a Thermal Barrier to Your Walls
Adding a thermal barrier to the walls of your crawl space helps maintain a consistent temperature throughout the year. This can lead to savings on your heating and cooling bills, which is worth considering.
You can use foam insulation boards around the outer walls of the crawl space or only in areas that need extra attention. Use spray foam insulation for a tighter seal, especially around the rim and band joist areas. This helps create a more sterile space and improves the entire crawl space air quality.
Insulating the foundation wall is vital for maintaining moisture and preventing wood rot. This step ensures the structural integrity and longevity of your home’s foundation. For instance, focusing on those areas would be beneficial if your house faces the sea or often experiences harsh weather from a particular direction.
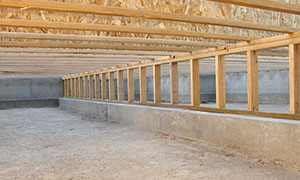
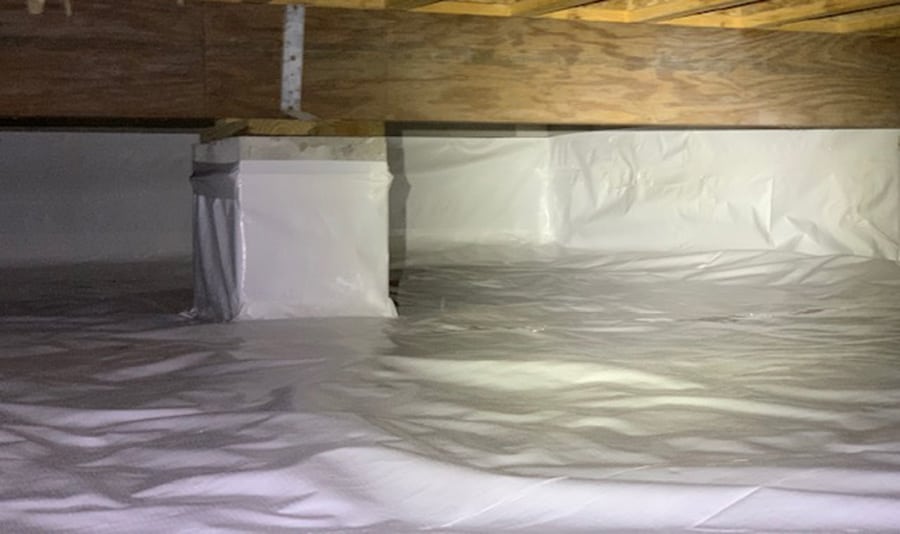
Step 4: Decide on the Thickness of the Vapor Barrier You’ll Need
Vapor barrier plastics are available in different thicknesses, ranging from six to 20 mils. Thicker plastic resists punctures better and lasts longer. Reinforced plastic is a smart choice for storing items in your crawl space.
When selecting a vapor barrier’s thickness, consider your crawl space’s ground condition. For areas with bare dirt, a thicker, reinforced plastic is often the best option for lasting durability and effectiveness. A plastic vapor barrier is key in controlling humidity levels and preventing moisture buildup. Ensure it covers the entire crawl space floor for effective encapsulation.
Step 5: Calculate How Much Vapor Barrier You’ll Need
When calculating the area you need to cover, don’t forget to purchase enough material to overlap at each seam. You must work out the amount required to cover the entire floor area and the walls. The overlap should be at least 6-12 inches at each seam.
Step 6: Tape the Seams to Seal the Barrier
It is vital that the vapor barrier material sticks properly to the top of the inside wall and that there are no gaps. Generally, you will need a lot more tape than you think! Remember that you may want to wrap a few strips around the top of piers or towers to ensure no moisture can enter the area.
There are a few different types of tapes and fasteners that you may need for various sections while securing the vapor barrier.
- Vapor Tape – is the standard type of tape that seals and waterproofs.
- Butyl Tape – use a specially designed tape that keeps the liner in place while you apply it to the sides for tougher spots. This double-sided tape makes it perfect for areas where the liner overlaps. It prevents the seams from pulling apart as you work. Later, you can use regular vapor tape to secure the loose top edges. This way, you won’t catch on them if you need to go back into the crawl space.
- Christmas Tree Fasteners – these are also called ratchet fasteners, used to secure softer materials to solid objects. Drilling through the Butyl tape regularly allows you to create an airtight, secure seal.
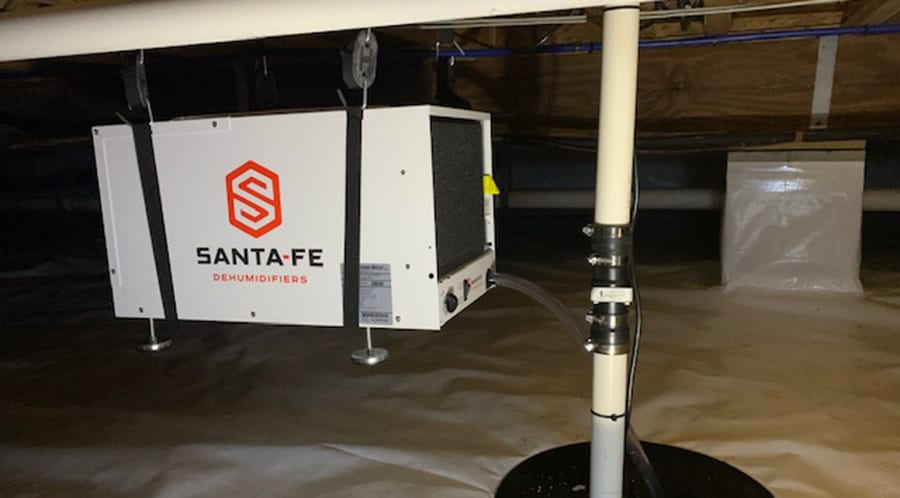
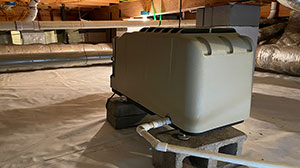
Step 7: Install a Dehumidifier
If your crawl space hasn’t had damp issues, you don’t need a specific dehumidifier. Just check regularly to ensure it stays dry. If needed, you can use your regular dehumidifier for a few hours, or run an electric fan for a couple of days to ensure the space is completely dry.
However, if you’ve had damp problems before, consider installing a commercial-grade dehumidifier designed for crawl spaces. These are smaller than regular units, fit easily into the space, and can drain outside.
I suggest the Santa Fe Compact70 Dehumidifier from Amazon. It’s effective for crawl spaces. Avoid using an indoor dehumidifier there, as its collection bin fills up fast and will shut off if not emptied regularly.
You’ll also need a condensate pump to remove the collected water. The Little Giant Automatic Condensate Removal Pump with Safety Switch, also available on Amazon, is a good choice.
You’ll need a GFCI-protected outlet for the crawl space dehumidifier and condensate pump. You should call an electrician to install an outlet protected by a GFCI breaker. You should do this so that if the GFCI trips, you can easily reset it without going into the crawl space.
You can find both the dehumidifier and condensate pump on Amazon:

- For Basements & Crawl Spaces up to 2600SF
- Removes 70-Pints Per Day
- Freestanding or Ducting Installation Options
- Cleaner Air with MERV 13 Air Filtration
- Auto Restart After Power Outage
- Auto Defrost Function
- Energy Star Rating
- 6-Year Warranty

Step 8: Don’t Forget the Access Door
Before wrapping up, seal the edges of the access door to the crawl space with insulation tape. The door might have been open during your work, so check for any gaps around the frame that could let moisture in before you leave.
Step 9: Do Regular Inspections of the Crawl Space
Once you’ve finished, the last step is to check that everything remains intact regularly. Over time, tree roots or burrowing rodents might damage the barrier seal on the floor, so it’s worth looking around occasionally. The most important time to do this check is before winter begins. Any tears in the vapor lining could let cold air into the space, lowering your house’s temperature.
Encapsulate a Crawl Space FAQs
Is it a good idea to encapsulate a crawl space?
Encapsulating a crawl space can be beneficial for moisture control, improved air quality, energy efficiency, pest prevention, and protecting the structural integrity of your home. For complex cases, consider hiring professional crawl space encapsulation services. They can provide expertise in handling crawl space mold and ensure a thorough encapsulation process.
How long does crawl space encapsulation last?
Crawl space encapsulation typically lasts 10 to 20 years. Its longevity depends on the quality of materials used, professional installation, environmental conditions, regular maintenance, and the level of usage of the crawl space.
Should a crawl space be completely sealed?
Sealing a crawl space is beneficial for controlling moisture and pests, but it should not be completely airtight. Adequate ventilation is necessary to prevent issues like radon gas accumulation and excessive humidity. Compliance with local building codes is also important.
What is the best material for crawl space encapsulation?
The best material for crawl space encapsulation is a thick (10-20 mils), reinforced polyethylene vapor barrier. It should be waterproof, chemically resistant, and UV-resistant if exposed to sunlight, ensuring durability and effective moisture control.
Conclusion
The crawl space under your home doesn’t need to be a damp, musty area filled with cobwebs. You can create an insulated cushion beneath your home’s floor by encapsulating it. This will protect the wooden structure from rot and help you save on energy bills.