All it takes is one squeaky board on the floor to wake up the entire household. And it doesn’t matter where it is located, and it is always loud enough to be heard throughout the house. Thankfully, squeaky floors are fixable. But, what causes creaking or squeaky wood floors, and how do you fix it?
Squeaky wood floorboards result from problems with the joists, missed nailing, temperature fluctuation, and uneven subfloors. Solutions include fastening a piece of wood onto the joist and securing the subfloor properly. Smaller gaps may only need a wood shim to fill them. Squeaky plywood or OSB subflooring is caused by deflexion, resulting in nails rising, and can be corrected by securing the subfloor to the joist with screws rather than nails.
There’s more about squeaky floorboards that you should know, and this guide will explore exactly just that. In the next parts of this article, we’ll explore the common causes of creaking floors. I also offered simple solutions on how to stop a floor from creaking.
What Causes Squeaky Floors?
1. Temperature Fluctuations That Contract And Expand The Wood
Wood contracts and expands depending on the time of the year. And that is perfectly normal and expected of wooden floors.
The creaking you may be experiencing could be because of the seasonal temperature changes.
In the summer, the wood expands, and in the winter, it contracts. In the cold months, the squeak is usually most noticeable in the middle of winter—the wood contracts due to the cold air resulting in other floor components’ movement.
The creaking sound is produced as the wood dries up, shrinks, and shifts around.
Summertime creaks occur as the wood expands and displaces other floor components to accommodate its new size. The wood swells as it absorbs humidity.
Temperature fluctuations affect both solid and engineered hardwood floors.
The levels of humidity in the house significantly affect the contraction and expansion of hardwood floors.
If you have hardwood floors, it is essential to know what humidity levels are bad for the floor. The ideal humidity levels range between 35 and 55 percent.
Levels below 35%, like those experienced in winter, dry out the wood. Dry wood is brittle wood, and brittle wood is weak.
As a result of the low humidity, the wood may begin to splinter or split along the grain. Also, such low levels ruin the finish of the floor.
On the other hand, humidity above 55% results in swollen wood boards. The moisture in the air seeps into the wood, causing the boards to cup or warp.
2. Poorly Functioning Joists
The joist is a long bar of timber laid under the floor to support it. They lie parallel to the bearing wall in the room.
The joists usually accommodate the weight of the floor in 3 main ways:
- By bearing on the soleplate
- By bearing on anchors or joist hangers at the end of the bars
- By bearing on a center wall
The soleplate is wood attached to the concrete foundation. The joists are placed on the soleplate and then attached to it with nails. Joist hangers/anchors are metal straps that attach the joist to a beam or ledger boards. Nails secure it to the beam.
If the joist runs from one foundational wall to the other, a bearing wall is placed in the center to secure the bar in place. The center wall also provides support for the joists.
When the joists are poorly installed or become weakened over time, they no longer stabilize the floor. They become loose and move about, resulting in the creaking sound.
You can identify problematic floor joists by looking for the following signs in addition to the creaking:
- Sloping and sagging floors
- Uneven floors in upper floors of the house
- Cracks and fissures on the walls inside the house
- Unlevel window and door frames
- Bouncy floors
- Rotten wood
If none of these signs are present but you suspect the joists are the culprit, go and check the flooring of the affected room from the room below.
3. Problems With The Subfloor
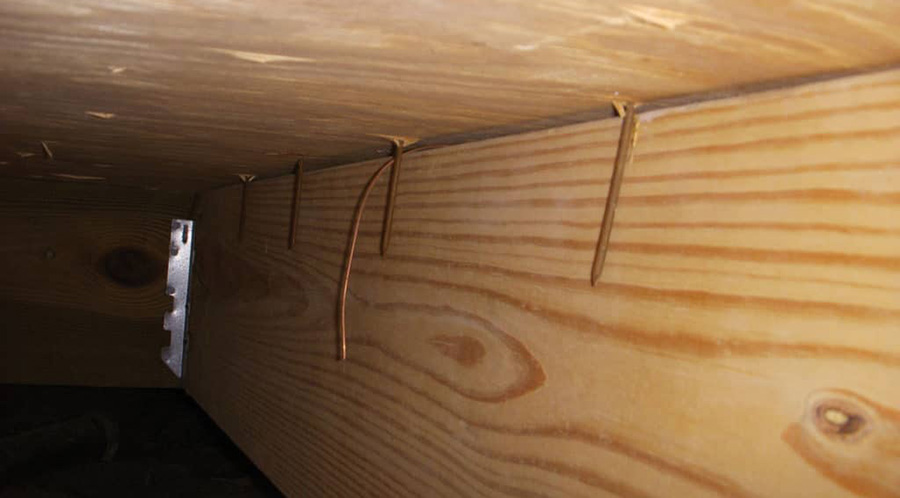
The subfloor in most modern homes is 5/8 inch plywood or OSB sheets that are either screwed or nailed to the floor joist. In the mid-1990s, contractors experimented with 1/2 inch subfloor materials like plywood, OSB, and presswood. Subfloor also used to be nailed by hand until nail guns hit the market, introducing speed and efficiency to construction.
What does any of this have to do with squeaky floors? The squeaking occurs when the subfloor separates from the floor joists. This process is called deflexion. As you walk on the subfloor, it flexes, causing nails to lift slightly. Usually, it means the nails attaching the subfloor to the joists can barely hold the two together. The nails slide in and out, resulting in the irritating squeaky sound.
Also, uneven subfloors tend to separate from the joist because of misalignment. The lack of alignment creates a space between the subfloor and the joist, which results in noise. The speed of nail guns can cause entire nail runs to miss the floor joist entirely.
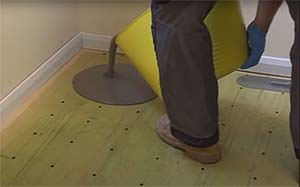
In this case, You can screw down the subfloor to secure the subfloor to the floor joists. Ideally, this should be done when the floor coverings are being changed, and the subfloor is exposed. Home RenoVision DIY explains this process and how you can stop the squeaks in your subfloor.
How Do I Stop My Hardwood Floors From Squeaking And Creaking?
By Regulating Humidity During Summer And Winter
- Install a hydrometer or humidistat to avoid squeaky hardwood floors throughout the year. Keep reading these instruments, especially during the months with extreme temperatures.
- Invest in a dehumidifier for the hot months and a humidifier for the cold months.
- Turn on your air conditioning. This will also help in the summer. However, this solution may mean that the cost of running the AC may be high in the long run.
The humidity within 35% and 55% ensures that the wood flooring does not swell and warp or dry and splinter.
It is best to ensure that the floor does not shrink or warp. The wood may not conform back to its original state if it undergoes too much warping or shrinking.
By Fixing The Subfloor
Make sure that the subfloor you install features new materials, not old, used components. Old materials in the subfloor make it hard for the nails to hold. As a result, the subfloor will be loose, which makes the top floor shift and squeak.
Also, when installing the subfloor, make sure that it is even to avoid gaps.
You will notice the creaking covers a much larger area if the gap is sizeable.
The good news is that you can fill in the gaps, depending on their size, by filling them with epoxy. The epoxy helps to level out the floor, eliminating the gaps that cause creaking.
However, this solution only works for small spaces.
Drill a small hole in the wood board directly above the gap. Inject the epoxy into the gap through the hole.
Always remain vigilant when it comes to the subfloor to catch any issues quickly.
The sooner you catch that first creak, the easier it is to rectify the problem before the gap expands.
By Stabilizing The Joists
Joists need stabilization to hold the subfloor and top floor in place. Install shims in the gaps found in the joist to stabilize the bars and keep the flooring in place.
Shims are thin pieces of wood that you place into the gaps. You can glue the shims on both sides to keep them from shifting. Or you could also gently wedge a shim into place until it snugly fits.
Emphasis is on being gentle when placing a shim. If you are too aggressive while inserting the shim, you may accidentally increase the gap. Keep the shim thin because a very thick shim will cause the floor to have an unsightly bump.
If the joist bar has warped over time, you could install a long, slightly raised timber plank along the joist to act as a replacement. The “replacement” joist will fill the gap created by the warped joist.
However, if there are more complex structural issues with the joist, you may need a comprehensive solution from a flooring expert.
By Repairing Creaking Wood Floors From Above
1. Through Hardwood
This technique allows you to repair the hardwood floor without interfering with all the wood boards on the floor.
Here is a step-by-step way to do this:
- Identify the exact place where the creak or squeak is by having someone walk on the floor. Go to the room underneath the floor, and listen for the creak. It is critical to locate the correct place because you will have to drill screws into the boards.
- Use dual-pitch screws for this task since these screws do a great job of holding the floor and the joist together. O’Berry Counter-Snap Kit for Wood Floors – Squeeeek No More is an excellent option.
- Bore a hole about 3/32 inches in diameter into the hardwood floor. You don’t have to drill as far as the joist.
- Put one of the Squeeeeek No More breakaway screws through the hole and drive it downwards using the driver bit in the kit. But don’t drive far into the floor because you need to snap the top off.
- The screw is long enough to drill into the subfloor and the joist. It will serve to hold the joist and subfloor together and curtail the movement that causes the squeaking.
- Unfortunately, when repairing from above, unsightly holes remain on the floor. Conceal the holes by filling them with wood putty. Let the putty dry, and then sand it off for an even and clean finish that matches the floor.
- If the problem is just the wooden flooring boards, you can opt to use 2-inch finishing nails and hammer them into the boards to hold them in place. The nails have to be steel brads. Steel brads are developed specifically for wood flooring, and they cause minimal damage to the wood.
- Make sure you hammer the nails but leave the head above the floor. Snap off the top, which will leave a hole. Use filler or putty to hide the hole and nailhead.
Tools Required
- The O’Berry Counter-Snap Kit for Wood Floors – Squeeeek No More (the kit contains 50 screws, one driver bit)
- A drill and a 1/8 drill bit
- Color putty
Or
- 2-inch nails
- A hammer
- Color putty or filler
2. Through Carpeting
You can also use the Squeeeeek No More kit to repair the creaking floor without having to strip the carpet off. Here is how:
- Locate the specific point where the squeak occurs and find the nearest joist to it
- The squeeeeek No More kit contains a depth control fixture that comes in handy when looking for precision while working on a carpeted surface. Place the depth control fixture directly over the joist of the section you need to work on.
- Wrap the screw with transparent tape to prevent it from snagging the carpet’s strands as it goes through the floor.
- Insert the screw into the depth control fixture and drive it down through into the floor. Once the screw is inside, remove the depth control tool. As you remove it, tip sideways to insert the screw’s head in a slot at the top of the fixture. That slot will help you snap off the top of the screw.
- Rock the fixture sideways until the head snaps off. It should snap off below the surface of the subfloor. Fill the hole where the screw breaks off with some color putty, and the carpet will not have a noticeable hole because of using the depth control fixture.
Tools Required
- The Squeeeeek-No-More Kit (contains a pilot screw to aid in finding the joist, a screw bit, 50 breakaway screws, and depth control fixture)
- Color putty or filler
- Drill
By Repairing Creaking Wood Floors From Below
1. Using Carpenter’s Glue
You have to go below the floor to make the repairs. That means going into the basement or a lower floor to rectify the squeak.
- Get someone to walk on the floor above you until you locate the squeak. Tell the person to stomp their feet on the exact spot to pinpoint it. Check for a gap or space between the subfloor and the joist.
- Have a thin shim ready. Apply carpenter’s glue on both sides of the shim and insert it into the space between the joist and subfloor.
- The shim prevents the joist and subfloor from having any room to move. That effectively eliminates the squeaky sound.
- Finally, drive a one and a quarter-inch screw into the joist and shim at an angle. Make sure that the screw also enters the subfloor. The screw secures the joist, shim, and subfloor together.
2. Using A Squeaker End
A squeaker end is a piece of equipment that features a steel bracket with a hook at the tip. Also, it has a threaded rod attached to a mounting plate.
- Put the mounting plate on the underside of your subfloor and screw it in place. Make sure it is precisely at the point of the squeak. The squeaker end comes with four screws for this purpose.
- Move the bracket over the threaded rod on the mounting plate and hook it to the joist. That gives you leverage to pull down the subfloor towards the joist.
- Rotate a nut onto the threaded rod and keep turning until the subfloor and the joist are snug against each other. You will need a wrench to tighten the nut.
- Alternatively, you can just attach the mounting plate to the joist and screw it onto the subfloor.
What About Squeaky Hardwood Stairs?
Use glue-coated shims on the joints between the vertical risers and horizontal treads on the stairs. You can do that from below. From above, you can tap thin wood shims into any gaps you notice or glue, then nail about a ¼ length molding onto each step.
How To Stop A Floor From Creaking in Record Time
Finally, it is possible to use baby powder or WD-40 to quiet the squeaks within minutes. A bit of baby powder in between the boards can act as a lubricant and prevent squeaking.
Alternatively, spray a bit of WD-40, which also acts as a lubricant. Experts have found that WD-40 works effectively for wood floors in eliminating creaks and squeaks.