Ideally, ecobee should automatically turn on your AC. However, you might find that this does not happen as you’d expect. While it is a frustrating ordeal, the good thing is that you can easily fix the problem.
Here are the primary reasons ecobee won’t turn on your AC:
- Drain clog from the condensation operation of your HVAC
- Low on refrigerant
- The AC air filters could be blocked
- The AC’s capacitor may be no longer functional
- A dormant fan
- Your ecobee thermostat may further be dysfunctional
There are a host of many other reasons your AC won’t switch on. First, we’ll look at the reasons ecobee won’t turn on your AC. Also, we’ll elaborate on how to troubleshoot and solve them. Next, we’ll look at other causes of AC not turning on. Read on for insights about this pertinent topic.
Reasons Why ecobee Is Not Turning On Your AC
Primarily, there are two main causes of the ecobee not turning on the AC. First, it is noteworthy that as the HVAC operates, it condenses some water from the surrounding. The water may build up in the HVAC system, causing it to fail.
Let us look at the first cause in detail.
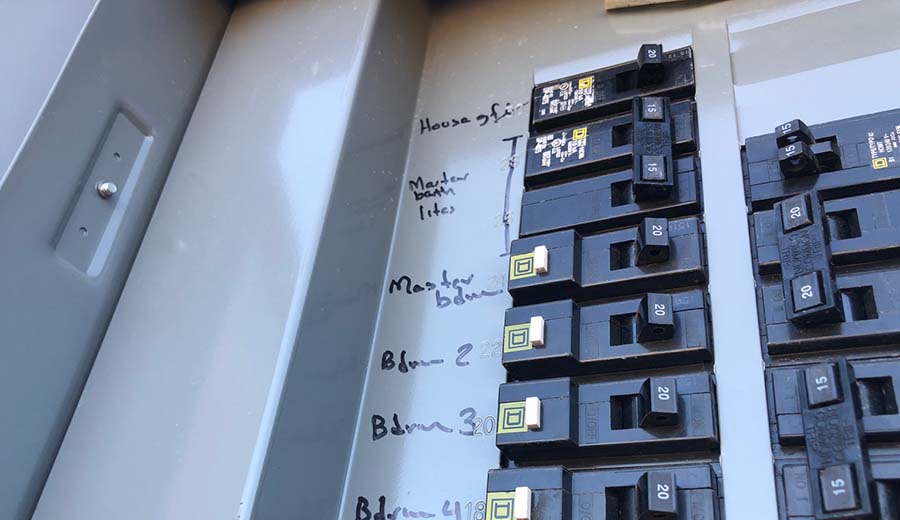
1. Clogged Drain Line
All HVAC systems will feature a drain line or pan. Also, the HVAC system interacts with air that is both dusty and wet. As this air passes through the system, it can cause the accumulation of algae, mold, or dust in the drain line or pan. Resultantly, the deposit of these materials will induce a build-up of condensing water.
When the water build-up gets to a certain level, it prompts the action of the system’s safety device. It will, in turn, cut the power supply to the thermostat and AC preventing them from going on when required.
You can identify if you are dealing with a clog easily by looking out for the presence of the following signs.
- If you note that your ecobee thermostat remains off when it should be on, that should be a drain clog warning flag. Also, if the ecobee thermostat is unusually rebooting, it’s possible that there is a drain clog.
- Also, when there is a clog, you’re certain to note water pools or water leaks from the AC. You do not necessarily have to see large pools of water. Even the presence of moisture anywhere close to the air conditioner is a telling sign of a drain line or pan clog.
- If your drain pan is overflowing, it’s probably clogged. Also, another sign of a clog is if it gets full quickly.
- Lastly, look out for damage caused by the water near the drain pan or drain line.
If you see either of these, your next step should be troubleshooting to ascertain that your drain line or drain pain is indeed blocked. Before commencing the troubleshooting, ensure that you have switched off the power supply to the HVAC. Also, your air handler, furnace, and outdoor compressor should be off.
Here’s how to troubleshoot and fix a clogged HVAC drain line:
Identify the Location of Key Parts
You need to locate the positioning of the Drain Pan and Drain line. Also, identify where the evaporator coils are situated. Their location will vary depending on the model of your system.
First, identify the location of drain pans and evaporator coils. In some systems, they’ll be on the top or bottom area of the air handler or furnace. They could also be on the side or in the base area.
Next, locate the drain line. It is often on the side of the furnace. You can quickly identify it as it’s usually a PVC pipe. It could be any color, but in most systems, it is white.
Note that your HVAC could have two drain pans. Such a scenario is possible if it is in an attic. In this case, one is the primary pan, and it’s typically situated just below the evaporator coil. The other is for backup purposes. It is normally below the air handler.
Clean the Clog
If you note that the parts are clogged, the next step is to drain them. The drain pipe could be having sediments clogging in. Thus, you need to flush out the dirt using a strong jet of water. You may not need to use water, but you’ll determine what to use depending on the degree of the clog.
If you are not sure how to go about the cleaning, consult an HVAC expert. Alternatively, check out some of the DIY instructions for clearing an HVAC from experts on online platforms. You’ll find out that clearing the drainpipe is a straightforward thing that does not require you to hire an expert. A simple flush of water through the system should do the trick.
Reset the Float Switch
Lastly, you need to reset the float switch. In most HVAC systems, you’ll find it at the side part of the drain pan. It could also be at the bottom part of the air handler or furnace. Locating it should be straightforward if you check these parts. But you could still not be finding it. In that case, consult the furnace control board or that of the air handler.
In most cases, the float switch will connect to the ‘R’ terminal via a wire. If you can still not find the reset switch, follow this wire from the ‘R’ terminal to where it ends.
Once you have identified it, the next step is resetting it. First, remove water from the drain pan. Alternatively, you can choose to let the water drain on its own by giving it some time.
Some air conditioners will not have a reset switch. In such a case, rest by first switching the air conditioner off from the thermostat. Let it remain off for some time, approximately five minutes, then turn it back on. The action will reset the AC.
If you still cannot reset the AC through this process, consult an HVAC expert.
2. Low Refrigerant Levels
A shortage of refrigerant will hinder your AC from going on when required. Typically, it is the cooling material that ensures that the coils don’t overheat. In low levels, you will struggle to generate cool air from the AC. Also, it affects the ability of the AC to deliver hot air from the heat pump.
Hence, a refrigerant is one of the relevant components of a properly functioning AC. Note that the AC will not use up the refrigerant to the extent that it runs low. Instead, the possible cause of low levels is loss via leakages.
Often, the AC coils develop cracks through which the refrigerant leaks out. Lack of routine maintenance is commonly to blame for the corrosion of the coils. They will take some time to corrode, so regular checks are imperative in noting the leaks and fixing them.
Also, note that repairing the issue may require the intervention of a professional. You may try filling the refrigerant but matching the manufacturer specified levels will be a daunting task. Hence for best results, ask assistance from an HVAC expert. They will check for the causes of the leakages and advise on the best way to solve the issue.
3. Dysfunctional AC Capacitor

Check if your AC goes on and off abruptly. Also, you may find that it cannot easily start or it’s making some unusual clicking sounds. All these are signs that the AC capacitor could be dead.
The capacitor is one of the relevant components in an air conditioner. It is central to the functioning of the motor circuit, especially in the initial stage of turning the motor on. Once it is running, the capacitor ceases controlling the circuit.
In all HVAC systems, you’ll find two main capacitors. First, there is a start capacitor which is helpful in the start stage of the AC’s motor. The other one is the run capacitor responsible for keeping the motors running all the time.
There are several causes of capacitor failures. Let’s look at each one of them in detail.
Sensitivity to Heat
Normally, the capacitor will be easily influenced by overheating. Often as the AC seeks to keep the surrounding temperatures under check, it will overwork, leading to heating of the capacitor.
A capacitor can also overheat, resulting from exposure to the sun if left out in the open.
You can control the overheating of the capacitor by not overworking the AC. For instance, don’t set the thermostat’s temperatures to the extremes during hot or cold weather. Doing so leads to excess operation of the capacitor. Resultantly, it overheats and wears out fast.
Power Fluctuations
Power fluctuations or outages are commonplace in all settings. But they are the leading causes of the HVAC’s capacitor damage. You can control this issue by adding a surge protector to the circuit.
Old Capacitor
It is also possible that over time the capacitor wore out. Regular maintenance is vital in identifying if the capacitor is wearing out. If it shows any signs of getting old and slow in functionality, replace it.
When replacing your capacitor, make sure that you are sure of what you’re doing. If you don’t have the expertise, consult an electrician, and you may get electrocuted. Also, make sure that you always have a suitable capacitor for the AC.
Using one that does not match the good rating will harm the motor. It’s expensive to replace the motor. Hence, you’d rather have the right capacitor.
4. Blocked Air Filters
Many people don’t clean the AC air filters often, which is a probable cause of its malfunction. It does not matter the model of air filters that you are using. Regularly cleaning them is a must. Otherwise, you’ll be receiving contaminated air, and ultimately, the AC will develop problems.
Also, the other common issue with blocked air filters is that they’ll destroy your outdoor AC system. Often, the AC will freeze, preventing optimal functioning and ultimately resulting in its failure.
How does this happen? Well, it all has to do with the refrigerant. Blocked air filters mean that the refrigerant receives no warm air from your house’s interior. As a result, it will become cold and thus freeze.
You can easily clean the air filters as there is not much work to do with the parts. Alternatively, you can hire a professional to give them a perfect cleaning. Note that when you clean them, you’ll melt the ice in coils. Hence, have a way of collecting this water. Also, make sure that you allow the filters sufficient time to dry.
Regular monitoring of the air filters is imperative in noting clogging and fixing the problem on time.
5. Fan Dormancy
Your fan could be the reason your AC cannot start. Often, you may find the fan is not working. The most probable reason could be that it is dormant. Another potential issue is that the cooling system could have been dormant in the winter. Of course, during this time, you do not need to cool your house.
Therefore, the fan was probably dormant all this time, and it could fail to rotate due to the accumulation of particles. An HVAC expert will assist you in repairing the fan if it has a problem or gets a way of getting it running again.
6. The AC Could Be Turned Off
As with other electrical appliances, the HVAC system has a start button. Often, many people don’t remember to check if the system is switched on when the AC starts misbehaving.
Therefore, check if the air conditioner is on before troubleshooting other possible causes of its malfunction.
7. Dirty Condenser
All ACs have a condenser responsible for the release of heat from the rooms to the outside. It is, therefore, on the outer part of the AC situated out in the open. As a result, it is prone to collecting dirt from the surrounding area.
Often dirt accumulation on the condenser is typical, especially if there is no regular system maintenance. The dirt will prevent efficient heat dissipation to the surroundings, thus causing a malfunction of the system.
How does that happen? When there is poor heat disposal, the condenser will require more current to operate. Thus, it will trip the circuit breaker, which will ultimately fail the AC system.
If the condenser is dirty, a professional can usually clean it better than you would probably do by yourself. You may also easily damage the compressor coil fins if you do it yourself, as they require some careful handling.
Regular cleaning is also imperative to prevent dirt accumulation which can be costly in the long run.
8. The Circuit Breaker is Down
Another critical area to check if your AC is not turning on is the circuit breaker. It’s often because a voltage surge caused the circuit breaker to trip. It is a normal occurrence intended to protect the AC from short-circuiting resulting from a surge.
Rectifying the problem is easy. First, locate the location of the circuit breaker. Next, turn it off for some time, then turn it on. Your AC should be up and running after this. Nonetheless, you must take caution, especially if the circuit breaker keeps tripping.
Continuous tripping of the circuit breaker implies that there is a problem with the current supply. Constant voltage surges can also cause electrical fire accidents. Hence, consult your electricity supplier to fix the problem.
9. The Motor is Worn Out
You can know if something is wrong with the motor if the AC produces a screeching sound when you turn it on. Often, the sound results from a problem with the motor.
In all ACs, the motor has a seal to shield it from water and dirt from the surrounding. Such material can cause dysfunction. Thus, the seal must be in good condition. However, after continued use, the motor can come off coupled with the lubrication oil leak.
The motor will not operate if it is not lubricated and will ultimately stop working. Heat dissipation is also affected when the motor is faulty. Such a problem is enough to stop the AC from working. If you are sure that the motor is worn out, consult a technician. It will be imperative in determining whether to fix it or if buying another one is the more economical option.
10. Disconnected Power Cord
You might be anticipating that your AC has a huge problem behind its failure to start, but it could be due to a disconnected power cord. If you have not used the AC for a while, the power cord could have become frayed over time.
Also, constant power outages and surges can destroy the power cable. If it shows signs of weakness, consider replacing it.
11. Your AC is Not the Correct Size
Consulting an AC expert is imperative before buying an air conditioner unit. Otherwise, failure to do so may come back to haunt you, especially if you buy the wrong size. For instance, if the AC unit is not the optimal size, constant breakdowns will be commonplace, and ultimately, you will have to replace it.
The mistakes will be either buying an oversized AC or an undersized one. In the former’s case, it turns on and off quickly. It might sound like a great thing, but constant switching on and off will increase its damage prospects through wear and tear.
A more oversized AC than necessary is also ineffective in humidity control. Because it must constantly switch on and off, it lacks enough time to expel excess humidity from the surroundings.
A more undersized AC is not a good thing either. Due to its size, it will struggle to keep the temperature changes under check throughout your home. Hence, expect it to run almost all the time, which will undoubtedly cause the capacitor to overheat. It will probably soon break down after constant overheating.
Another possible problem with a smaller than required AC is that it will increase your power bills. If you chose the AC size wrong, you might not have other options than replacing the whole system. Hence, getting the right size first place is a cardinal imperative.
What do you consider when choosing the AC size? There are several key considerations. First, you must pay attention to the size of your rooms and the climate of your area. A professional will help you in making the correct determinations at this step.
Alternatively, if you choose to do it yourself, use the following equation.
[Size of the area (square foot) X 0.002083 ] – 0.5
From the above equation, you can obtain the ideal AC size.
Example:
Find the ideal AC size for an area measuring 2000 square feet.
AC Size = (2000 X 0.002083) – 0.5 = Approximately 3.67
Hence, a 3.67 ton AC is ideal.
12. The AC is Worn Out
It is also probable that the entire AC set is worn out, and you need to replace it entirely. But how do you identify that it is now time to replace the AC? Check out the following signs.
- The AC’s airflow has significantly suffered a dip – Often, a simple clean-up of the airflow will fix the problem. However, if the problem persists even with regular cleaning, the AC may have run its time.
- The air conditioner constantly requires some fixing – Regularly fixing the AC once in a while as usual. But if it becomes a common occurrence, then there is a chance that it is beyond repair.
- There is an abnormal surge in your power bills – An old AC is not effective in temperature control. As it struggles, it will consume more power. As a result, your electricity bill will abnormally balloon. At such a moment, it’s best to replace it as it is beyond redemption and will continue costing you more in electricity use.
- There is excess leaking of the AC from the interior – First, ask an expert to check if the refrigerant leak issue can be solved. If not, consider replacing the AC as it will keep disappointing you.
- The AC is making loud grinding and screeching sounds – Ideally, the AC should seamlessly run. Hence, if you note that it’s producing abnormal sounds, it is time to fix it.
- The AC is producing a foul smell – Your AC filters could be dirty, prompting them to produce a foul smell, probably due to mold or dirt accumulation. Thus, first, consider cleaning the AC filters. However, if the smell is persistent, something about the AC is amiss, and you might need to change the entire unit.
How To Use ecobee To Turn On Your AC
Automatic control of your ecobee is imperative in controlling the home temperature. It ensures that the temperature of your home is correct. Thus, when it’s functional, you do not have to worry about temperature fluctuations. Also, if you live in a mild climate, the ecobee thermostat will detect this and rectify the temperatures by controlling the AC.
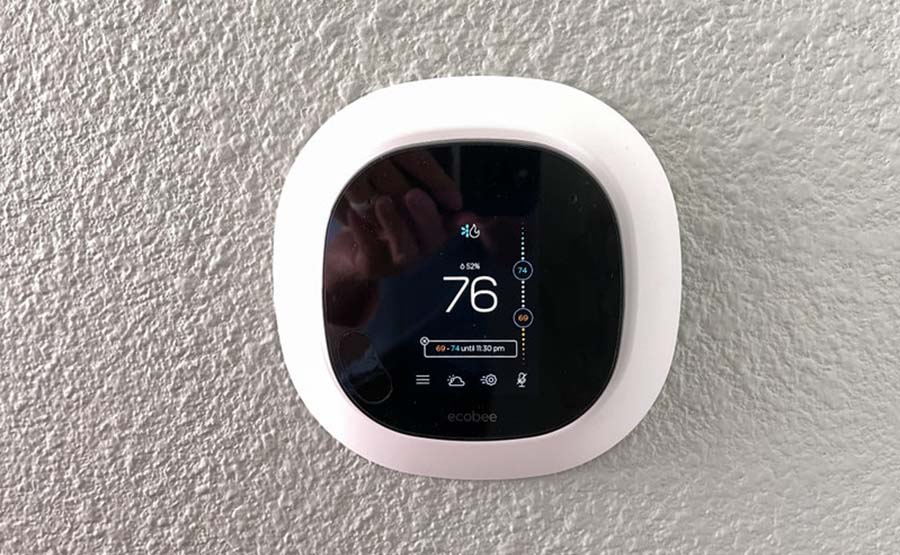
So the million-dollar question is on how to turn on the AC of the ecobee thermostat. But before that, let me explain how the ecobee displays while on auto mode. Typically, there are two points on the ecobee, one for the heating and the other for the cooling mode. The heating mode is indicated by orange, while a blue indicator shows cooling.
We have earlier looked at how to select the threshold setting on the ecobee thermostat menu. Similarly, click on the ‘Main Menu’ and navigate your way to ‘Thresholds.’ Next, click on ‘Auto Heat/Cool’ on ecobee and select ‘Enable.’
After this, you can select the auto mode. Alternatively, you can choose the auto mode from ecobee’s HVAC settings.
Typically the essence of this function is to control the temperature changes automatically. For instance, when the temperature is above the blue setting, the ecobee will prompt the ignition of the cooling function. Similarly, when it goes below the orange set, it will ignite the heating system.
Does ecobee Work With Any AC System?
Your ecobee will work with most of the common heating and cooling systems. It is also compatible with most gas and oil systems. We’ll look at the compatibility of ecobee with some of the common systems. Check out the list below.
Electrical Requirements
ecobee will work with 24VAC controls without any hitch. Nonetheless, it is incompatible with recreational vehicles as they run on DC power. Also, it is incompatible with fireplaces as they operate on millivolt power systems. Lastly, ecobee will not work with electric baseboard heaters as they are high voltage systems.
Conventional Air Conditioners
An ecobee will be perfect in control of two heating and cooling stages for a conventional furnace and air conditioner. It will also work with a humidifier and a ventilator. It will also support an HRV and single-speed fan control. Also, you can use the ecobee with PEK in the absence of a C wire.
Heat Pumps
An ecobee will operate efficiently with single-speed fan control on heat pumps. It will also work well with up to four stages of heating and two stages of cooling with a heat pump. Additionally, it will be a perfect match for a single accessory such as a dehumidifier, ventilator, and ERV. Also, similarly to conventional air conditioners, they will operate well with PEK in the absence of a C wire.
Boilers
An ecobee can support two stages of the heat in a boiler system and single accessories like a humidifier or ERV. However, unlike the two above systems, it cannot work with PEK without a C wire.
Boiler and Air Conditioning
For dual transformers that incorporate a boiler and air conditioning, an ecobee will support two heating and cooling stages. It will also support a single accessory like in the other devices above. However, it will not work with PEK in the absence of a C wire. The precondition of such support is if the C wire comes from the air conditioner but not from the boiler.
Compatibility of ecobee with Proprietary Systems
An ecobee will not support communication with equipment featuring proprietary features. An example of such equipment is a variable fan speed. You may be unsure of whether your thermostat is in contact with the equipment. In such a case, there are two things you can check out for confirmation.
- Check if your thermostat features non-standard terminals. An example of such is 123. Ideally, an ecobee is designed to operate with equipment with standard terminals. For instance, if there are R, G, Y, W, C terminals, it will function well. If they are absent, a simple rewiring of your equipment will go a long way in making it compatible.
- Next, you also need to check if your equipment features an Equipment Interface Module (EIM).
How to Troubleshoot Your ecobee Thermostat
After checking your drain pans and drain lines, you may find no signs of a clog. In such a case, the problem could be your ecobee thermostat. Hence, you need to troubleshoot if it is in the proper working condition.
The following are the essential checks for troubleshooting your ecobee thermostat. Note that they do not work for Smart SI, Smart, EMS SI, and EMS ecobee thermostats.
1. Confirm That the Wiring Is Correct
Your ecobee thermostat could malfunction because of a fault in the wiring. Check if it’s okay by first unmounting the ecobee from the wall. Next, look if your ecobee has a wire on the Y1 terminal. It should be present for a properly working ecobee.
The essence of the Y1 terminal is to facilitate the connection to the outdoor compressor. Therefore, the wire leading to the terminal must be well mounted for the ecobee to function. You can check if it’s loosely attached by slightly tugging it. If it comes off easily, it was not well connected and could be why your ecobee was not working. It shouldn’t also be loose.
Note that not all ecobee thermostats will have this wire. For instance, if you have an ecobee 3 lite or ecobee 4 with a PEK, the wire will be absent. Therefore, its absence should not prompt you to think that it’s probably the reason your ecobee thermostat is dysfunctional.
To be sure that the wiring is okay, make sure to double-check all the connecting wires. If you note a disconnected wire, it’s an indication that something could be wrong. Fix it first or engage an electrician to sort the issue.
2. Check the Furnace and Air Handler Wiring
You also need to confirm that the furnace and air handler wiring is okay. Put keen attention on the connection of the Y wire. The cable that connects to the Y1 port on the ecobee should connect to the Y port on the furnace and air handler.
Similarly, confirm that you also have the same connection for a PEK-installed system. The Y1 cable must be attached to the respective Y port on the PEK. Otherwise, the ecobee will not work.
The other critical thing to check is the condition of the splice points. If your Y cable has the points, confirm that they are well secured.
Next, check if the cables from your outdoor compressor connect to the proper terminals. Typically, they are two and are in wire bundles. One of the wires should connect to the C port, while the other should attach to the Y port. Make sure that they are well connected. Otherwise, your outdoor compressor unit will malfunction.
3. Confirm the Equipment Configuration
For this test, you will need to access your ecobee menu.
Click on ‘Main Menu.’ and select the ‘Settings’ option. Next, choose ‘Installation Settings’ and select ‘Equipment.’ Lastly, click on the ‘Wiring’ button.
The above process is only applicable to those without PEK. If you have PEK installed, your configuration is different.
From the menu, you should have both RH and RC highlighted. Otherwise, if there is only one wire on the RC terminal, a reconfiguration is imperative to fix this.
Also, Y1 should be highlighted. If not, reconfigure the system.
For reconfiguration, follow the above steps. However, in this case, after clicking ‘Equipment,’ select ‘Reconfigure Equipment.’
Selecting the option will prompt you to confirm if you have connections to the RC terminals. It will either ask you if you have connected one wire or two wires. If you are running on a single wire, confirm on the screen that you have one. Similarly, if you have two, select the option that indicates that RC and RH are connected.
The ecobee will then give the wires that are connected. At this juncture, check if Y1 is among those highlighted. If not, click the no option to confirm that there is incorrect wiring.
Next, you will click the ‘Modify’ button. Click it and select the Y1 button. Click on ‘Next’ and finish the configuration process.
To confirm that the equipment is now fully configured, check if the Air Conditioner has appeared on the ‘Equipment’ screen. Also, check if Y1 is automatically selected when you click the ‘Wiring’ button.
4. Check the Threshold Settings
From ecobee’s ‘Main Menu,’ click ‘Settings’ and select ‘Installation Settings.’ Next, select the ‘Thresholds’ button.
For this setting, you’ll be trying to fix two fundamental issues.
Minimum Outdoor Temperature
For your ecobee’s compressor to function, you must ensure that the outdoor temperature does not go below the minimum level. Therefore you must pay attention to the minimum outdoor temperature setting. Ensure the threshold level is within limits.
Minimum Cycle Off Time
Another critical area is the critical cycle of off-time. Typically, it’s the period when your compressor will be off, as the name suggests. Often the default setting is five minutes. After a cooling cycle, the compressor will go off for this period. You can also set it to the time limit that you find significant.
The compressor will go on after this time has elapsed.
You may find that despite taking all the troubleshooting tips into practice, your ecobee thermostat is still dysfunctional. In that case, consult ecobee for assistance. Check out their contacts from the official ecobee website.
Final Thoughts
Having your ecobee in top condition is paramount in keeping your room’s temperature at the ideal levels. But you might find that it is not turning the AC on, which suggests that something could be amiss.
However, if you have such an issue, worry not. We have listed several ways of identifying what is ailing your AC. At least one of the above-listed problems may be the primary cause of the AC malfunction. Hence, using this advice, you can check it all by yourself.
If you still can’t locate what’s amiss, involve a professional expert in HVAC systems. They will identify the issue and provide further advice on how to mitigate its recurrence in the future. We hope that our insights will be handy in improving your AC’s performance once and for all.