I am a Google Nest Thermostat and home heating appliances seller. Over the last five years, I have received various complaints from customers who bought Nest smart thermostats from my shop. My experience and knowledge with Nest Thermostats enable me to attend to these complaints well.
When a Nest thermostat shows “in 2+ Hours,” it generally requires no action on your part. The “In 2+ Hours” message occurs when you raise the temperature 4 or more degrees higher or lower than the current temperature. The Nest thermostat estimates it will take 2+ hours to reach the desired setting. However, if the “In 2+ Hours” message doesn’t go away, there could indicate a problem with the Nest temperature sensor, installation, or a problem with the HVAC system itself. These reasons can include:
- Your thermostat is recently installed and is still learning
- Your thermostat is recently installed and is not wired correctly
- Your thermostat did a system reset or reboot
- Your thermostat initially powers up after an extended power outage
- System or software update
- Your HVAC system is struggling to meet the demand and may require service or repair
Nest learning thermostats are super effective in monitoring the energy usage in your home. Besides, they allow you to have the perfect target temperature in your home, unlike a traditional thermostat.
The readings on your Nest learning thermostat are way more accurate since it learns your home’s cooling or heating characteristics and the target temperature settings of your home. However, there are instances that your Nest Thermostat may not be working perfectly.
For instance, one most common message is the “In 2+ Hours” on the Nest Thermostat display estimates how long it will take to raise or lower the current room temperature.
This article will walk you through all you need to know about the “In 2+ Hours” error message.
Sounds good? Keep reading to learn more.
What Does “In 2+ hours” Mean on Nest Thermostat?
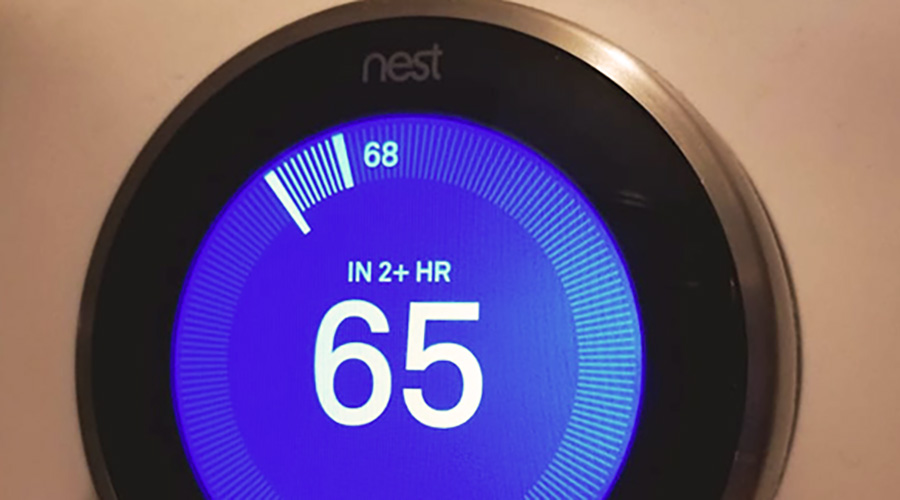
One most alarming message you might be getting on your Thermostat is “In 2+ Hours”. You might be there wondering what it means. This section will make you understand what this alarming message means.
Whenever you get the “In 2+ Hours” message on your Nest Thermostat, it means that your Thermostat is slowed down for cooling your home.
It usually occurs when the current room temperature is at a certain level, but you are trying to change that temperature to a comfortable temperature for your home.
For instance, you might notice your thermostats saying that it takes 2+ hours to cool your house from 60 degrees Fahrenheit to 58 degrees Fahrenheit.
Typically, four reasons are associated with this “In 2+ Hours” message. They are;
- Your Nest Thermostat is recently installed and is still learning
- You did a system reset or reboot
- The circuit is not pending or not completed
- System or software update
Your Nest Thermostat is Recently Installed and is Still Learning
You will be enraged if your school tutor asks you to learn a new taught topic and do a test in an instant. It is nearly impossible for your brain to know instantly, process, and apply new information similarly to the Nest learning thermostat.
The “In 2+ Hours” message is typical in Cool Mode, but it can happen in Heat Mode.
Therefore, one of the possible issues you are supposed to check whenever you get the “In 2+ Hours” message is if you installed the Nest learning thermostat recently in your house. If you did install it in less than a month, you do not need to be worried.
For instance, whenever you install your Nest Thermostat, it does not understand how fast or the time it takes for your home or room to cool down. As such, it will give you an “In 2+ Hours” message. This is because it does not have the data it needs to provide an exact time estimate.
Therefore, if your Nest Thermostat is recently installed, it could be the most probable source of the “In 2+ Hours” message. You should note that there is nothing wrong with your Nest Thermostat.
Just be patient and allow your Nest Thermostat enough time to learn and calculate how much it will take to get to your suitable, comfortable, and desired temperature.
Once the Nest Thermostat has learned and adapted to your home and habitat, you will be guaranteed enjoyment of the ultimate of your newly installed Nest Thermostat.
You did a System Reset or Reboot
Did you know that ‘System Reset’ means forgetting or deleting the current settings and starting new? For instance, if you reset your Nest Learning Thermostat to default settings, it will act as if it is newly installed.
Therefore, it will need to take a few days to learn the specifics of your home to give an ultimate temperature estimate.
It is important to note that your Nest Thermostat does not control the AC. It will only show the time it will take the AC to reach the ultimate temperature and have it working. Therefore, the time you see on the thermostat screen is just an estimate.
Just as in the ‘recently installed Nest Thermostat,’ you will need to be patient and give your reset or reboot Nest Thermostat time to learn the specifics of your habitat or house. In a short while, it will provide you with the ultimate timing.
The Thermostat Circuit is Pending or not Completed
Another possible reason you are getting the ‘In 2+ Hours” message is an incomplete circuit.
Your Nest learning thermostat is not battery-powered like traditional thermostats. The newer Nest Learning and E models have rechargeable lithium-ion batteries inside.
A Nest Thermostat to access the furnace to be adequately powered requires an extra wire. Most people forget about this additional wire to make the circuit complete.
Therefore how can one check if the Nest Thermostat circuit is complete? Here is a guide;
Step 1: Get to the Nest and access the thermostat settings.
Step 2: Click ‘Equipment” under the settings. For instance, if your Nest Thermostat is correctly wired, you will see time tabs next to;
- Y1 – yellow wire – cool
- W1 – white wire – heat
- G – green wire – indoor fan
- C – black wire – common wire
- RH – red wire – switched power
- B – blue wire – reversing valve in heat for heat pumps
- O – orange wire – reversing valve in cool for heat pumps
If the Nest Thermostat is not complete, you will not see a tab next to the C. You will only see tabs next to G, Y1, RH, and W1. A tab next to C signals a lack of an additional wire needed to complete the circuit.
Therefore, consider looking for that extra wire and fixing it accordingly to complete the circuit.
System or Software Update
System or Software update means bringing new features to your existing system without changing the system hardware.
Therefore, doing software updates may negatively impact the timing of your Nest Thermostat. As such, you will be alarmed by the “In 2+ Hours” message. Therefore, you will be required to fix this to have the best timing estimate.
For instance, if the firmware on your Nest Thermostat got updated recently, you do not need to be worried by the “In 2+ Hours” message.
There is no technical issue with your Nest Thermostat. You only need to be patient. For instance, give it some time, and your Nest Thermostat will be as accurate as before.
There is another instance where it has been a long since you updated the Nest Thermostat software, but you are still getting the “In 2+ Hours” error message. In such a case, update the software accordingly, and you will fix the issue perfectly.
How Do You Solve the “In 2+ Hours” Thermostat Errors?
Understood what the “In 2+ Hours” message means, and understanding is not enough to solve or fix the issue.
Therefore, how do you fix or solve this issue? There are two possible ways that you can go for;
- Allow the Nest thermostat time to adjust
- Complete the incomplete circuit
- Call a qualified HVAC technician to examine your HVAC system
Allow the Nest Thermostat Time to Adjust
There is no other way to fix the “In 2+ Hours” error message other than just waiting for it to work generally if the cause is one of the following:
- A recently installed Nest Thermostat
- System reset or reboot
- System update
In either case, you only need to be patient and give your Nest Thermostat time to learn your home. You should note that this usually takes time to resolve.
Once your Nest Learning Thermostat system learns how fast your home gets cooled down, the “In 2+ Hours” error message will automatically disappear on its own. As such, your home will start cooling even quicker than 2 hours.
If the “In 2 Hours” message persists, you’ll need to troubleshoot the wiring connections, mainly if this is a new installation.
Complete the Incomplete Circuit
If you diagnosed and realized that the “In 2+ Hours” error message is caused by lack of an additional wire or incomplete circuit, you will be required to complete the circuit.
This is not an easy task for non-professionals. However, if you follow the correct instructions or guide, you are assured of solving the “In 2+ Hours” error message.
Here is a step by step guide that you should follow;
Step 1: Switch off the furnace power at the circuit breaker
Step 2: Check to confirm an additional wire in the Nest Thermostat. Usually, it is a blue wire, and it should only be one. The orange and blue wire is generally for a heat pump. These 2 wires control the reversing valve in a heat pump.
Step 3: Make sure you have the following;
- Headlight or
flashlight - A respirator
- Philips screwdriver
- A regular standard screwdriver
- 6-in-1
Step 4: Access the furnace and double-check to confirm if the furnace is unplugged.
Step 5: Using the 6-in-1, take off the cover of the back part of the furnace. Doing this will enable you to access the wires, usually at the lower system.
Step 6: Locate the wire that gets to your Thermostat. For instance, the AC only has two wires, while the large black cable cover has several wires.
Step 7: Locate the blue wire. Once you find it, attach it to a plug that says “Comm” or “C.”
Step 8: Close your furnace. You should leave the furnace unplugged
Step 9: Access the Nest Thermostat and plug that blue wire into the “Comm”
Step 10: Lastly, power up your furnace. Then test it to confirm if it works perfectly.
How Do I Change the Time on My Nest Thermostat?
The Nest Thermostat is programmed to learn your temperature preferences over time. As such, it auto-adjusts the temperature accordingly.
However, it allows you to set a specific temperature for a particular time.
This feature is only available on programmable Nest Thermostats, and you can change time directly from the Thermostat itself. Besides, you can change the time using your smartphone within the installed Nest App.
I will walk you through a step-by-step guide on how you can change time on your Nest Thermostat.
Changing Time on the Nest Thermostat
Nest Thermostats have a scroll wheel that allows you to change the Nest Thermostat’s temperature schedule directly. Here is a step-by-step guide on how you can change time directly on the Thermostat.
Step 1: Click on the Nest thermostat unit to pop up the main menu.
Step 2: Navigate to “Schedule” using the silver scroll wheel. Once you find “Schedule,” select it
Step 3: When the ‘Schedule” screen opens. Click on the setting unit to allow you to start changing the schedule for the Nest thermostat temperature.
Step 4: Click on “New
Step 5: Using the silver scroll wheel, scroll to the time of the day that you wish
Step 6: Select or click on it to choose that time
Step 7: Rotate the silver scroll wheel to pick the specific temperature you wish to associate or link with the particular time you have chosen.
Step 8: Click on the selected temperature.
Step 9: Those temperature and time entries are saved. Therefore, you can move on to making more time and temperature entries.
Step 10: Scroll over the existing time entry till you hover over it
Step 11: Click down on the current time entry
Step 12: Click on “Change.” When it opens, you can make the changes you wish. If you want to delete any time entry, select “Remove.”
Changing Time in the Nest Thermostat App
Step 1: Install the Nest app on your smartphone
Step 2: Click on the Nest app to launch or open it
Step 3: Once it opens, tap on the Nest Thermostat on your main screen
Step 4: At the bottom of the main screen, click “Schedule” to open a blank calendar-like spreadsheet
Step 5: Click on any day of the week. For instance, you can click on ‘Monday.’
Step 6: In the bottom-right corner of the spreadsheet, click on “Add” to take you to a grid
Step 7: Click at any place on the vertical axis at the top of the time you wish to set to a particular temperature. For instance, if you want the temperature to be 62 degrees at 8 AM, click at any place just on top of “6 AM”. On clicking, a dot with a temperature value will appear with time below it.
Step 8: To change or adjust the current room temperature, Click and long press on the dot and drag that dot until it reads 62
Step 9: To adjust or change time, click and long press on the dot, then drag it from right to left to select the particular time you wish to set. You need to note that you can set time at an hour interval or a 15-minute interval.
Step 10: Repeat the same steps to add more temperature and time settings. To remove a particular time entry, click on “Remove” at the bottom-right corner of the spreadsheet.
Step 11: To change a particular time entry, click and long press on that entry. Move it from right to left or down to up to adjust or change it.
Call a HVAC Technician to Service Your System
Finally, you may need to call an HVAC technician to service and possibly repair your system. There can be numerous reasons why you get a message on the thermostat display. Some reasons may have nothing to do with your Nest thermostat. Potential reasons include:
- HVAC system not performing properly
- Thermostat wire is broken or wired incorrectly
- Ducts could be leaking air or restricting airflow
- Air filter could be dirty
How Long Does Nest Take to Schedule?
It is common for your home’s ambient temperature to have a slight variation below or above the temperature set on the Nest Thermostat for a particular time, usually due to an inbuilt temperature schedule for turning on your Nest system.
This delayed schedule is typically called deadband, maintenance band, temperature swing, or differential. The delayed schedule usually takes a few minutes. It is aimed at helping you and your Nest Thermostat system. For instance;
- Most thermostats have an inbuilt delayed schedule to help prevent wear and tear. For instance, this is because there are moving parts of your Nest system.
- It enables your home temperature to change by certain degrees before the system gets turned on.
- It assists in energy savings and prevents system tear and wear for Neo thermostat systems that do not have a delayed schedule turning on.
Final Thoughts
A Nest Thermostat helps regulate the energy usage and temperature in your home.
You should not be worried if you experience a delay, an “In 2+ Hours” error message. It could likely be due to a rebooted thermostat, a recently installed Nest thermostat, an incomplete circuit, or a software update.
Fortunately, in most cases, you are not required to do anything to fix the delay. You should allow the Nest Thermostat to learn the specifics of your home. However, there are rare cases where you will be required to complete the circuit if the Nest is not connected to the “C” common wire.
Hopefully, this article was helpful. You can leave us your thoughts in the comment section below.