When planning your home, you will have to learn to carefully consider the materials and locations of things you never knew existed. Something that leaves many people scratching their heads is the use of collar ties and the regulations accompanying them.
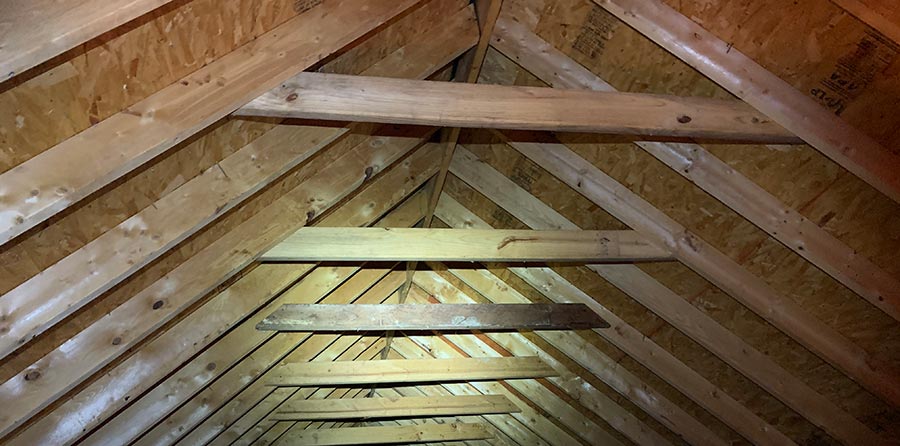
A collar tie prevents rafter framing from separating from the ridge board under unbalanced loads. Collar ties should be no smaller than 1×4 nominal lumber and should be near or in the upper third of the rafter span. In 24 inch rafter spacing, collar ties are on every other pair of rafters or 48 inches apart.
When you plan to build an addition to your own home, or you want to know how your builders have to do something, you will need to see a lot more.
What are Collar Ties
- Collar ties are not required by the 2018 International Residential Code.
- Collar ties must be at least 1 x 4 nominal lumber, with a spacing of no more than 4 feet apart. Where necessary, they should be installed on every other rafter where rafter spacing is 24 inches apart.
- Collar ties, contrary to popular belief, do not keep walls from spreading.
The 2018 International Residential Code does not require collar ties. However, collar ties have three standard building practices that affect how you install the collar ties for your home. These are the three main characteristics of collar tie design that you should pay special attention to when planning:
- Collar tie lumber size
- Collar tie positioning on the rafters
- Spacing between collar ties
In the following few sections, I’ll take a more in-depth look at the three main code restrictions regarding collar ties.
Collar Tie Size
The maximum size of a collar tie is not clearly defined, and the size of the collar tie overall needs to be determined by calculating the total amount of weight that the roof may have to carry. You need to plan for the roof’s weight and the added weight of snow if that’s a concern.
The smallest collar tie can be 1×4 (nominal) lumber, which is not very thick. Most builders prefer to use 2×4 (nominal) lumber, giving a lot more stability and strength. Being over-engineered is always better than the alternative when it comes to your house’s support structure.
Collar Tie Position
Collar ties should be placed in the upper third of the rafters near the roof’s ridge. Installing them lower causes them to strain and not properly prevent rafter and ridge separation as intended.
Collar Tie Spacing
Collar ties spacing should be no more than four feet apart or alternating every second rafter.
Are Collar Ties and Rafter Ties The Same?
- rafter ties are required by IRC
- rafter ties are in the lower third of the raafter near the ceiling joists
- ceiling joists parraellel to the rafters can often serve as rafter ties
Rafter Ties
Tension Forces
Outward Thrust
Ceiling Joists
Where Do You Use Collar Ties?
Collar ties are used in most homes with roof rafters, with the two pieces of the rafters meeting each other in the ridge beam of the house. The ridge beam is non-structural but is critical to provide a surface to attach rafters. The collar ties complete the triangulation of the roof, ensuring that rafters don’t twist or separate under unbalanced loads like wind and snow.
The collar ties serve the purpose of helping the roof take the brunt of the weight placed on top of the roof. Many people will use collar ties specifically when they know an area is likely to experience a lot of snow or earthquakes.
Many homes worldwide have no collar ties, relying instead on the structural strength provided by other joining methods. Roofs with more dramatic angles in their roof will benefit from not having the collar ties, allowing them to push the weight straight down comfortably.
A Step-By-Step Guide to Installing Collar Ties
Now that you know what code requirements there are for collar ties and the various ways you will need to consider them when building, you need to know how to make them. There are a few things to look out for when making collar ties, as they can be tricky the first time.
Your engineer, architect, and veteran builders will all have the knowledge required to help you professionally install them. However, you may be alone or just ahead of schedule and want to start installing them. The designs will tell you the basic design your collar ties require.
Step 1. Determine the Regularity
You should have done this on the planning stage, but just in case, we are covering this again, as it will determine how many collar ties you have to cut while on the ground. Your collar ties should be placed once every four feet; assuming you have a roof that is just over 30 feet long, we can calculate.
With that, assuming that you have placed rafters every two feet, we know there are 15 rafters (both ends need collar ties). In total, you will need eight collar ties to place one on each end and then place a collar tie on every second rafter, with one end of the roof having two collar ties next to each other.
Step 2. Choose the Collar Tie Size
Before we start cutting and measuring, we need to choose the total size of your collar tie, with smaller collar ties perfect for smaller homes. The code does say that 1×6 is the minimum. However, this will not be strong enough when things become difficult.
Most builders and engineers prefer to use the tried and tested size of 2×4 as these pieces are usually high-quality and are easily rigid enough to support any weight. When building and installing collar ties, we recommend sticking with 2x4s or larger as 1x6s can be surprisingly flimsy.
Step 3. Measure the Length
Your engineer might be happy to use four nails to hold your collar tie, or your rafters might be at such a low angle that he wants to use up to eight nails. You will have to measure the total length of the collar tie depending on whether you are cutting the collar tie to the angle of the rafters.
Square collar ties can handle fewer nails than angles collar ties, which means that angled collar ties must be longer to accommodate the angled cuts on their ends. An excellent way to do this is to cut one collar tie to length and then use it to measure every other collar tie.
Step 4. Position the Collar Tie
If you are working with a team, this will take only a few minutes, marking where the collar tie needs to be before installing it. We recommend getting a few g-clamps to help hold the collar ties in place before attaching them completely if you are working alone.
When the ends are cut at an angle, you should already have marked lines to where the collar ties should be; use the angle and the lines to place the collar tie. We recommend perfectly aligning both sides with the lines and angles before attaching completely.
Step 5. Nail the Color Tie Into Place
The most common way to secure a collar tie is with a set of nails; we recommend using 16D nails around three and a half inches long. Four nails on each side should be more than enough to hold the collar tie in place. However, some engineers can ask for much more.
This is why having the ends cut at the right angle is essential. If the ends are left square, there won’t be enough space for nailing. Usually, you will be aware of what is needed when planning if you find there is not enough space for the planned amount of nails.
Step 6. Move Onto the Next Collar Tie
The most bothersome part of installing collar ties is that it can quickly become repetitive, with the clamps requiring to be moved with each installation. If you have a friend or more people to help install the collar ties, the entire process will be made significantly easier as you go.
As with all things engineering, you will be a lot better as you continue to practice, with the second collar tie going in significantly faster than the first. As you continue to move through the roof, you will become more proficient and learn what not to do.
What Size and Material are Collar Ties?
When it comes to what materials to use for your collar ties, many people may be left scratching their heads, especially when they first start using them. A significantly large number of people never realize that the material choices affect the overall strength of their construction.
Nearly all color ties used in residential construction are wood, though occasionally, you’ll find ones made from steel.
| Collar Tie Type | Pros | Cons | Additional Notes |
|---|---|---|---|
| Wood Smaller than 2×4 | Inexpensive | Often isn’t heavy-duty enough | The minimum lumber size for collar ties is 1×6 |
| 2×4 wood | Very common, strong, and cheap | Not many cons, but they may not be large enough | The most common collar tie material and size |
| 2×6 Wood | A good balance of strength and cost | They can start becoming expensive | A good step up from a 2×4 |
| 2×8 Wood | Very sturdy and tall lots of surface area contact | Expensive | Lots of surface area for extra nails |
| Wood Larger than 2×8 | Extremely sturdy and durable | Expensive and heavy | Usually too tall and impractical |
| Steel | Low maintenance, strong, and durable | Expensive and heavy | Overkill in most situations but sometimes worth it |
Which collar tie material you use in your construction project depends largely on your specific situation and needs. Make sure to consult a professional if you have any questions or doubts.
With collar ties, the size of the wood you use determines what types of wood you will have. When installing your collar ties, you need to know as much about the materials as you can so you make an informed decision.
2×4, 2×6, and 2×8 Collar Ties
The most common sizes used for your collar ties are pine wood in most situations. Many people assume that they can have stronger collar ties when using different materials; however, pine always works.
Whichever material is available in the areas around you will also work, as the strength of the collar tie is from the combined strength of the system.
When professionally installed, which collar tie material you use matters less because the whole structure works together to provide ample stability and support.
Larger, Covered Collar Ties
House designs with open collar beams, rafters or attics require special, large collar ties often treated, oiled, or otherwise coated to look nice. When doing this, the collar tie material needs to be considered and treated before final installation.
Depending on the design specifications, these collar ties can be cherry wood, hardwoods, or steel beams. Many people choose exotic woods or wood stains because they look fantastic when complete.
Conclusion
Collar ties only seem complicated when you have never heard of them before. Their installation, measurement, and planning can be pretty easy once you know the basic codes and rules. We recommend brushing up on some local code limitations before planning your project to allow the best use of material.
Whatever you do, please don’t ignore the safety regulations that your country has when building a roof. They are there for a reason and help keep construction safe, repeatable, and structured for everyone’s safety.