More homeowners are doing their projects because of the internet, inflation, and other factors. But most don’t know their toilet dimensions when remodeling a bathroom. You need some basic plumbing knowledge, including how to measure the toilet.
It is crucial to have accurate measurements and know what to look for when roughing in a toilet. Toilet flange location is crucial; consider surrounding walls and obstacles. You can purchase the correct toilet for your bathroom with these measurements.
Most toilets have the same measurements, but yours might be different. Older homes or wall-mounted toilets may have a different rough-in size for plumbing. If you want to change your toilet by yourself but don’t know how you’re in the right place.

What is a Toilet Rough-In?
A toilet rough-in is the space between the drain pipe, flange, and back wall. Measuring the distance from the toilet to the wall is important during the rough-in process. Otherwise, the toilet won’t fit.
During the rough-in stage, you measure the distance from the flange to side walls and obstacles. We will discuss this further later on.
Toilet Rough In
A toilet rough-in refers to the measurement from the wall to the center of the toilet drain. It is crucial to choose the right toilet for your bathroom. The measurement is 12 inches, but options such as 10 or 14 inches are available.
Toilet Rough In Dimensions
Toilet rough-in dimensions are the distance from the wall to the center of the toilet drain. It is essential for proper installation. The standard rough-in size is 12 inches, but 10 and 14-inch options are also available. A plumber should consult to determine the correct measurement.
Standard Toilet Dimensions
If you’re putting in a new toilet or swapping out an old one, you must know the usual measurements. The most common rough-in measurement is 12 inches.
But there are also options for ten and 14 inches. 14-inch rough-ins are less common than their 12 and 10-inch counterparts. 10-inch rough-ins are especially popular for a small bathroom, a half-bath, or a powder room.
When buying a new toilet, you should know some standard dimensions.
Toilet Seat Height
The plumbing code says toilet seats should be 17 to 19 inches high. Following these dimensions for chair-height toilets or wall-hung toilet fixtures is important. This is especially true if you want a modern design, elongated bowl, or pressure-assisted toilet. You can choose where to mount your toilet paper dispensers.
Toilet Tank Height
The toilet tank height refers to how high the top of the toilet tank is off the ground. The toilet tank height is much more open to interpretation and will depend on your toilet type. Usually, the tank’s top is around 21 to 31 inches tall. One-piece toilets are shorter, while tanked toilets are taller.
Width of the Toilet
The width of your toilet is essential if you fit it into a small space between walls or a wall and a vanity. No uniform plumbing code says how wide or narrow your toilet must be, but most toilets are around 20 inches wide.
Toilet Depth
Toilet depth refers to how long your toilet is from the front to the back. The standard measurement for the depth of toilets is usually between 27 and 30 inches, depending on your toilet type and shape. Elongated bowl toilets are longer than standard ones but are the same width.
What are the Standard Toilet Rough-In Measurements?
Now that you know the standard toilet dimensions, let’s look at the standard toilet rough-in measurements.
Distance from the Toilet Flange to the Back Wall
The distance from the flange to the wall is crucial when installing a toilet. This measurement should be 10, 12, or 14 inches, depending on the toilet type. After setting up the toilet, leave some space at the back to easily remove the tank lid. Avoid pushing it tightly against the wall.
Distance from the Toilet Flange to the Side Wall
There is no specific rule about how far the toilet should be from the wall or vanity. You should ensure a clearance of 15 inches on all sides for comfort. There should be at least 15 inches of space around the toilet for cleaning and maintenance.
Distance from the Toilet Flange to Obstacles in the Front
The distance from the front of your toilet to a wall won’t be an issue. Placing the toilet near the bathroom door can cause problems if you have limited space. When installing or replacing your toilet, consider this measurement. It will help you access your bathroom easily.
Location of the Water Line
When installing a toilet, it’s crucial to consider where the cold water supply line is located. Many people overlook this important detail. If you’re replacing an existing toilet, this measurement doesn’t matter. If you’re building a new bathroom, use a tape measure to position the water line for the toilet. Place it 6″ left of the flange’s center and 7″ above the floor.
Toilet Rough In Size
The toilet rough-in size refers to the measurement from the wall to the center of the toilet’s drainpipe. Knowing this measurement before purchasing a new toilet is crucial to ensure proper installation. Most bathrooms have a rough-in size of 12 inches, but some may have 10 or 14-inch options.
How to Measure for a Toilet Rough-In Without a Toilet
For our first scenario, let’s look at how to measure for a toilet rough-in if you don’t have an existing toilet to go off of. This situation applies to building a new house, adding a new addition to your home, or adding a bathroom. You can rough in your bathroom using these steps and measurements as a professional plumber would.
- The rough-in process’s first step is to get a good measuring tape.
- Using the tape, measure 12″ from the wall behind where the toilet will be outward.
- Use a pencil or marker to mark this location, which will be the center of your toilet flange.
- You can then cut or drill a hole in the floor for the location of your toilet drain.
You can also buy and install the toilet, but hire a plumber to install the drain line. If that’s the case, here’s what you need to do.
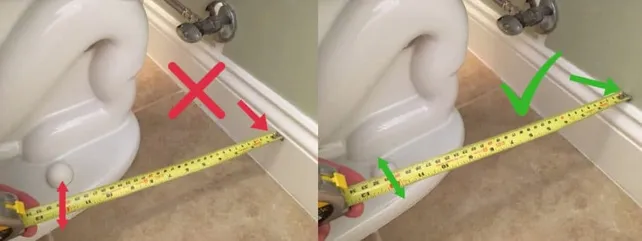
- Use a tape measure to measure the distance from the wall behind the toilet to the center of the toilet flange.
- Include base molding in your measurement, or place the tape above it if you have base molding.
- If a professional plumber installed your toilet, it should measure 10, 12, or 14 inches.
- If your measurement is not one of these three numbers, measure again to ensure you measure accurately.
- It’s not the end of the world if, for example, your measurement is 11″ instead of 10 or 12. To get around this problem, you can install a 10-inch rough-in toilet. This will give you an extra inch of space behind the toilet. If this is too bothersome, you can search for a specialty toilet or extend your plumbing.
This scenario also applies if you have an old toilet that needs replacing. You can remove the toilet before taking rough-in measurements.
Toilet Rough In Measurements
Toilet rough-in measurements is the distance from the wall to the center of the toilet’s floor drain. Standard rough-in measurements are 12 or 14 inches, but other sizes might exist. You need accurate measurements to buy a toilet that fits and connects to the plumbing.
How to Measure for a Toilet Rough-In With a Toilet
It’s harder to measure your toilet’s rough-in distance if you measure before removing it. It’s more challenging because you can’t see the toilet flange and won’t know exactly where the center is. If you must buy a new toilet before removing the old one, here is what you need to know.
- Locate the bolt caps on either side of the toilet.
- Remove the bolt caps to see the floor bolts below holding your toilet. You should do this to ensure that what you’re seeing are the bolt caps.
- Measure from the finished wall behind the toilet to the floor bolts or the center of the bolt caps.
- The bolt caps are usually in the centerline with the middle of the toilet flange. They help measure the rough-in reliably.
How to Measure a Corner Toilet Rough-In
Corner toilets come in two-piece or smart styles with different bowl shapes and designs. Measuring the rough-in becomes tricky because they are placed in a tucked-away corner.
When measuring, remember the specific requirements for the height of the toilet and the types of seats. To save water, consider installing a replacement toilet in the corner.

- First, find the bolt caps on the existing toilet.
- Look down at your toilet and estimate where the toilet flange is by looking at the bolt caps. To measure this way, you must guess and estimate more than with other toilets. However, you can still get an accurate measurement.
- You can use a small piece of tape to mark the center of the flange on your toilet seat.
- Measure from the wall on either side of the toilet to get your rough-in measurement.
- To ensure that you measure straight out from the wall, you can use a 2′ carpenter square. Press one side of the square against the wall. Keep the other endpoints straight in the toilet’s center.
- Measure 10, 12, or 14 inches from each wall. The two measurements should be the same.
What Is Rough In Size For Toilet
To find the rough-in size for a toilet, measure the distance from the bolt caps to the wall. This measurement ranges from 10 to 14 inches, with the most common size being 12 inches.

How to Choose the Right Toilet for Your Space
To choose a toilet that fits your bathroom, get the rough-in measurement. You should also think about how deep, wide, tall, and what shape your toilet bowl is. If the toilet is too long, it might stop your bathroom door from opening and closing.
You also don’t want a toilet bowl that’s too wide if your toilet gets wedged between walls or your shower and vanity. To make it easy to service and access your toilet, keep at least 15 inches of space around it.
To pass a plumbing inspection, you must be between 17 and 19 inches tall. The size of the toilet seat and bowl doesn’t matter. The toilet tank is an important concern, especially if you have cabinets behind it. The tank should never be so tall that you can’t remove the lid and access the interior for servicing or repair.
Measuring for the Water Supply Line
Finally, you should never forget about the cold water supply line. Your toilet needs this line to have water every time you flush it, or it won’t work. The water line should blend in and not stand out by being nondescript and in the background.
- Measure 6 or 7 inches from the center of the flange to the toilet’s left side when facing the toilet.
- From that spot, measure 6 or 7 inches up from the finished floor or where the finished floor will be.
- Mark the spot on the wall with an X to indicate where your water line will stick out through the back wall.
Toilet Dimensions FAQs
What are the dimensions of a standard toilet?
Standard toilet dimensions include 14 to 15 inches, with modern “comfort height” models at 17 to 19 inches. The width of the bowl is typically 14 to 15 inches but can vary for elongated or special models. Toilet depth ranges from 27 to 30 inches, and the rough-in distance from the wall to the floor drain center is usually 12 inches.
What are the dimensions of most toilets?
Standard toilet dimensions range from 14 to 15 inches in height (standard) and 17 to 19 inches in comfort height. The width is around 14 to 15 inches, with variations for special or elongated models. Depth ranges from 25 to 30 inches, depending on the bowl shape.
What is the clearance space for a toilet?
In the US, toilet clearance guidelines suggest 21 inches of front space. The ADA suggests 48 inches. You need 15 inches of side space, and the ADA recommends 18 inches. You need 80 inches of vertical clearance. Local codes may vary, so consult local authorities for specific requirements.
What is the difference between standard height and comfort height toilets?
Standard-height toilets are about 14 to 15 inches high. These toilets are great for families with children. Comfort height toilets are ADA-compliant and favored by adults and seniors for knee and back comfort.
Can I replace a 10-inch rough-in with a 12-inch one?
In most cases, you won’t be able to replace a toilet set up for a 10-inch rough-in with a toilet set up for a 12-inch one. The 12-inch toilet will either be tight against the back wall, or the toilet flange won’t match the toilet drain.
Can I replace a 12-inch rough-in with a 10-inch one?
Although it isn’t ideal and might look too far away from the wall, you can technically replace a 12-inch rough-in with a toilet set up for a 10-inch one. Generally, you can always go smaller with a toilet, but not always bigger.
Are elongated toilets the same as standard toilets?
No, an elongated toilet is different than a standard toilet. An elongated toilet has an oval-shaped bowl that measures up to two inches longer than a round bowl. It is usually more comfortable for adults to sit on.
Are toilets one-piece or two-piece?
Most toilets have two pieces: a pedestal and a tank. The pedestal contains the bowl, while the tank holds water and activates a flush. Two-piece toilets come in standard and elongated seat styles.
Are smart toilets popular?
Evidence suggests smart toilets are becoming more widely used in homes and businesses. Smart toilets have many useful features, like automatic flushing and self-cleaning. They also have remote control capabilities, making them more convenient and hygienic.
Are wall-mount toilets in homes?
Wall-mount toilets are not commonplace in residential homes. They are popular in businesses because they save floor space and are easier to clean around.
How many types of toilet seats are there?
There are generally two types of toilet seats. Modern toilets have elongated seats, heated seats, and standard seat options. Elongated toilet seats are the most popular choice among homeowners.
Are ADA-compliant toilets required in homes?
No, ADA-compliant toilets are not required in homes. Although many people install them for accessibility.
Final Thoughts
When measuring for a toilet rough-in, think about the distance from the back wall to the center of the toilet flange. Remember to account for your water line. The toilet you choose should fit your needs. This step makes sure your toilet fits well with your bathroom fixtures.