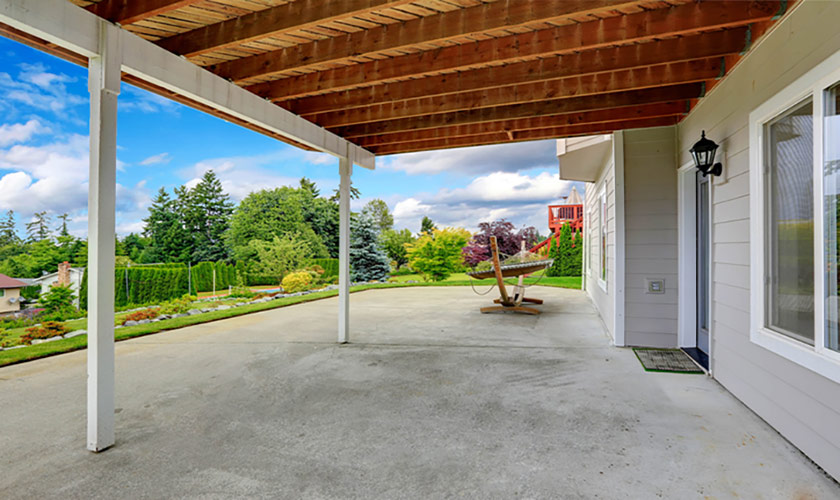
Many homeowners need help with what to do about their old concrete driveway or patio surface. As concrete ages, it becomes dull and dingy. Cleaning concrete is an option, but what about resurfacing concrete? Resurfacing concrete can make ideas more appealing and open up new possibilities.
I have successfully resurfaced our home’s concrete patio, and here are a few things I learned about it.
There are two reasons for resurfacing concrete: to repair wear and tear damage and to improve its appearance. There are many patterns and options for resurfacing concrete.

Get FREE quotes from Concrete Contractors in your area today. Whether you need a new concrete poured or want to spruce up an old patio with a decorative overlay We Can Help! All Contractors are screened, licensed, and insured.
How to Cover an Old Concrete?
As concrete ages, the surface deteriorates due to wear and tear. Resurfacing a concrete floor in your basement, driveway, or concrete patio can open up a world of design creativity. You can create designs in stamped, stained, and painted concrete finishes.
Or, maybe you’re just looking to:
- repair a crack or an area of concrete damage
- resurface rough concrete to provide a smooth surface for flooring
Driveways and patios without coverings can be damaged by bad weather. They may develop small cracks and look rough and discolored over time.
Well, if the concrete is damaged in any way, then you could choose to:
- repair the concrete damage area only
- repair the concrete damage and resurface the whole floor
- remove old concrete and pour new concrete
If your concrete is crack or damage-free, you can clean it using a power washer and a long-handled squeegee. Use a 5-gallon bucket to remove any standing water. Be careful around control joints and expansion joints. After you clean, consider painting, staining, or using epoxy coating on the concrete. This will give it a polished look.
Resurfacing is the way to go if you need to repair concrete or change the color and style.
To cover old concrete, here are three common concrete resurfacing techniques:
Decorative Spray Concrete Overlay Resurface
The technique in this video is best suited to resurface concrete that is in overall good condition. To clean the concrete, use a grinder to remove old paint or epoxy and vacuum up debris.
To prepare the concrete, apply an acid etch. Then, pressure wash to remove the acid before applying the base coat. The base cost is the color for the grout lines and needs 24 hours to dry before taping off the pattern.
Instead of pouring concrete, the overlay is sprayed using a hopper gun.
Aside from giving the surface an anti-slippery effect, it produces one of the best topical finishes. With a hopper gun, you can achieve diverse colors that delight the eye.
Spray texture is a great way to hide concrete flaws and blemishes. It has a subtle texture that is similar to stucco. It’s a perfect concrete solution popular for resurfacing pool decks. You can also use it for patios, driveways, entryways, and other outdoor surfaces.
How to Resurface Concrete Patio
When resurfacing a concrete patio, it is important first to repair any cracks or damage. Next, the surface should be thoroughly cleaned and prepared for the resurfacing material. To make your patio look smooth and fresh, apply a concrete resurfacer that fills in imperfections.
To resurface a concrete patio, clean it using a pressure washer or water and detergent. Remove loose or damaged concrete, then apply a resurfacer mix using a trowel or squeegee. Smooth the surface and allow it to dry for at least 24 hours before using the patio again.
Concrete Patio Refinishing Ideas
Consider concrete patio refinishing if you want to revamp your outdoor space. To complete this process, you must fix cracks, apply sealer, and add decorative features. You can improve your patio by refinishing it, making it stronger and more attractive.
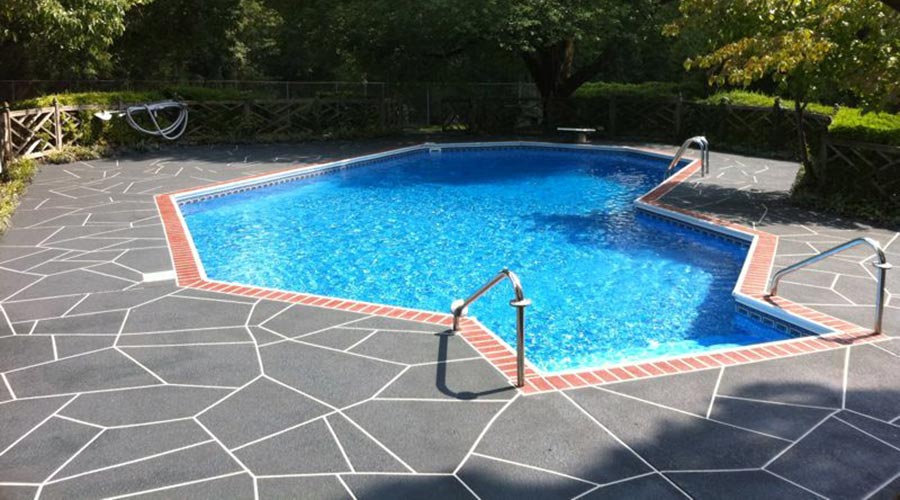
Pool Deck: Spray Concrete Resurface Mimics Brick and Stone
The decorative concrete overlay above this pool deck mimics brick coping and flagstone.
Patio: Spray Concrete Overlay Mimics Brick and Slate
This patio’s decorative spray concrete overlay resembles brick edging and slate stone.
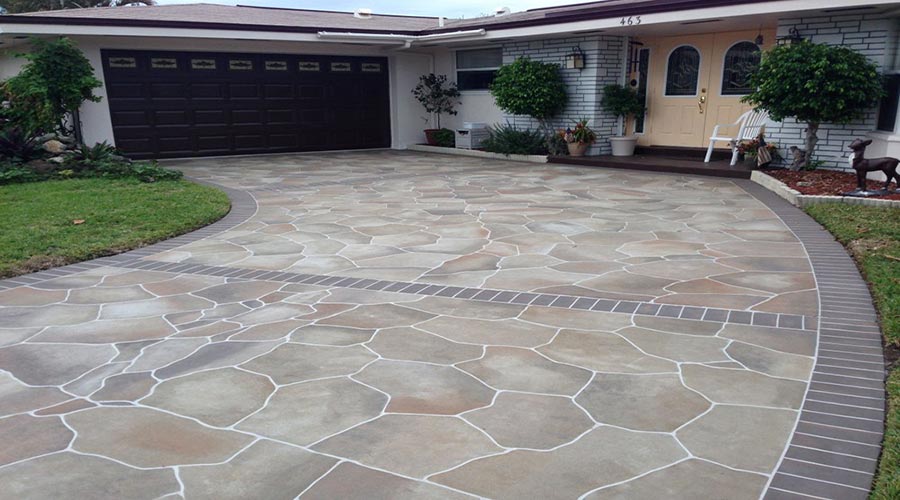
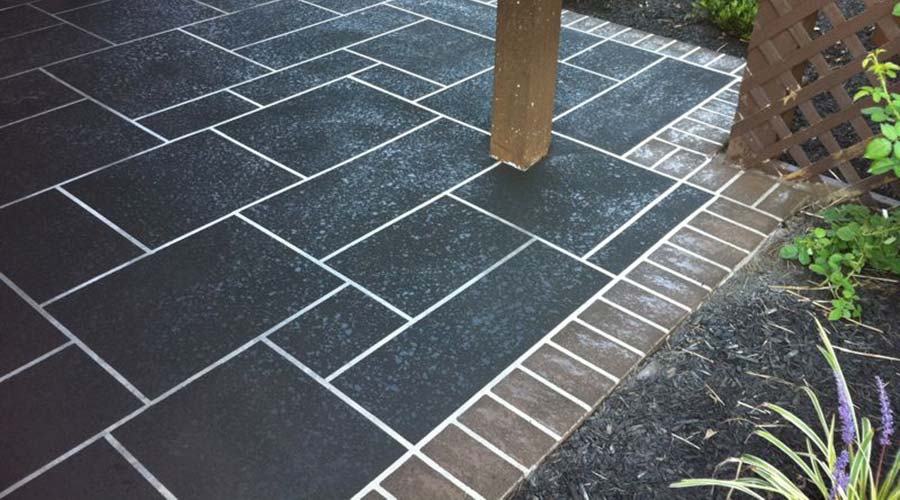
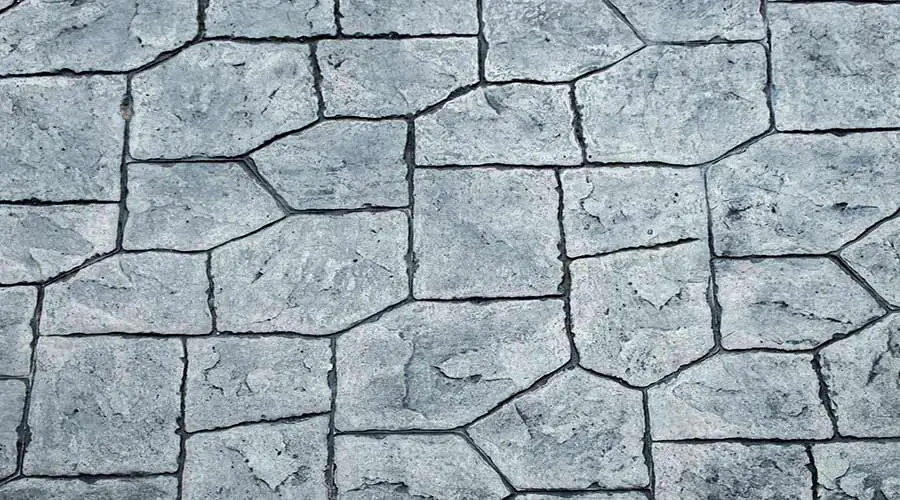
Driveway: Spray Concrete Overlay – Brick Edging and Flag Stone
This driveway’s decorative spray concrete overlay has brick edging and natural flagstone.
Now, let’s look at the stained concrete overlay process.
Stained Concrete Resurfacing
Stained concrete resurfacing is like other concrete overlay methods. It uses a special concrete stain instead of wet color mixing. Stained concrete resurfacing goes deep into the concrete and doesn’t peel off like paint.
You must thoroughly clean the concrete and remove all paint with a grinder. The concrete overlay is poured over and troweled to a smooth finish in a two-part process.
The stain is rolled, sprayed, or brushed over the concrete. The above process used a single-color stain. You can layer stains and use an acid etching to break them up, giving them a natural stone or earthy look. They are highly versatile and eco-friendly, oozing out granite and marble’s finishing effect.
Use a concrete sealer in two thin coats with a wide paint roller to seal the concrete.

Driveway: Stained Concrete Overlay with Border
Adding a stained concrete overlay to resurface concrete driveways can give it a new look and increase the value of your home. You can also add a border to add some extra decoration. There are many different colors and designs so that you can find the perfect one for your home.

Patio: Stained Concrete Overlay with Border
One of our favorite projects is a stained concrete overlay on an exterior patio with a border. The patio was in rough shape, with many cracks and uneven surfaces. The contractor fixed all those problems by pouring a new concrete overlay and staining it with a darker border. A patio resurface makeover done right can last many years.
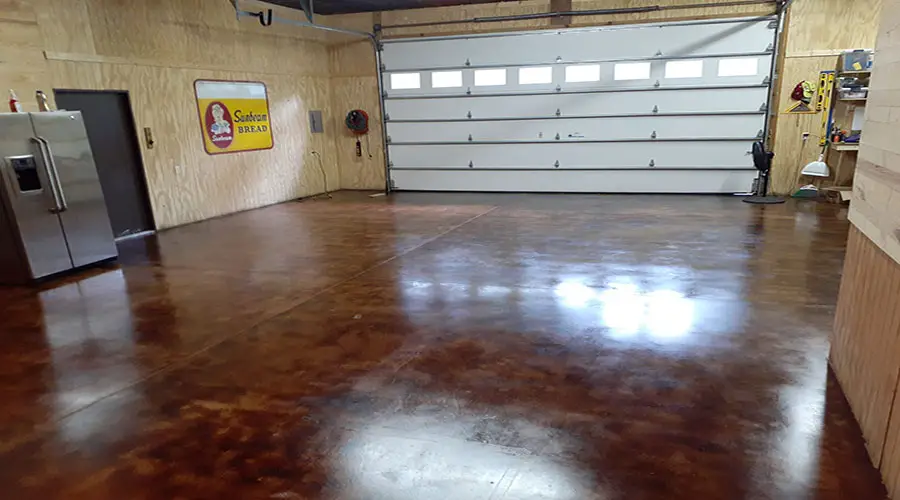
Garage: Glossy Stained Concrete Overlay
A glossy stained concrete overlay is a great way to add extra pizzazz to your garage floor. The overlay can be stained in any color or pattern, protecting your garage floor from wear and tear. Plus, it’s easy to keep clean – sweep or mop regularly.
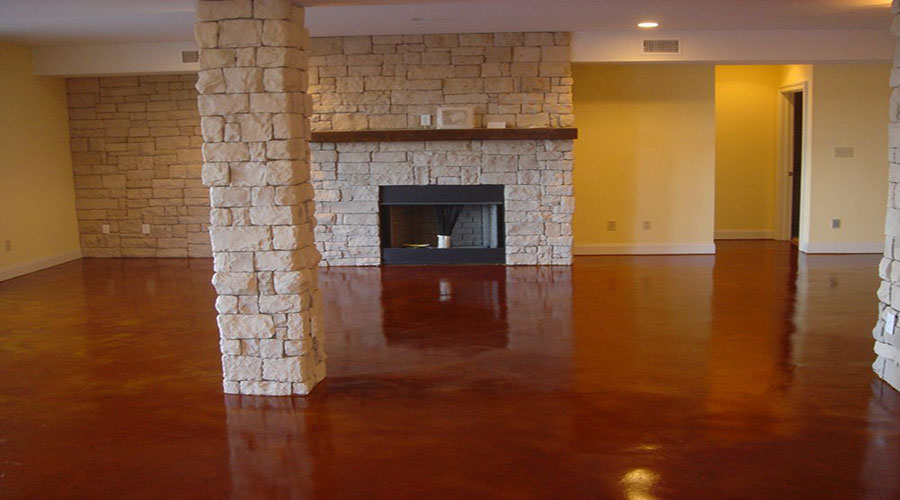
Basement: Glossy Stained Concrete Overlay
A glossy stained concrete overlay is a great way to update your basement without breaking the bank. This relatively inexpensive option can give your space a new look and feel and is easy to maintain. Plus, you can choose various colors and finishes to create the perfect look for your home.
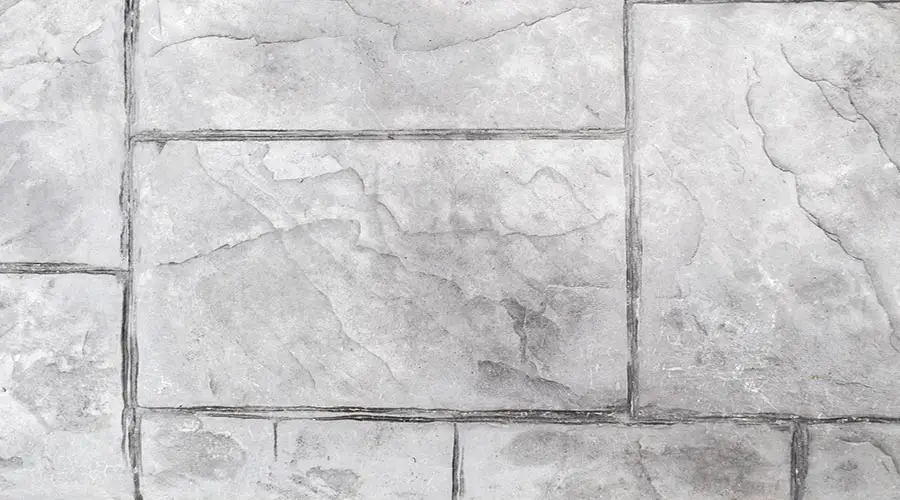
Stamped Concrete Overlay
Stamped concrete overlay is a popular and widely used concrete patio resurfacing technique. It comes with an endless range of possible ideas embossed and engraved on an otherwise standard overlay to convey a classic look.
This technique can make your concrete patio look like slate, stone, or bricks. It also incorporates color and different designs.
Stamped concrete is most popular on driveways, walkways, patios, and pool decking. It’s generally not a popular interior floor finish, but that’s not to say it can’t be an option.
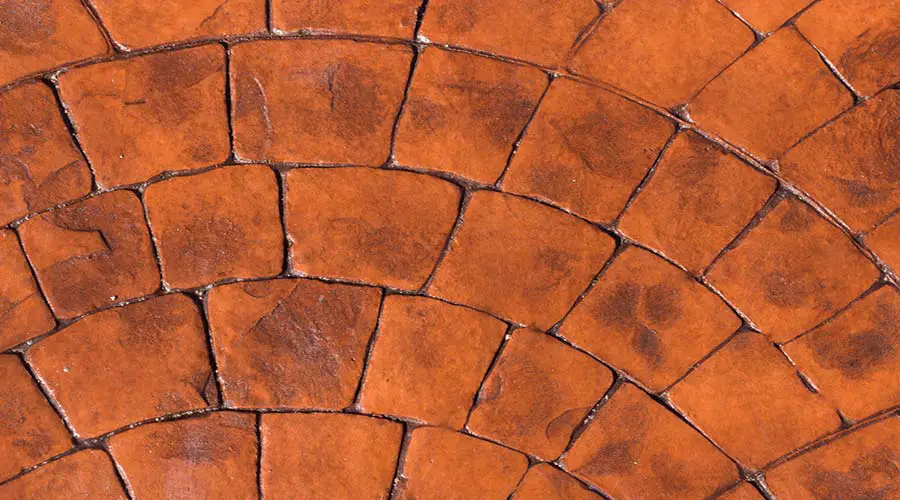
Stamped Paver Pattern
The stamped paver pattern is a great way to add interest to your patio. The pavers are set at an angle to create a curved or circular design. You can do this in any color or style of paver you like. Mix and match different colors and styles to create a unique look.
Stamped Paver Stone Pattern
The stamped paver stone pattern is an excellent option for anyone looking to add extra flair to their patio or driveway. You can achieve this pattern by using a stamping tool to create an embossed design in the concrete. You can choose from many designs to find the perfect one to match your style.
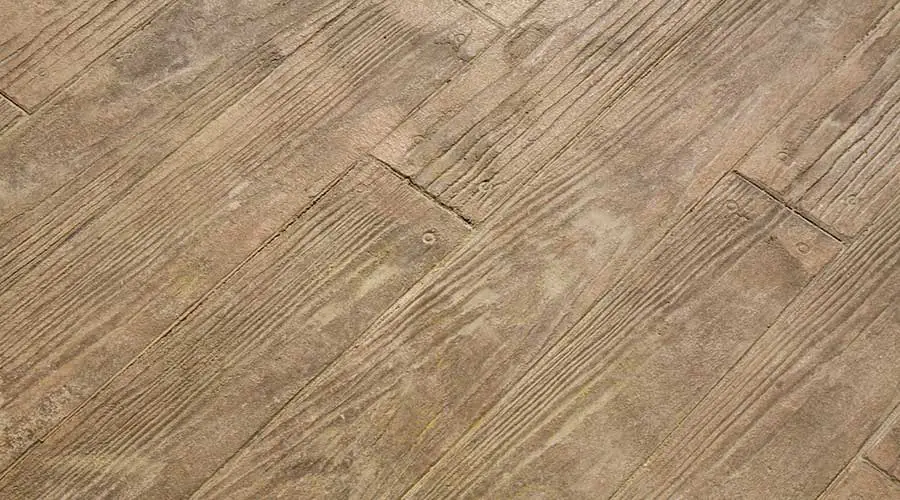
Stamped Wood Pattern
This stamped wood pattern is a great way to add extra visual interest to your projects. The design is easy to create and can be used on various projects. This stamp overlay can be popular on a basement or concrete floor.
Stamped Stone Tile Pattern
Stone tile is a great way to add character to your stamped concrete. It can also be a great way to add extra protection against wear and tear. To find the perfect one for your project, stone tile templates come in many shapes and sizes.
How Much Does it Cost to Resurface Concrete?
Concrete resurfacing is an inexpensive, practical, and enticing patio restoration alternative.
Many other construction materials are generally expensive; these include wood, brick, and stone, but not concrete.
The average cost for 100 square feet of basic concrete resurfacing is $400. Less expensive projects can run as little as $300, while more expensive ones are about $500. The price per square foot can range between $3 and $5.
Get FREE quotes from Concrete Contractors in your area today. Whether you need a new concrete poured or want to spruce up an old patio with a decorative overlay We Can Help! All Contractors are screened, licensed, and insured.
Concrete Resurfacing Cost Per Square Foot
Resurfacing concrete costs $3 to $25 per square foot, according to SunDek, a top concrete resurfacing company. Prices vary widely due to some projects’ many options and intricate details.
HomeAdvisor echos similar concrete overlay costs at $3 to $20 per square foot.
The consensus around basic concrete resurfacing is $3 to $8 per square foot, making it a budget-friendly way to get the look and feel of a new patio.
Resurfacing concrete costs depend on surface detail and size, but it’s cheaper than removing and replacing it.
| Type | Per Square Foot | Per 100 Square Feet |
|---|---|---|
| Basic (Single stain color) | $3 – $5 | $300 – $500 |
| Decorative Overlay (Multiple colors, polishing, saw cuts) | $7 – $12 | $700 – $1,200 |
| Stamped (Embeds, dividers, stencils, epoxy terrazzo) | $8 – $20 | $800 – $2,000 |
We are discussing the product’s availability, price, durability, and installation charges.
You could pull out a fine resurfacing job by yourself if you choose to, but of course, having the help of a friend is beneficial. It will give you a pleasant experience and help you cut expenses.
Concrete combines sand, gravel, water, and cement resurfacing products. It is easily accessible and cheaper. Concrete overlays can last 10 to 20 years if maintained well and applied correctly.
How Much Concrete Will You Need?
You should note that many people often interchange the words cement and concrete. Cement is the dry portland mix mixed with water to make concrete. Quikrete is the largest provider of packaged cement mix.
Resurfacing is great because the thin overlay only needs a few bags of cement.
One bag of cement on a typical day covers 10 square feet. Calculate the square feet in your outdoor space, giving you the required bags.
It will help you not buy excess cement and only what you require.
You can use Quickrete Concrete resurfacer for DIY concrete projects at home. If you need to gain experience with concrete, it’s best to call a professional resurfacing company.
Cement-based resurfacing products vary from $60 to $140, depending on the manufacturer.
So if a bag can surface 10 square feet of concrete floor and your patio measures 50 square feet, your material cost will be $700.
If you add color, it costs about $4 per square foot.
Then, there are different natural designs a concrete patio floor can replicate, e.g.
- Marble stone
- Slate
- Stone
- Bricks etc.
Labor per square foot costs between $3 to $20. You can resurface a concrete patio easily and cheaply compared to other materials.
How to Resurface Concrete?
Resurfacing concrete is a daunting task, as you might imagine. In the past, if a concrete patio or driveway got really old and worn out, the only way to fix it was with a jackhammer or bulldozer. Today, there are more practical alternatives.
Before the surface makeover can start, you must complete several steps for concrete resurfacing. Some prep work is necessary. You should first determine if the concrete is suitable for resurfacing.
Here is what you need then, followed by a step-by-step procedure on how to apply an overlay of concrete on a patio:
- Cement-based resurfacer
- A 5-liter gallon bucket for mixing the products
- Water for mixing overlay
- A paddle mixer for mixing up the contents of water and cement resurfacer
- Two pairs of hand trowels
- A squeegee for applying the mixture to the floor
- A soft-bristled broom for the finishing touch
- Eye protection
- Gloves
- Gum-boots
1. Clean the Old Concrete
To get the old patio ready for renovations, clean out dirt, stains, and debris from cracks. It helps the concrete overlay stick to the old concrete.
If possible, wash but not with detergents and allow the water to drain, but do not allow it to dry. It is always best to apply an overlay when the surface is wet.
2. Repair Damage to Concrete
Repair all cracks by filling them up. Fix problems underneath to protect the new coating.
Before resurfacing, you can let the repairs breathe or dive straight into resurfacing. Allowing the repairs to breathe will also enable you to take a short break as the task ahead will be rigorous.
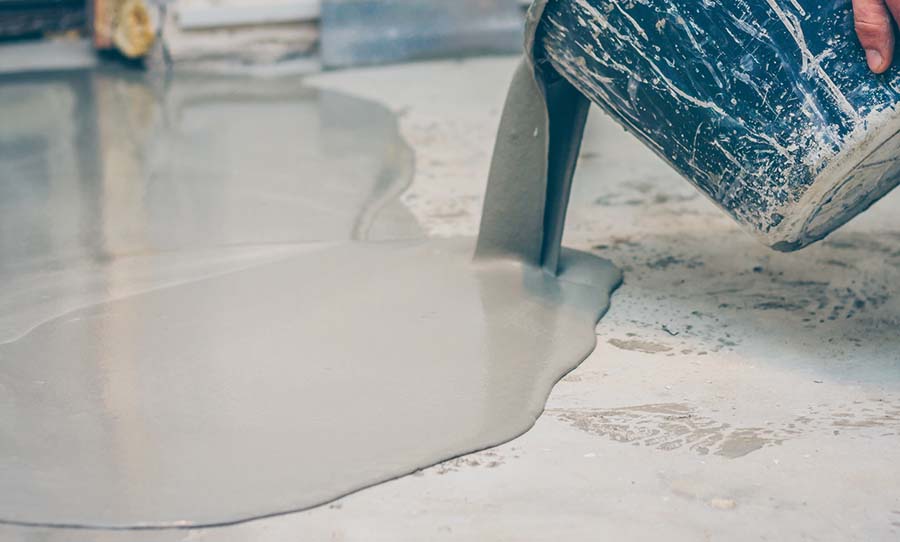
3. Mix Your Concrete Overlay
Mix the cement base with water. To start, pour 3½ liters of water into the five-liter bucket. Tear up the cement packet and pour a quarter or half into the five buckets. Roll up your sleeves and mix the two products using the paddle mixer.
As you mix, keep on adding more water to the paste. Mix until you achieve a paste that does not have lumps. If the paste is too thin, add more resurfacer and more water if it is too thick.
The thicker, the better it allows for a broader depth between ¼” and 1″.
The point here is to achieve a paste that is easy to pour and comfortable to spread. Cement resurfacers dry fast, so mix in stages based on how much you can pour and spread.
To prevent the fresh coat from drying, have someone mix it while you spread the other coat.
Coats should follow each other simultaneously without delay.
4. Pour the Overlay
Pour the resurfacing mix generously on the old concrete floor. Work on a wide strip that is long enough to be comfortable. Kneel and stretch when using a trowel or stand and pull when using a squeegee.
Act quickly and allow enough time for work to avoid the product drying out.
5. Spread the Overlay Evenly
Here, you will have decided if you are using a trowel or a squeegee. Pull the mix evenly towards you with a squeegee as you retreat slowly. As you work, keep pouring more mix bucket upon bucket onto the unapplied concrete surface.
With a trowel, pour the concrete resurface mix on the floor. While kneeling, use your left hand to hold one scoop and carefully follow the edge of your working area. Make a fine, straight edge by applying the mix along the three edges with your right hand.
You work from one side to the other as you retreat on your back, moving the trowel in a figure-eight motion.
6. Lightly Brush the Finish
After finishing each bucket of overlay, use a soft-bristled broom to apply a smooth finish. Sweep in the same direction as when applying the mix.
One sweep ensures uniformity and evenness throughout the resurfaced concrete surface.
Please let the cement-based resurfacing products dry completely before walking on them.
Resurface Concrete FAQs
Does concrete resurfacing work?
Resurfacing concrete makes old surfaces like new by smoothing and covering cracks and pits. It’s used on driveways, walkways, and patios to enhance appearance and extend lifespan.
What is the best thing to resurface concrete with?
When choosing a concrete resurfacer, consider factors like quality, compatibility with the surface, weather resistance, ease of application, finish options, curing time, and brand reputation. Popular options include Quikrete Concrete Resurfacer, Ardex CD, Sakrete Flo-Coat, and Rapid Set NewCrete.
What are the cons of resurfacing concrete patios?
Resurfacing concrete offers improved appearance and extended surface life but has drawbacks. Proper surface preparation is labor-intensive, and weather affects curing. It’s temporary, challenging for DIYers, and costs materials and labor.
How do you resurface concrete yourself?
Resurfacing concrete yourself is cost-effective and enhances its appearance. Assess and repair minor cracks, clean the surface with a power washer, and let it dry. Mix and apply the concrete resurfacer evenly, ensuring consistent thickness. Create texture if desired. Let it cure for 24-48 hours, keeping it moist. Optionally, seal the surface for added protection.
What does it mean to resurface concrete?
Resurfacing concrete is a process that can give your old concrete driveway, patio, or sidewalk a new look. It is also a way to fix any damage that may have occurred on the surface of the concrete. Resurfacing can also blend new and old concrete to create a uniform look.
How many times can you resurface concrete?
It depends on how thick the concrete is and what material is used to resurface it. You can resurface concrete up to three times in most cases.
Is concrete patio resurfacing worth it?
Absolutely. Concrete patio resurfacing is a cost-effective way to rejuvenate an old, worn-out patio. Homeowners can fix cracks, stains, and damage and get a new look by adding concrete. You can use different decorative finishes to make it look the way you want.
Final Thoughts
If the floor of a cement patio is damaged through wear and tear, you can resurface it. The owner wants to improve the appearance of the concrete floor. Different ways exist to resurface concrete and change its color, design, and pattern.
The patio in many homes is exposed, so even strong concrete floors can get damaged over time. They can get stained or eroded by water, especially during heavy rains or snowy days.
To make your concrete more durable, add a waterproof sealant to the concrete mix when you’re mixing it. This will help embed it in the concrete floor.
When it comes to cost, the average cost to resurface 100 square feet of concrete is $400. Less expensive projects can run as little as $300, while more expensive ones are about $500. The price per square foot can range between $3 and $5.
Resurfacing concrete can be a DIY project, but it’s not a one-person job. Hiring a professional contractor will achieve the best results.
Get FREE quotes from Concrete Contractors in your area today. Whether you need a new concrete poured or want to spruce up an old patio with a decorative overlay We Can Help! All Contractors are screened, licensed, and insured.