Discover the remarkable benefits of a mini split for sheds, providing an ideal climate control solution to enhance your shed’s functionality and comfort.
A mini split, also known as a ductless mini-split system, is a versatile and efficient heating and cooling solution. It’s a system that’s compact, powerful, and designed to provide optimal temperature control.
A mini split for a shed is a compact HVAC system that provides heating and cooling for small outdoor structures. With easy installation and customizable temperature control, it offers efficient climate control, enhancing the comfort and usability of the shed space.
Unlike traditional HVAC systems, mini splits don’t require extensive ductwork, making them an ideal choice for spaces like your shed.
Why You Should Consider A Mini Split For Shed?
Energy Efficiency: Mini – splits are renowned for their energy efficiency. They operate on an “on-demand” basis, meaning they only use energy when you need them to. This can lead to significant savings on your energy bills.
Space Optimization: Sheds often have limited space. A mini split, with its compact design, doesn’t intrude on your valuable space. It can be installed on a wall or ceiling, leaving your floor space free for your activities or storage.
Ease of Installation: Installing a mini split for sheds is a straightforward process, especially when compared to installing a traditional HVAC system. You won’t need to worry about fitting ductwork into your shed, which can be a complex and time-consuming task.
Comfort: Above all, a ductless mini split can transform your shed into a comfortable retreat. Whether you’re using your shed as a workshop, a home office, or a relaxation space, a mini split can create an environment that’s conducive to your activities.
As you delve deeper into this article, you’ll discover more about the advantages of using a mini split for sheds, how to choose the best one for your needs, and how to maintain your system for long-lasting performance.
Top 3 Advantages Of Using Mini Split For Sheds
You’re about to uncover the remarkable benefits of using mini splits in sheds. These compact yet powerful systems offer a host of advantages that can transform your shed into a comfortable, efficient space all year round.
#1. Energy Efficiency
Mini splits are champions in this arena. They operate on an ‘on-demand’ basis, meaning they only consume energy when you need them to.
Unlike traditional HVAC systems that continuously cycle on and off, mini splits maintain a consistent temperature using minimal energy consumption.
This can lead to substantial savings on your energy bills, making your shed not only a comfortable space but also an economically smart one.
#2. Space Optimization
It’s often limited, and every square foot counts. Here’s where the mini split shines. Its compact design and flexible installation options allow for optimal space utilization.
What You Can Do?
You can mount it on a wall or ceiling, leaving your floor space free for your activities or storage. No more bulky HVAC units taking up valuable room. With a mini split, you’re maximizing your shed’s potential.
#3. Ease Of Installation
You might think that installing a heating and cooling system in your shed would be a complex task. But with a mini split for sheds, it’s surprisingly straightforward.
There’s no need for extensive ductwork, which can be a major undertaking. Instead, a mini split for sheds requires only a small hole in the wall for the conduit. This makes the installation process quicker, easier, and less intrusive.
Summary
Using a mini split for sheds offers a trifecta of benefits: energy efficient operation, space optimization, and ease of installation. These advantages make mini – splits an excellent choice for your shed, transforming it into a comfortable, efficient, and functional space.
Choosing The Best Mini Split For Sheds
Selecting the perfect mini split for sheds is a crucial decision.
It’s not just about picking any model; it’s about finding the one that fits your specific needs and circumstances. When choosing a mini split for sheds, several factors come into play:
4 Key Factors To Consider
Size of the Shed: The size of your shed is a primary consideration. A larger shed may require a more powerful mini split, while a smaller one can do with a less powerful model.
Climate: Your local climate plays a significant role in your choice. If you live in a region with extreme temperatures, you’ll need a mini split that can handle those conditions.
Insulation: The insulation in your shed affects how well your mini split will perform. Good insulation keeps the warm or cool air inside, reducing the load on your mini split.
Usage: How you use your shed also matters. If you’re using it as a workspace, you might need a more powerful mini split to maintain a comfortable temperature. If it’s mainly for storage, a less powerful model might be enough.
Summary
Remember, it’s not just about the physical space; it’s also about the volume of air that needs to be heated or cooled. On the other hand, if your climate is relatively mild, a less powerful model may suffice. If a mini split for sheds isn’t well-insulated, you might need a more powerful mini split to compensate.
Top Brands And Models
Once you’ve considered these factors, it’s time to look at some top brands and models. Here are a few to consider:
Mitsubishi MUZ-FH: This model from Mitsubishi is a super-efficient option available in multiple sizes. It’s known for its excellent performance and reliability, making it a great choice for any shed.
MRCOOL Oasis: The MRCOOL Oasis is another excellent option. It’s easy to install and offers both heating and cooling capabilities. Plus, it’s known for its quiet operation, which is a bonus if you’re using your shed as a workspace.
Senville Aura: This model is Energy Star certified, meaning it’s designed for maximum energy efficient operation. It also comes with a remote control for easy operation.
Cost Considerations
Mini split for sheds can be an investment, but it’s important to consider the long-term benefits. A more efficient model might cost more upfront, but it can save you money in the long run through lower energy bills.
Also, consider the cost of installation. Some models are easier to install than others, which can save you money if you’re planning to do it yourself.
Important
Choosing the best mini split for sheds involves considering the size of your shed, your local climate, the insulation in your shed, and how you plan to use the shed. It also means comparing different brands and models and considering the cost. With these factors in mind, you’re well on your way to finding the perfect mini split for sheds.
Installation Of Mini Split For Sheds: A Comprehensive Guide
Installing a mini split in your shed can seem like a daunting task, but with the right guidance, it’s a project you can tackle with confidence.
This guide will walk you through the process step by step, outline the necessary tools and materials, and highlight important safety precautions.
7 Steps For Installing A Mini Split For Sheds
Choose the Location: The first step is to decide where to install the indoor and outdoor units of your mini split. The indoor unit should be placed in a location that allows for optimal air distribution. The outdoor unit needs a spot that’s free from obstructions and provides good ventilation.
Mount the Indoor Unit: Once you’ve chosen the location, it’s time to mount the indoor unit. Use the mounting bracket that comes with your mini split. Make sure it’s level and secure it to the exterior wall.
Drill a Hole for the Conduit: Next, drill a hole in the wall for the conduit that will connect the indoor and outdoor units. The hole should be located near the bottom of the indoor unit and should be large enough to fit the conduit.
Install the Outdoor Unit: The outdoor unit should be placed on a level surface. You can use a concrete pad or a wall bracket, depending on your preference and the layout of your shed.
Connect the Indoor and Outdoor Units: Run the conduit from the indoor unit to the outdoor unit. The conduit will contain the power cable, refrigerant lines, and a condensate drain.
Connect the Power Supply: Once the units are connected, you can connect the power supply. Make sure to follow the manufacturer’s instructions to ensure a safe and correct installation.
Test the System: Finally, it’s time to test the system. Turn on the mini split and check that it’s heating or cooling as expected. If everything is working correctly, you’ve successfully installed your mini split!
Necessary Tools And Materials
Here are the tools and materials you’ll need for the mini split for sheds installation:
Drill and drill bits
Level
Screwdriver
Wrench
Pliers
Pipe cutter
Vacuum pump
Refrigerant manifold gauge
Electrical cable
Conduit
Mounting bracket
4 Safety Precautions
Safety should always be your top priority when installing a mini split for sheds.
Always turn off the power before starting the installation.
Wear protective gear, such as gloves and safety glasses.
Be careful when handling the refrigerant lines, as refrigerant can be harmful if it comes into contact with your skin or eyes.
If you’re not comfortable doing the installation yourself, don’t hesitate to hire a professional.
Summary
Installing a mini split in your shed is a manageable project if you approach it with preparation and care. By following safety features and guide, gathering the necessary tools and materials, and adhering to safety precautions, you’re well on your way to enjoying a comfortable, climate-controlled shed.
Exploring 6 Efficient Cooling And Heating Solutions
Window Air Conditioners and Portable Air Conditioners: Window air conditioners and portable air conditioners are popular choices for cooling smaller living spaces. These units are designed to fit into a window or be moved easily from one room to another.
Ductless Mini-Split air conditioners: Ductless mini-split air conditioners have gained popularity in recent years due to their energy efficiency and versatility. They consist of an outdoor condenser and one or more indoor air handlers connected by refrigerant lines.
Space Heaters: Space heaters are ideal for heating smaller areas or unconditioned spaces where a centralized heating system may not be practical. They are portable and can be used to warm up specific zones or personal spaces.
Through-the-Wall Air Conditioners: Through-the-wall air conditioners are similar to window units but are designed to be permanently installed on a wall. They provide efficient cooling and are a decent option for spaces without windows or for those who prefer a more streamlined appearance.
Ductless Heat Pumps: Ductless heat pumps, also known as mini split heat pumps, offer both cooling and heating functions. They are highly efficient units that use refrigerant to transfer heat between the indoor and outdoor units.
Mitsubishi Electric: Mitsubishi Electric is a renowned brand known for its high-quality air conditioning and heating systems. They offer a wide range of ductless mini-split units and are recognized for their cutting-edge technology and energy-saving features.
Understanding different types of air conditioning and heating systems, including window air conditioners, portable air conditioners, ductless mini-split air conditioners, and space heaters can help you find the perfect solution for your living space.
Maintaining Your Mini Split: A Guide to Long-Lasting Performance
To ensure your mini split continues to provide optimal performance, regular maintenance is key.
Routine Maintenance Tips
Maintaining your mini split involves a few simple, regular tasks:
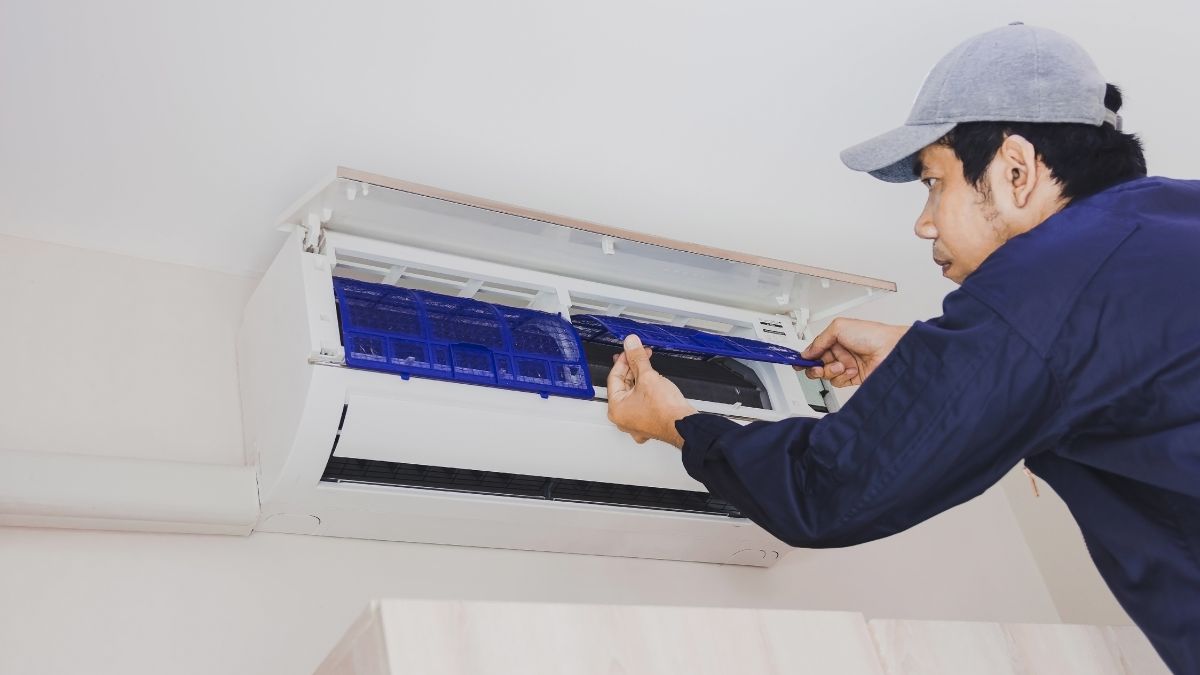
Clean the Filters: Your mini split’s filters should be cleaned every month. This helps maintain air quality and keeps your system running efficiently. Simply remove the filters, clean them with a soft brush or vacuum, and put them back in place.
Inspect the Outdoor Unit: Regularly check the outdoor window unit for any debris or obstructions. Leaves, grass, and dirt can hinder the unit’s performance. Keep the area around the unit clean and clear.
Check the Drainage: Ensure the condensate drain is clear and draining properly. A blocked drain can lead to water damage.
Clean the Indoor Unit: Wipe down the indoor unit with a damp cloth to keep it clean and dust-free.
Troubleshooting Common Problems
Even with regular maintenance, you might encounter some common problems.
Poor Heating or Cooling: If your mini split isn’t heating or cooling properly, check the filters. A dirty filter can hinder performance. If the filters are clean, the refrigerant level might be low, which requires professional attention.
Noisy Operation: If your mini split is making unusual noises, it could be due to loose parts or debris in the unit. Check the indoor and outdoor units for any loose components or obstructions.
Water Leaks: If you notice water leaking from your mini split, the condensate drain might be blocked. Check the drain and clear any blockages.
While many maintenance tasks and minor issues can be handled on your own, there are times when it’s best to call a professional.
When To Call A Professional?
Refrigerant Recharge: If your mini split needs a refrigerant recharge, this should be done by a professional. Handling refrigerant requires special training and equipment.
Major Repairs: If your mini split isn’t working despite your troubleshooting efforts, it’s time to call a professional. They have the expertise to diagnose and fix complex issues.
Summary
In conclusion, maintaining your mini split is crucial for its long-lasting performance. By following these routine maintenance tips, troubleshooting common problems, and knowing when to call a professional, you can ensure your mini split continues to provide comfortable, efficient heating and cooling in your shed.
Case Study: Successful Mini Split Installations In Sheds
Exploring these actual examples, you’ll gain a deeper understanding of the benefits and lessons learned from these experiences.
A Woodworker’s Paradise
Consider the case of a passionate woodworker named Alex. His shed, nestled in the backyard, was his sanctuary. However, the extreme summer heat and winter chill often made it uncomfortable to work in.
After installing a Mitsubishi MUZ-FH mini split, Alex’s shed transformed into a year-round woodworking paradise.
The benefits were immediate. The mini split provided consistent, comfortable temperatures, allowing Alex to work in his shed no matter the weather. Plus, the energy efficient operation of the mini split led to noticeable savings on his energy bills.
A Cozy Home Office
Next, let’s look at Sarah, a remote worker who converted her shed into a home office. The lack of climate control made it challenging to work during temperature extremes. After installing an MRCOOL Oasis mini split, Sarah’s shed became a cozy, productive workspace and livable space.
The mini split not only improved the comfort of Sarah’s shed but also its functionality. The quiet operation of the MRCOOL Oasis ensured that Sarah’s conference calls were free from background noise.
A Relaxing Retreat
Finally, meet John, who turned his shed into a personal retreat for reading and relaxation. However, fluctuating temperatures often disrupted his peaceful escape.
After installing a Senville Aura mini split, John’s shed became a relaxing retreat, perfect for unwinding.
The mini split’s efficient heating and cooling made John’s shed a comfortable space in all seasons. Plus, the remote control made it easy to adjust the temperature without interrupting his relaxation.
Summary
These real-life examples highlight the transformative impact of mini split installations in sheds. Whether it’s a workspace, a home office, or a personal retreat, a mini split can enhance the comfort and functionality of your shed, making it a versatile space for any purpose.
Mini Split For Sheds FAQs
As you consider installing a mini split in your shed, you might have a few questions. Let’s address some of the most common queries to help you make an informed decision.
What Size Mini Split Do I Need for a Shed?
The size of the mini-split system you need depends on the size of your shed and the climate in your area. As a general rule, you’ll need approximately 9,000 BTUs of cooling capacity for every 400-450 square footage of space.
How Much Does a Mini Split Cost for a Shed?
On average, you can expect to pay between $700 and $2,500 for the unit itself. Installation costs can range from $200 to $1,000, depending on whether you do it yourself or hire a professional.
What Is the Best HVAC System for a Shed?
While there are several HVAC options for sheds, a mini split is often the best choice. It offers the advantages of a traditional HVAC system—like efficient heating and cooling—but without the need for extensive ductwork.
Final Thoughts On Mini Split for Sheds
A mini split is a versatile, efficient, and cost-effective solution for heating and cooling your shed. Whether you’re just starting to explore your options or you’re ready to install, knowing these guides can guide you on your journey to a more comfortable shed.
From understanding what a mini-split system is, to appreciating its energy efficient system, space optimization, and ease of installation, we’ve delved into the process of choosing the best model, installing it, and maintaining it for optimal performance.
Consider installing a mini split for sheds and experience the comfort, efficiency, and versatility it can bring to your space. Embrace the power of mini – splits and transform your shed into a year-round haven.
Hubert Miles is a licensed home inspector (RBI# 2556) with more than two decades of experience in inspection and construction. Since 2008, he has been serving South Carolina through his company, Patriot Home Inspections LLC. As a Certified Master Inspector, Hubert is dedicated to providing his expertise in home inspections, repairs, maintenance, and DIY projects.